Cum să creezi și să accesezi un cont FTP
Una dintre cele mai rapide și mai simple metode de a încărca fișierele site-ului dvs. pe serverul de găzduire este conectarea la server prin FTP folosind un client FTP. Pentru aceasta, trebuie să obțineți acces autorizat, acordat sub forma unui cont FTP. Fiecare cont FTP include un nume de utilizator și o parolă unice, care oferă acces la directorul cPanel desemnat de pe server.
Când vă înscrieți la un plan de găzduire cu cPanel sau creați un domeniu addon, un cont FTP implicit este generat automat.
De asemenea, puteți crea conturi FTP suplimentare pentru a oferi altor utilizatori acces fără a partaja datele dvs. de autentificare cPanel. Fiecare cont FTP nou poate fi atribuit unui director specific, permițându-vă să controlați nivelul de acces acordat fiecărui utilizator.
Cum să creați un cont FTP?
Pentru a crea un cont FTP:
Conectați-vă la contul dvs. cPanel.
Navigați la secțiunea Files .
Faceți clic pe FTP Accounts:
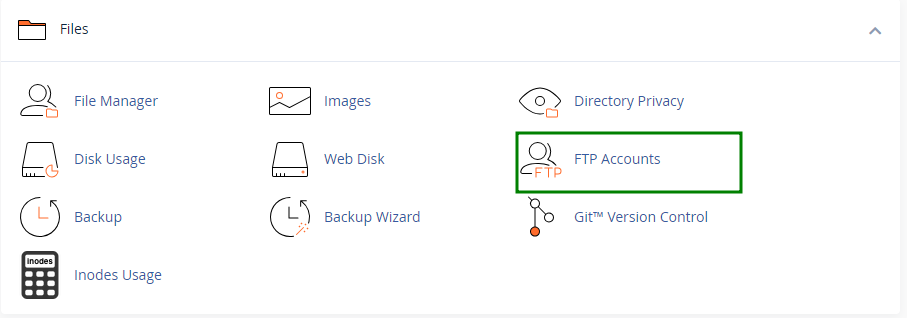
În cadrul meniului, furnizați detaliile necesare pentru a configura un nou cont FTP:
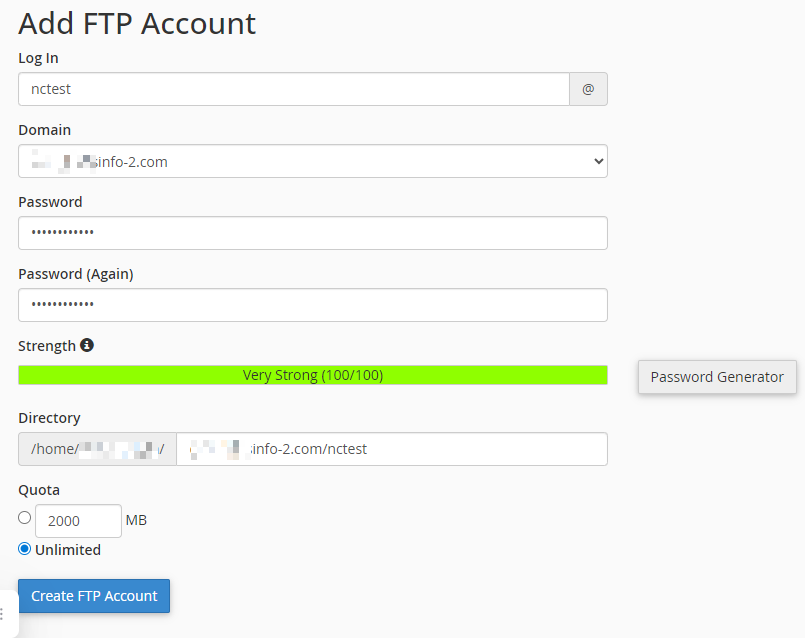
Autentificare: Specificați numele de utilizator pe care doriți să îl folosiți. Acesta va fi asociat automat cu domeniul dvs. principal pentru a forma numele de utilizator FTP complet.
Parolă: Creați o parolă puternică și sigură pentru cont. Puteți folosi Generatorul de parole pentru a crea una.
Parolă (din nou): Reintroduceți aceeași parolă pentru a verifica exactitatea.
Putere: Acest indicator arată cât de sigură este parola aleasă de dvs., variind de la Foarte slabă la Foarte puternică.
Director: Contul FTP va avea acces doar la folderul pe care îl atribuiți aici. cPanel sugerează de obicei un director bazat pe numele de utilizator, dar îl puteți modifica. Introducerea unui singur / oferă utilizatorului acces la directorul dvs. principal (inclusiv la tot ce se află în afara folderului public_html).
NOTĂ 1: Utilizatorul FTP nu poate ieși din directorul pe care îl desemnați, dar va avea acces complet la toate fișierele și subdirectoarele din interiorul acestuia.
NOTĂ 2: Asigurați-vă că eliminați numele de utilizator al contului FTP din câmpul „Director” pentru a oferi acces la directorul rădăcină al site-ului:
Cotă: Aici puteți restricționa cât spațiu pe disc poate folosi utilizatorul FTP sau puteți alege să lăsați setarea la Nelimitat.
După ce sunt introduse detaliile necesare, faceți clic pe butonul „Create FTP Account”. Asta este tot.
Cum să gestionați un cont FTP?
Meniul Conturi FTP vă permite nu doar să creați conturi FTP noi, ci și să le gestionați pe cele existente.
Toate conturile FTP create manual de dvs. sunt listate în secțiunea FTP Accounts a paginii:

Sunt disponibile următoarele opțiuni de gestionare a contului FTP:
Schimbați parola;
Schimbați cota;
Ștergeți un cont;
Configure FTP Client - oferă detaliile contului FTP pentru configurarea acestuia într-un client FTP, precum și fișierele de configurare ale clienților FTP CoreFTP și Cyberduck:
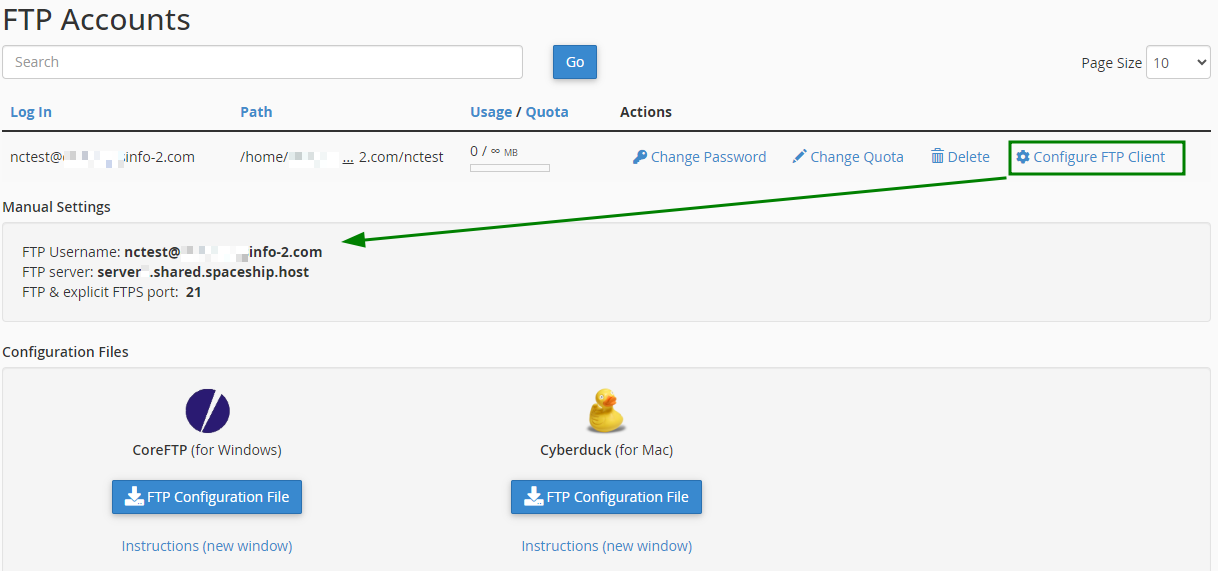
NOTĂ: Dacă descărcați clientul FTP CoreFTP sau Cyberduck folosind fișierele de configurare furnizate, clientul FTP se deschide automat, se configurează singur și se conectează la serverul dvs. FTP. Pentru a utiliza un alt client FTP, trebuie să configurați manual contul FTP.
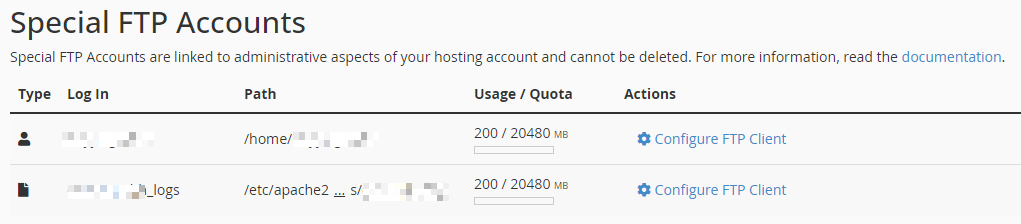
Secțiunea Special FTP Accounts afișează contul FTP principal asociat cu numele dvs. de utilizator cPanel, precum și contul de acces la jurnale. Aceste conturi sunt create automat și sunt esențiale pentru sistem, ceea ce înseamnă că nu pot fi editate sau eliminate. Funcțiile lor sunt legate direct de operațiunile administrative de bază din mediul dvs. cPanel:
Cum să accesați un cont FTP?
Este posibil să accesați contul dvs. de găzduire prin FTP folosind:
Clienți FTP
Această metodă este ideală atunci când lucrați cu un volum mare de fișiere sau când conținutul site-ului dvs. este actualizat frecvent.
Utilizarea unui client FTP vă permite să gestionați eficient fișierele și să accesați instantaneu spațiul dvs. de găzduire. Singura limitare este că clienții FTP nu pot extrage fișiere comprimate, așa că va trebui în continuare să folosiți cPanel pentru această sarcină specifică.
Vă puteți conecta la contul FTP creat folosind următoarele setări:
FTP (File Transfer Protocol)
Gazdă: numele de gazdă al serverului dvs. sau adresa IP
Criptare: Folosiți FTP explicit prin TLS dacă este disponibil
Nume de utilizator: numele dvs. de utilizator FTP
Parolă: parola contului dvs. FTP
Port: 21FTPES (SSL explicit, criptat)
Gazdă: ftpes:// urmat de numele de gazdă al serverului dvs. sau de adresa IP
Nume de utilizator: numele dvs. de utilizator FTP
Parolă: parola contului dvs. FTP
Port: 21SFTP (bazat pe SSH, criptat)
Din păcate, nu oferim autentificare prin parolă SFTP pe Spaceship. Dar vă puteți conecta la contul FTP creat prin SFTP folosind chei SSH.
Pentru a utiliza conexiunea SFTP bazată pe fișier-cheie, este recomandat un client FTP complet, precum FileZilla. Pentru aceasta, deschideți clientul FTP FileZilla >> opțiunea „Site Manager” și utilizați următoarele setări:
Protocol: SFTP
Gazdă: numele de gazdă al serverului dvs.
Port: 21098
Tip de autentificare: Fișier-cheie
Utilizator: numele dvs. de utilizator cPanel
Fișier-cheie: cheia privată generată în cPanel și convertită în .ppk
NOTĂ: Pentru a vă conecta la Spaceship VPS prin FTP, trebuie de asemenea să utilizați orice software FTP la alegere și să vă conectați folosind detaliile FTP (gazdă, utilizator, parolă și port). Totuși, instrucțiunile pot diferi în funcție de sistemul de operare instalat pe VM-ul dvs.
Există mulți clienți FTP disponibili; îl puteți folosi pe oricare preferați. Totuși, recomandăm FileZilla, un client FTP utilizat pe scară largă, cunoscut pentru interfața sa intuitivă, ușurința în utilizare și configurarea simplă.
Pentru a vă conecta la contul FTP în FileZilla, urmați acești pași:
Descărcați și instalați FileZilla;
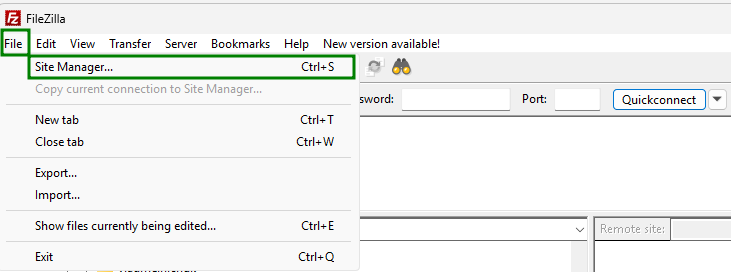
Navigați la fila File > meniul Site Manager:
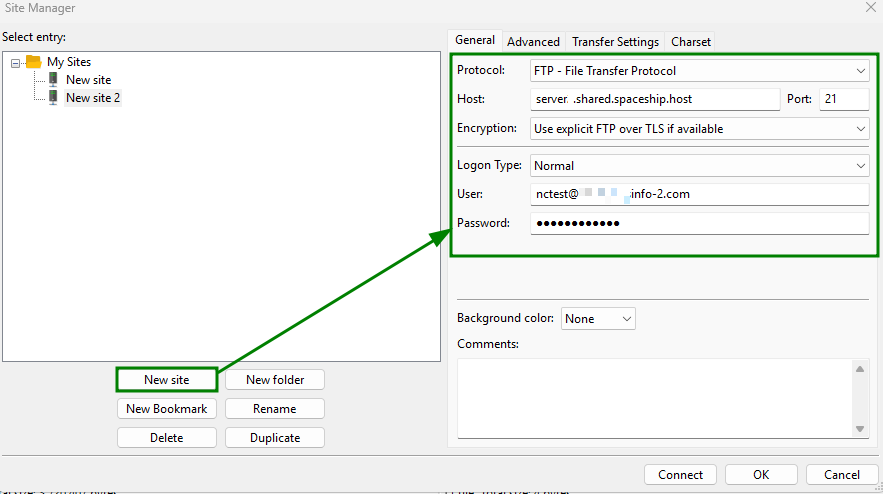
Faceți clic pe New Site, selectați protocolul (FTP sau FTPES) și introduceți detaliile de configurare ale contului dvs. FTP:
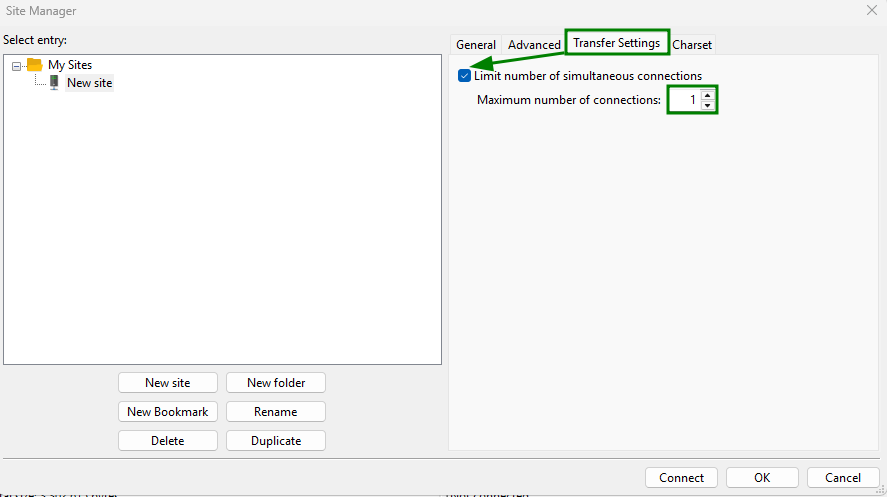
După aceea, deschideți fila Transfer Settings din meniul divizat din partea dreaptă, bifați „Limit number of simultaneous connections” și setați „Maximum number of connections parameter” la 1:
Faceți clic pe Connect.
După ce conexiunea la server este stabilită cu succes, în partea dreaptă (1) va fi afișat un director la care utilizatorul dvs. FTP are acces. Conținutul directorului său va fi listat mai jos (2). Fișierele de pe computerul dvs. local vor fi afișate în partea stângă.
Pentru a încărca un fișier/folder de pe computerul dvs. local pe server, pur și simplu trageți-l și plasați-l în coloana din dreapta, iar după finalizare, puteți verifica fișierul/folderul în locația corespunzătoare din meniul File Manager din cPanel: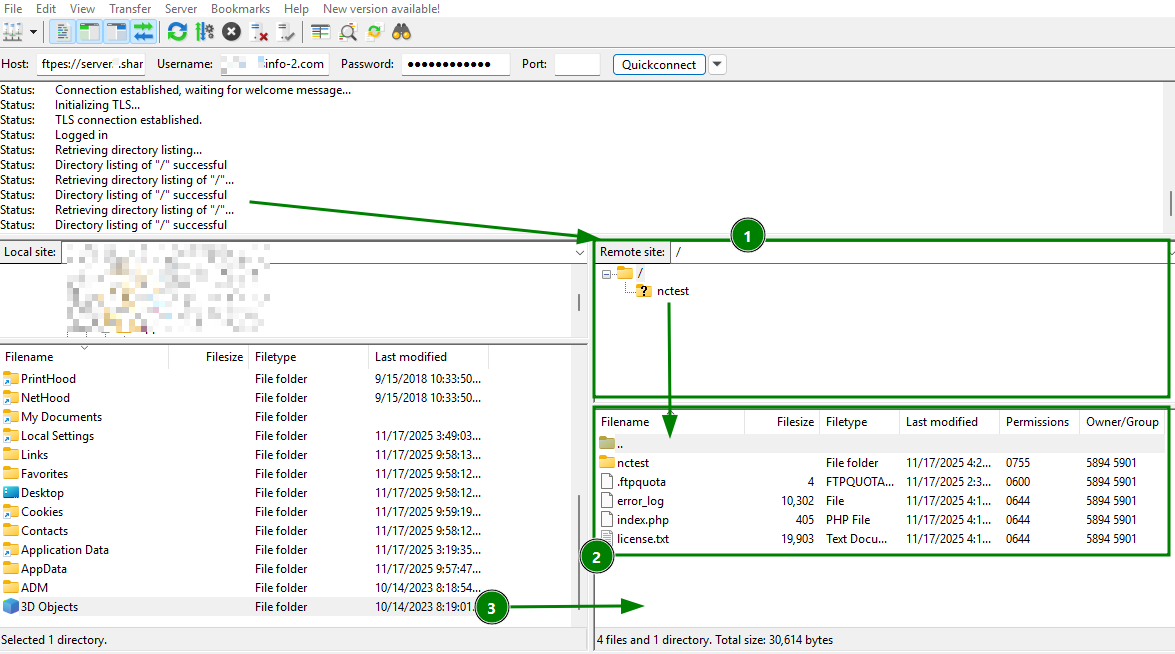
Încă o modalitate de a vă conecta la un cont FTP în FileZilla este folosind opțiunea Quickconnect :
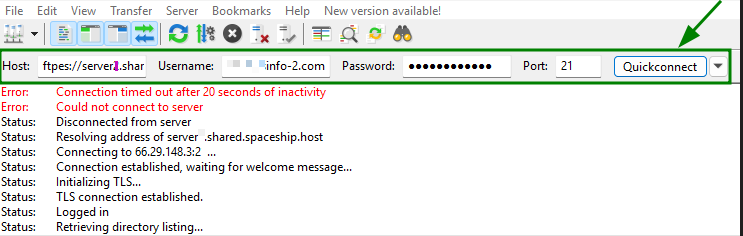
NOTĂ: Pentru a vă conecta la server folosind opțiunea Quickconnect, parametrul „Host” trebuie introdus într-un format corespunzător:
serverX.shared.spaceship.host - pentru conectarea la un cont de găzduire folosind protocolul FTP;
ftpes://serverX.shared.spaceship.host - pentru conectarea la un cont de găzduire folosind protocolul FTPES.
* Asigurați-vă că înlocuiți serverX cu serverul pe care este găzduit contul dvs. cPanel.
Client FTP încorporat pe macOS
Pe un computer macOS, vă puteți conecta la un cont FTP direct de pe desktop fără a instala software suplimentar.
Clientul FTP încorporat în macOS oferă acces doar pentru citire, ceea ce înseamnă că puteți descărca fișiere de pe serverul dvs. de găzduire, dar pentru încărcare este necesar un client FTP terț.
Pentru a vă conecta la contul FTP pe macOS, trebuie să:
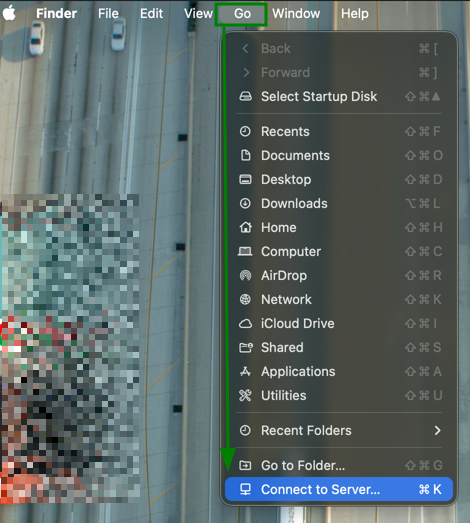
Deschideți meniul Go și selectați Connect to Server (puteți folosi și scurtătura de la tastatură asociată pentru a accesa această opțiune):
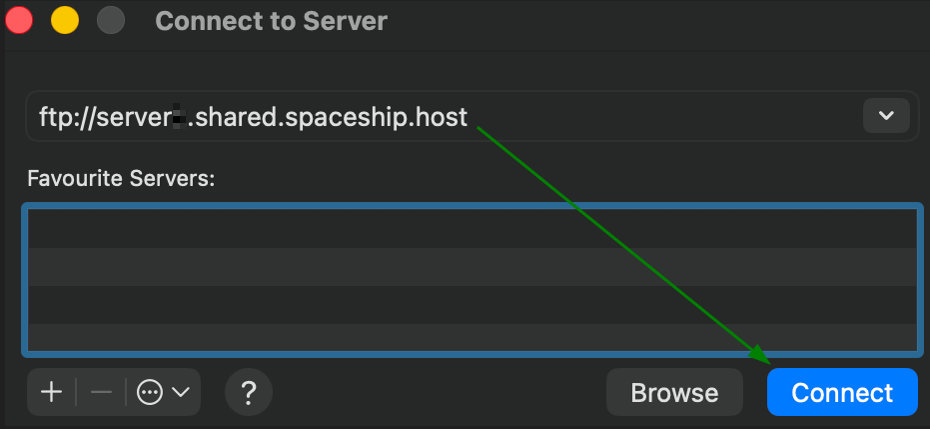
Introduceți numele serverului FTP în formatul ftp:// sau ftpes:// și faceți clic pe Connect:
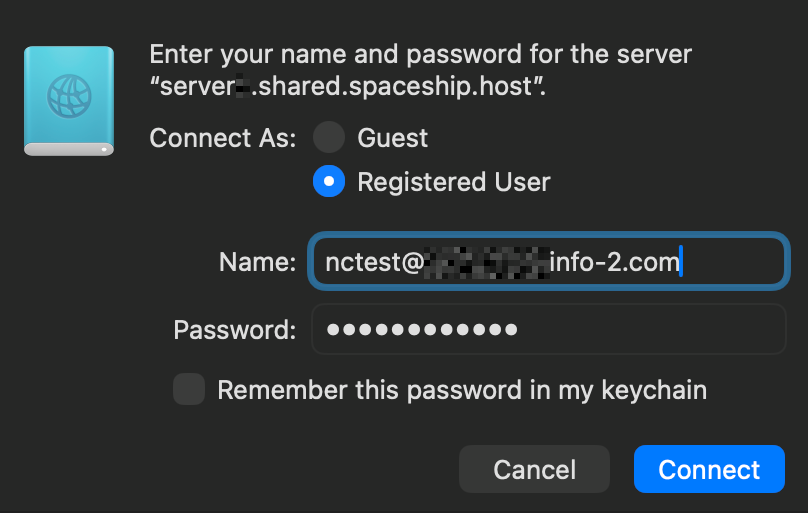
Selectați opțiunea Registered User, introduceți numele de utilizator și parola contului FTP în câmpurile corespunzătoare și faceți clic pe „Connect”:
Poate dura câteva secunde pentru a realiza conexiunea dintre Mac-ul dvs. și un server FTP. Odată ce conexiunea a fost stabilită cu succes, veți vedea conținutul serverului dvs. FTP în folder:
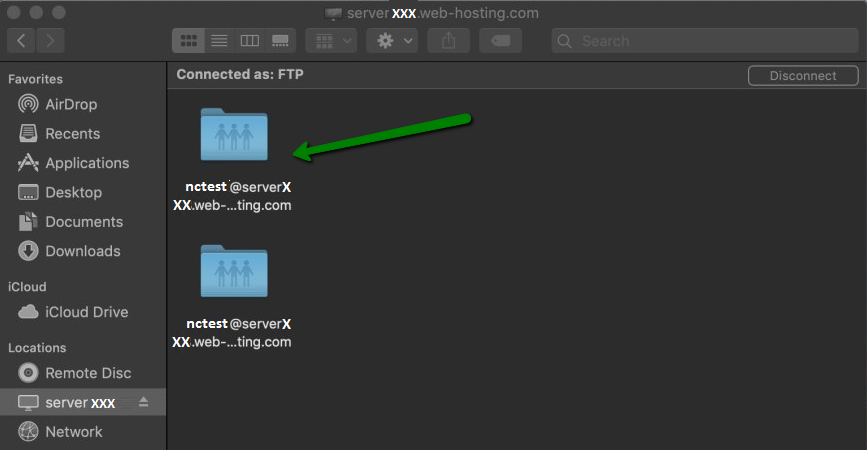
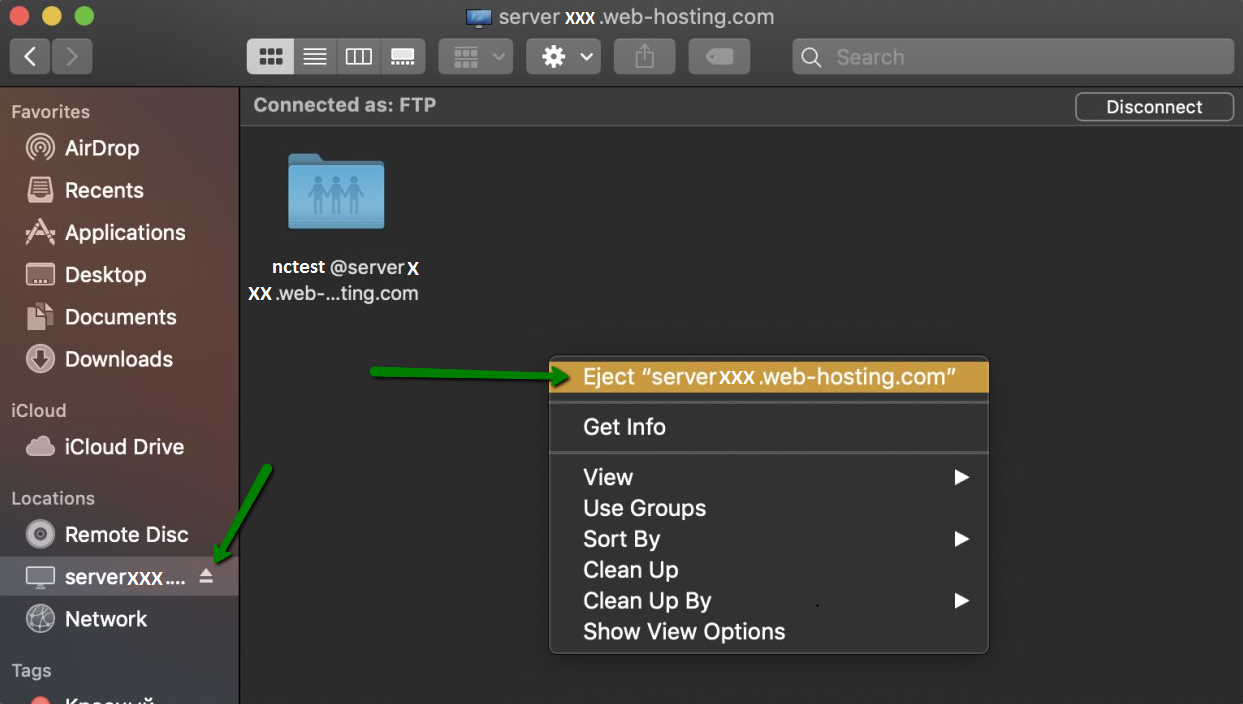
NOTĂ: Mac va monta automat folderul FTP atunci când îl accesați. Chiar dacă închideți fereastra serverului, folderul va rămâne vizibil și accesibil.Pentru a vă deconecta de la server, faceți clic dreapta pe folderul FTP >> faceți clic pe Eject the FTP server:
Client FTP încorporat pe Windows
Managerul de fișiere încorporat în Windows (File Explorer) poate fi folosit pentru a vă conecta direct la conturi FTP. Totuși, este important de reținut că nu acceptă conexiuni SFTP.
Pentru a accesa un cont FTP pe Windows, deschideți File Explorer (sau Windows Explorer pe versiunile mai vechi) > navigați la This PC > faceți clic dreapta pe orice spațiu gol și selectați opțiunea Add a network location:
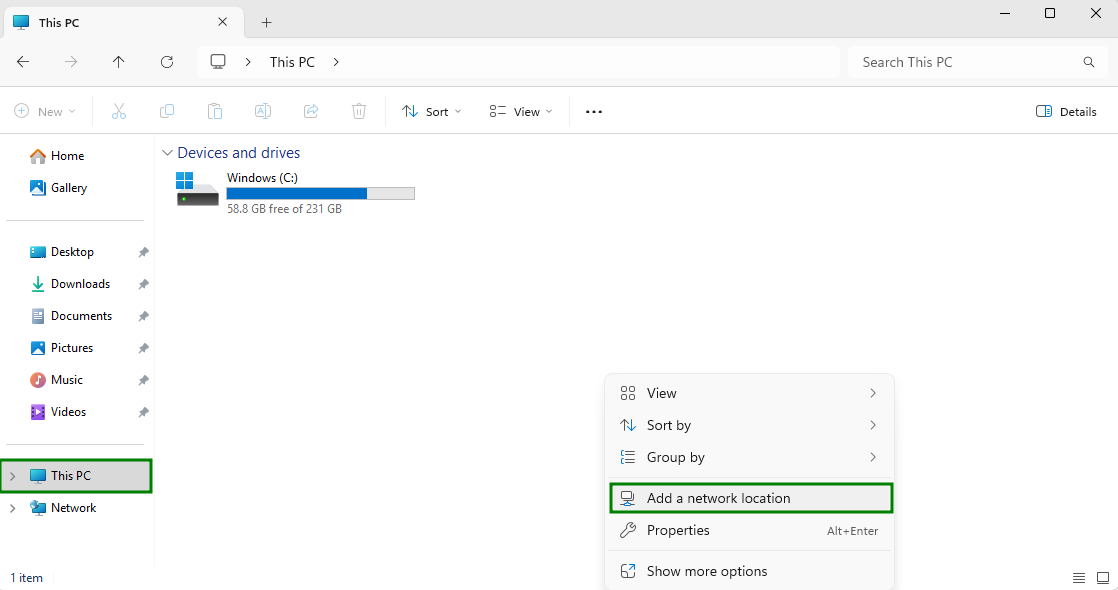
Alternativ, deschideți meniul Start și alegeți This PC de acolo.
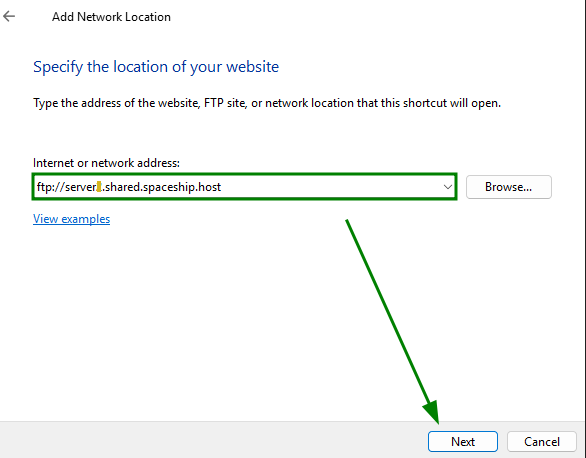
Apoi, trebuie să parcurgeți asistentul și să selectați Choose a custom network location. Introduceți gazda contului dvs. FTP în formatul ftp:// și faceți clic pe Next:
Asigurați-vă că „Log on anonymously” este debifat și introduceți numele de utilizator al contului FTP:
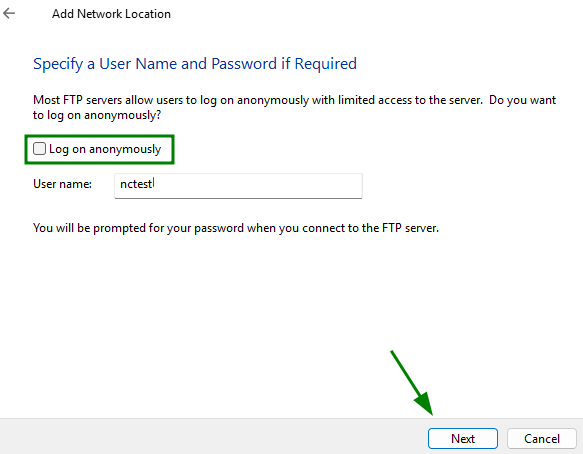
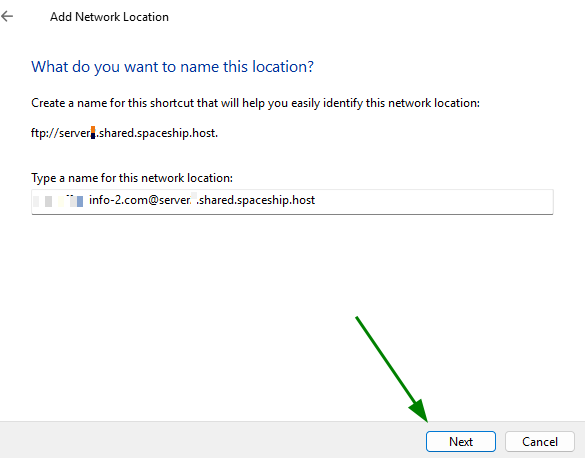
Denumiți locația de rețea:
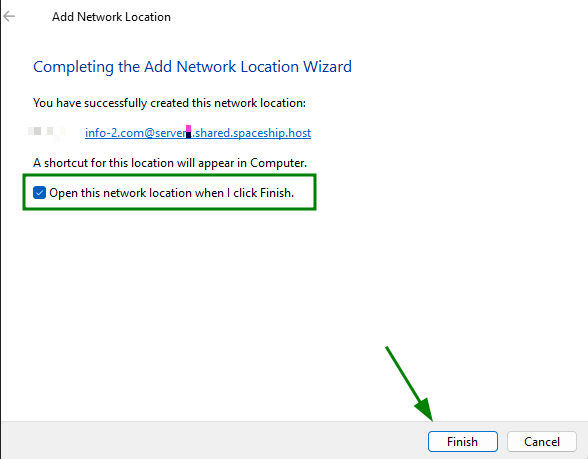
Bifați opțiunea „Open this network location when I click Finish” și faceți clic pe Finish:
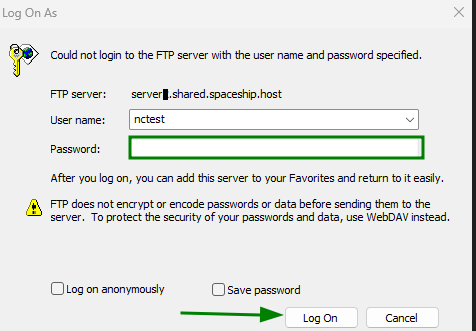
După aceasta, locația de rețea va fi adăugată la pagina This PC. Faceți clic dreapta pe ea și introduceți parola contului FTP pentru a deschide locația:
NOTĂ: Când accesați un folder FTP în Windows, sistemul îl montează automat. Chiar dacă închideți fereastra serverului, folderul rămâne vizibil și accesibil. Pentru a vă deconecta de la serverul FTP, faceți clic dreapta pe numele conexiunii din partea dreaptă a ferestrei și ștergeți-l.