हैक किए गए WordPress वेबसाइट से कैसे निपटें
इस लेख में, हम WordPress हैक्स के सबसे सामान्य प्रकारों, उन्हें पहचानने के तरीके, और उन्हें ठीक करने के विभिन्न तरीकों पर चर्चा करेंगे। यदि आपको ऐसी कोई समस्या आती है, तो हम दृढ़ता से सलाह देते हैं कि आगे की सहायता के लिए किसी पेशेवर वेब डेवलपर से संपर्क करें। अपनी होस्टिंग अकाउंट की सुरक्षा बढ़ाने के लिए अतिरिक्त मार्गदर्शन के लिए, कृपया इस गाइड को देखें।
महत्वपूर्ण: कोई भी बदलाव करने से पहले, अपनी वेबसाइट का पूरा बैकअप बना लें।
कृपया ध्यान दें: भविष्य में WordPress हैक्स के जोखिम को कम करने के लिए, नियमित रूप से अपनी होस्टिंग अकाउंट को स्कैन करें एंटीवायरस टूल से, किसी भी दुर्भावनापूर्ण या संदिग्ध फाइल को हटाएँ, और अपनी वेबसाइट के सभी प्लगइन्स और थीम्स को उनके नवीनतम संस्करण में अपडेट रखें।
डिफ़ॉल्ट फाइलें गायब हैं
हालांकि कई अलग-अलग समस्याएँ डिफ़ॉल्ट फाइलों के गायब या बदल जाने का कारण बन सकती हैं, सबसे सामान्य कारण आपके WordPress इंस्टॉलेशन में इंजेक्ट किया गया मैलवेयर है। सौभाग्य से, हमारे वेब और होस्टिंग सर्वरों पर एंटीवायरस टूल्स स्वचालित रूप से संक्रमित फाइलों का पता लगा सकते हैं और उन्हें क्वारंटीन कर सकते हैं।
यदि आपकी मुख्य WordPress फाइलें संक्रमित हो जाती हैं, तो आपको निम्नलिखित लक्षण दिखाई दे सकते हैं:
एक खाली पेज;
500 इंटरनल सर्वर एरर;
एक “यह साइट तकनीकी समस्याओं का सामना कर रही है” त्रुटि (WordPress 5.2.2 में पेश की गई);
या अन्य इसी तरह की त्रुटियाँ।
इस समस्या को ठीक करने के लिए, नीचे दिए गए चरणों का पालन करें।
अपनी वेबसाइट की error_log फाइल जांचें
यह पता लगाने के लिए कि आपकी साइट पर समस्या का कारण क्या है, error_log फाइल की समीक्षा करें। यह फाइल आपकी वेबसाइट पर आने वाली किसी भी गंभीर त्रुटि को रिकॉर्ड करती है।
आप इसे अपने cPanel अकाउंट > “File Manager” मेनू > अपनी WordPress इंस्टॉलेशन की रूट डायरेक्टरी में पा सकते हैं।
एक बार जब आप डोमेन के रूट फोल्डर में पहुँच जाएँ, तो error_log फाइल खोजें। यदि यह मौजूद है, तो इन चरणों का पालन करें:
फाइल पर राइट-क्लिक करें, फिर View चुनें:
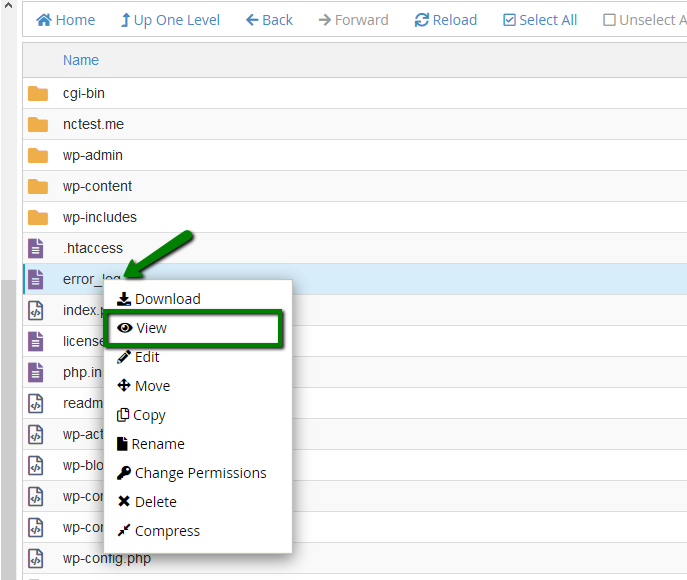
लॉग के अंदर, आपको ऐसी त्रुटि दिखाई दे सकती है: “No such file or directory in…”, इसके बाद गायब फाइल का पथ होगा। इसका मतलब है कि आवश्यक फाइल अनुपस्थित है और वेबसाइट को सही ढंग से चलने से रोक रही है।
उदाहरण के लिए:/home/cPuser/public_html/wp-settings.php
गायब फाइल को पुनर्स्थापित करने के लिए, इस गाइड के "गायब फाइलों को कैसे बदलें" अनुभाग तक नीचे स्क्रॉल करें।
display_errors PHP विकल्प सक्षम करें
यदि error_log फाइल आपकी वेबसाइट की रूट डायरेक्टरी में उपलब्ध नहीं है, तो आप अपने cPanel अकाउंट में display_errors PHP विकल्प को सक्षम कर सकते हैं। यह सेटिंग त्रुटि संदेशों को सीधे आपकी वेबसाइट पर दिखाने की अनुमति देती है, जिससे समस्या की पहचान करना आसान हो जाता है।
महत्वपूर्ण: सुरक्षा कारणों से, समस्या निवारण पूरा होने के बाद display_errors को अक्षम करना सुनिश्चित करें।
आप निम्नलिखित तरीकों से PHP विकल्प को सक्षम कर सकते हैं:
php.ini के माध्यम से
cPanel के “PHP Tweaks” मेनू के अलावा, आप किसी वेबसाइट के लिए कुछ सेटिंग्स सीधे php.ini फाइल के माध्यम से भी समायोजित कर सकते हैं, वहाँ संबंधित लाइनें जोड़/संपादित करके।
display_errors विकल्प को सक्षम करने के लिए, आपको फाइल में निम्नलिखित लाइन जोड़नी होगी: display_errors=1
आप या तो वेबसाइट के रूट फोल्डर में एक नई php.ini फाइल बना सकते हैं और वहाँ लाइन जोड़ सकते हैं या नीचे दिए गए चरणों का पालन करके सिस्टम-जनरेटेड फाइल को संशोधित कर सकते हैं।
अपने cPanel अकाउंट में लॉग इन करें और “File Manager” मेनू पर जाएँ।
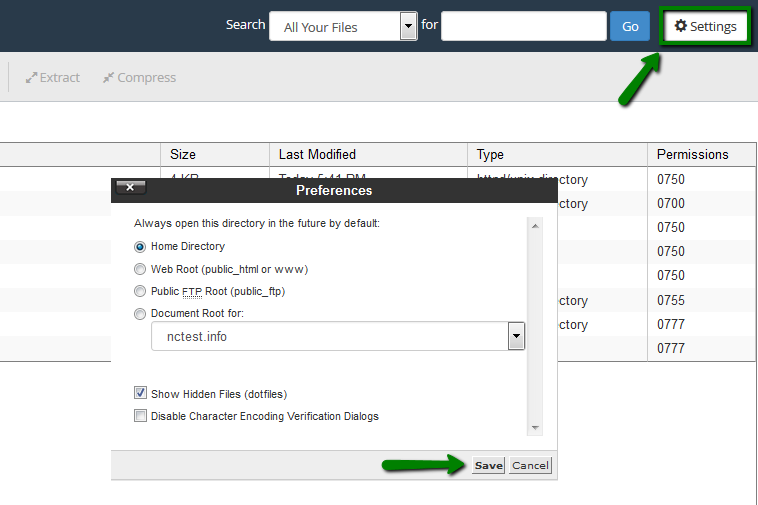
सुनिश्चित करें कि सेटिंग्स में “Show Hidden Files (dotfiles)” विकल्प सक्षम है:
निम्नलिखित डायरेक्टरी पर जाएँ: /home/cPanel_user/.system-php/ini
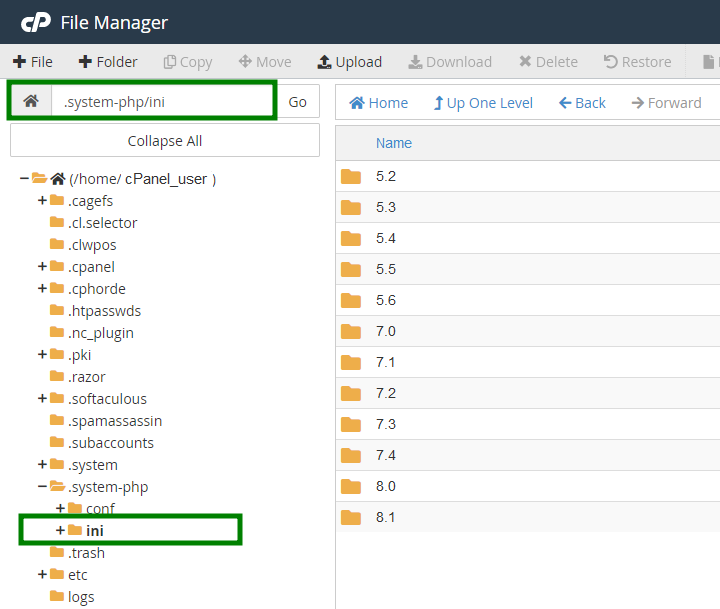
अपने डोमेन को असाइन किए गए PHP संस्करण का चयन करें और फिर डोमेन की डायरेक्टरी चुनें। उदाहरण के लिए, पूरा पथ इस प्रकार हो सकता है:
/home/cPanel_user/.system-php/ini/7.0/testwebsite.comphp.ini फाइल पर राइट-क्लिक करें और Edit चुनें।
फाइल में निम्नलिखित लाइन जोड़ें:
display_errors=1
.htaccess के माध्यम से
.htaccess फाइल के माध्यम से display_errors PHP विकल्प सक्षम करने के लिए, आपको वेबसाइट की रूट डायरेक्टरी में “File Manager” के अंदर फाइल को संपादित करना होगा, और वहाँ निम्नलिखित लाइन जोड़नी होगी:php_value display_errors 1
.htaccess फाइल को खोजने के विस्तृत चरण इस आर्टिकल में पाए जा सकते हैं।
अपने बदलावों के बाद, Save पर क्लिक करें।
गायब WordPress फाइलों को कैसे बदलें
WordPress एक सरल और व्यवस्थित फाइल संरचना का उपयोग करता है, जिससे गायब या भ्रष्ट फाइलों को पुनर्स्थापित करना अपेक्षाकृत आसान हो जाता है। डिफ़ॉल्ट कोर फाइलों को बदलना दृढ़ता से अनुशंसित है, क्योंकि यह सुनिश्चित करता है कि मैलवेयर से संक्रमित कोई भी फाइल पूरी तरह से पुनर्स्थापित हो जाए। हालांकि, सावधानी से आगे बढ़ें: कुछ फाइलों या फोल्डरों को बदलने से, यदि सही तरीके से नहीं किया गया, तो डेटा हानि हो सकती है।
गायब WordPress फाइलों को बदलने के लिए नीचे दिए गए चरणों का पालन करें:
अपने cPanel में लॉग इन करें और Softaculous Apps Installer पर जाएँ।
एक अस्थायी सबडायरेक्टरी में एक नया WordPress इंस्टॉलेशन बनाएं। ऐसा करने के लिए, WordPress आइकन पर क्लिक करें और फिर Install चुनें:
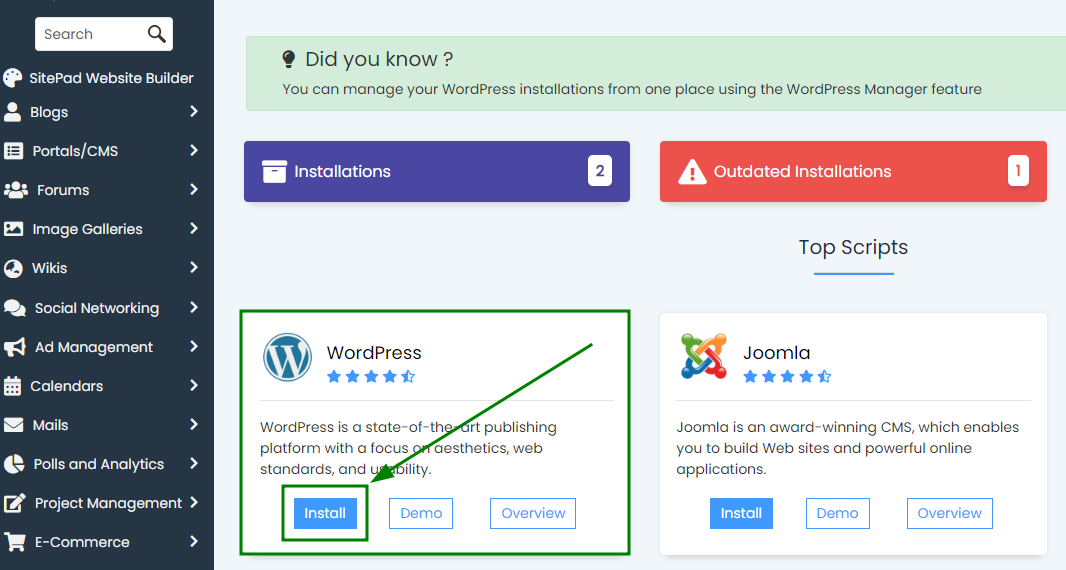
आपको इंस्टॉलेशन सेटिंग्स पेज पर रीडायरेक्ट किया जाएगा। वहाँ, ड्रॉपडाउन मेनू से संबंधित डोमेन नाम चुनें, और In Directory फ़ील्ड में एक सबफोल्डर का नाम दर्ज करें।
इस उदाहरण में, हम WordPress इंस्टॉलेशन के लिए ” fix” सबफोल्डर का उपयोग करते हैं: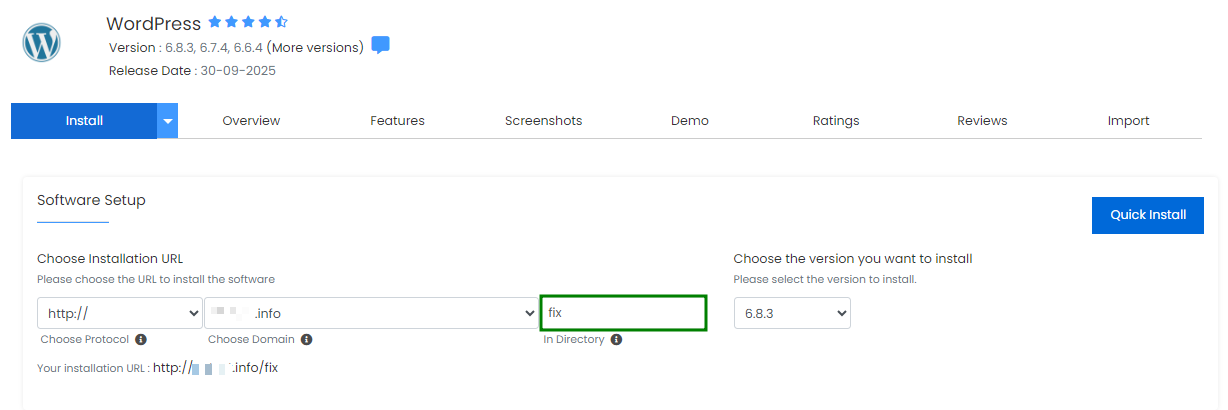
नोट: सभी डिफ़ॉल्ट फाइलों को बदलने से आपकी मौजूदा इंस्टॉलेशन उस संस्करण में अपडेट हो जाएगी जो अस्थायी “fix” इंस्टॉलेशन में उपयोग की गई है, और विभिन्न संस्करणों की फाइलों को मिलाने से सिस्टम संघर्ष और साइट की कार्यक्षमता में बाधा आ सकती है।
यदि आपके लिए मौजूदा WordPress संस्करण बनाए रखना महत्वपूर्ण है, या आप केवल विशिष्ट फाइलों को बदलना चाहते हैं, तो अपनी साइट का संस्करण /wp-includes/version.php फाइल के अंदर जांचें, और सुनिश्चित करें कि नया इंस्टॉलेशन वही WordPress संस्करण उपयोग करता है: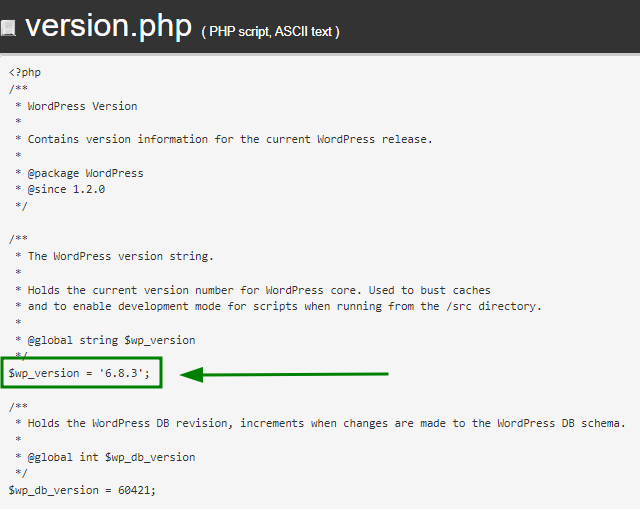
आप नए इंस्टॉलेशन के लिए WordPress संस्करण को सीधे इंस्टॉलेशन विंडो में चुन सकते हैं:
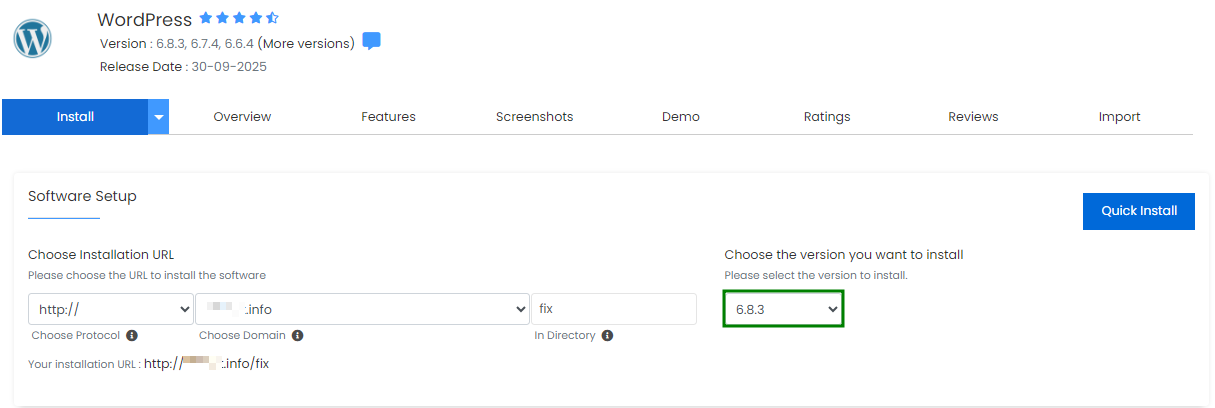
सभी सेटिंग्स कॉन्फ़िगर हो जाने के बाद, Quick Install पर क्लिक करें या इंस्टॉलेशन पेज के नीचे स्क्रॉल करें और Install पर क्लिक करें।
नया WordPress इंस्टॉलेशन पूरा होने के बाद, इसकी फाइलें “File Manager” > आपके डोमेन की रूट डायरेक्टरी में दिखाई देंगी। फोल्डर को डबल-क्लिक करके खोलें:
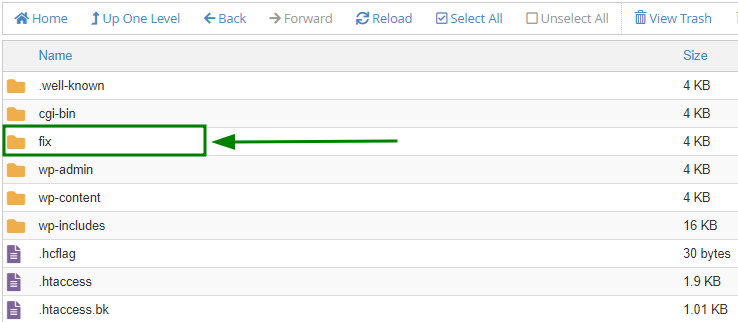
किसी विशिष्ट गायब फाइल (जैसे, wp-settings.php) को बदलने के लिए, उस फाइल को नए इंस्टॉलेशन की डायरेक्टरी में खोजें।
इसके बाद, फाइल को अपनी वेबसाइट की वर्तमान रूट डायरेक्टरी में ले जाएँ: फाइल पर राइट-क्लिक करें > Move पर क्लिक करें > अपनी वेबसाइट के रूट फोल्डर का पथ दर्ज करें > Move file(s) पर क्लिक करें।
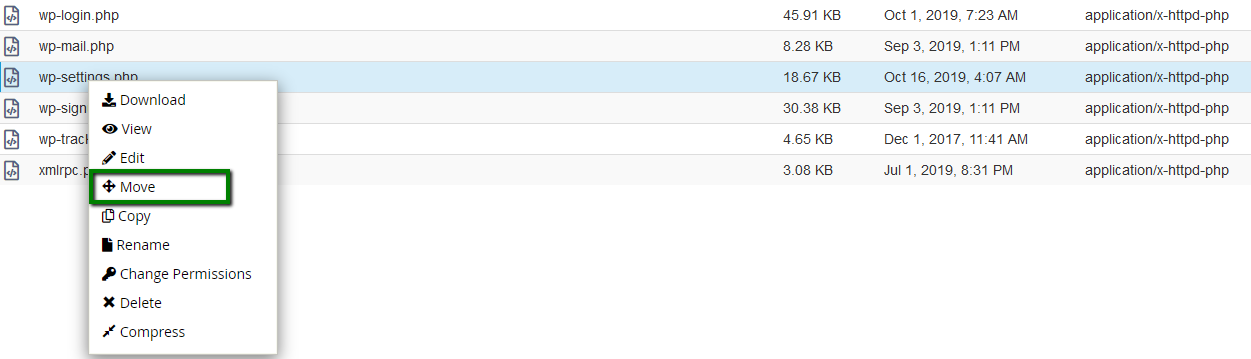
पूरा होने के बाद, गायब फाइल पुनर्स्थापित हो गई है, और आपकी वेबसाइट अब सही तरीके से लोड होनी चाहिए।
सभी डिफ़ॉल्ट WordPress फाइलों को कैसे बदलें
किसी वेबसाइट के लिए सभी डिफ़ॉल्ट WordPress फाइलों को बदलने की प्रक्रिया में, चरण 1-6 “गायब WordPress फाइलों को कैसे बदलें” अनुभाग के समान हैं।
इन चरणों के पूरा होने और नया WordPress इंस्टॉलेशन बनने के बाद, अपनी वेबसाइट के रूट फोल्डर में सभी डिफ़ॉल्ट फाइलों को बदलने के लिए कृपया इन चरणों का पालन करें:
नए WordPress इंस्टॉलेशन का रूट फोल्डर खोलें:
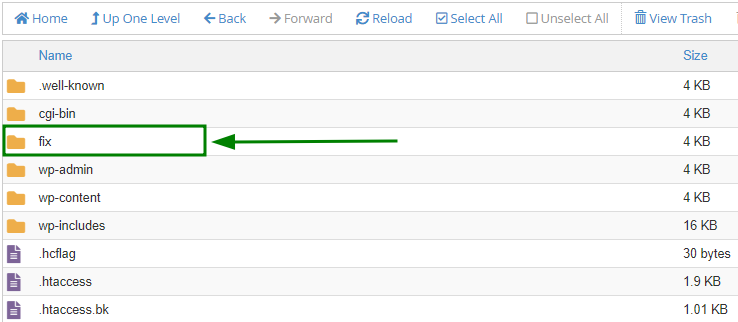
नए इंस्टॉलेशन फोल्डर के अंदर, निम्नलिखित फाइलें और फोल्डर हटा दें:
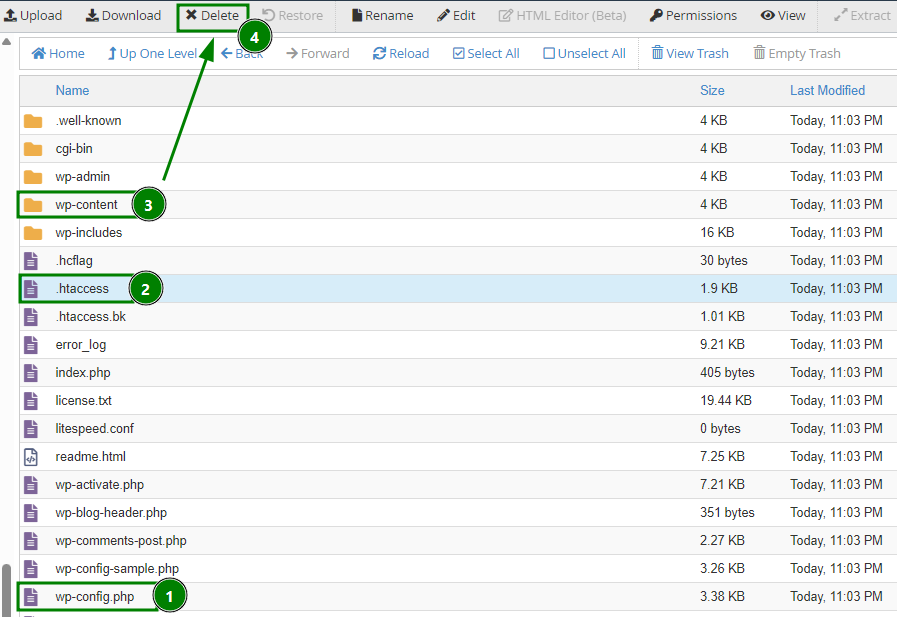
.htaccess
wp-config.php
wp-content
ये फाइलें और फोल्डर आपकी साइट की कॉन्फ़िगरेशन और सामग्री रखते हैं, और इन्हें अपरिवर्तित रहना चाहिए।
फिर, शेष फाइलों को अपनी मुख्य वेबसाइट की रूट डायरेक्टरी में ले जाएँ। इसके लिए, Select All बटन का उपयोग करें > पर क्लिक करें Move > अपनी साइट के रूट फोल्डर का पथ दर्ज करें > पर क्लिक करें Move file(s):
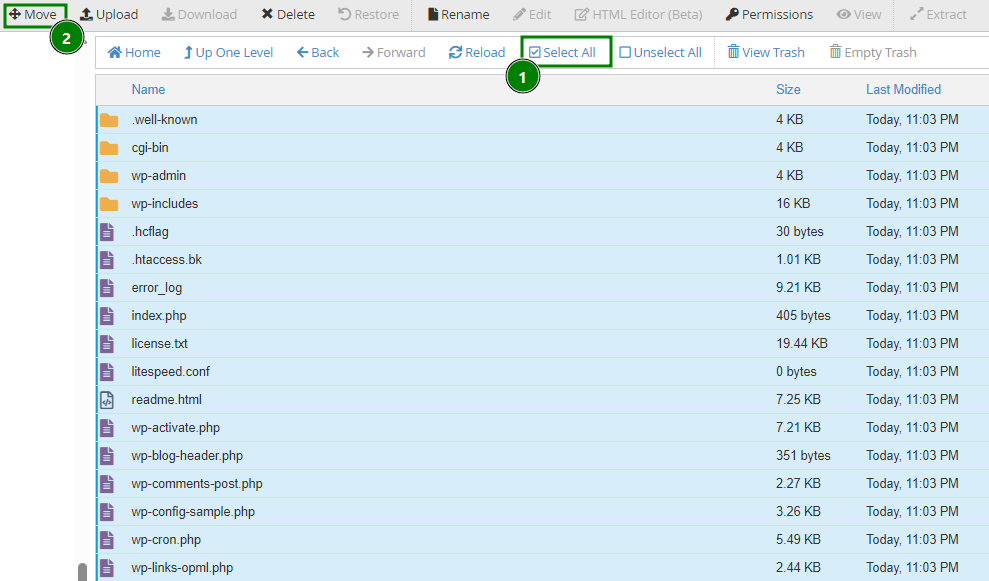
आपकी WordPress कोर फाइलें पूरी तरह से बदल दी गई हैं। सब कुछ सही से लोड हो रहा है या नहीं, यह जांचने के लिए अपनी वेबसाइट पर जाएँ।
यदि साइट अभी भी त्रुटियाँ दिखाती है, तो error_log को फिर से जांचें। अधिकांश मामलों में, अतिरिक्त समस्याएँ थीम या प्लगइन फाइलों के गायब होने के कारण होती हैं।
थीम या प्लगइन फाइलें गायब हैं
थीम या प्लगइन फाइलों के गायब होने के कई कारण हो सकते हैं, लेकिन सबसे सामान्य कारण मैलवेयर है जो आपके WordPress इंस्टॉलेशन के आवश्यक घटकों को संक्रमित और हटा देता है।
यदि आपकी किसी भी WordPress प्लगइन या थीम फाइलें गायब हैं, तो आपको निम्नलिखित समस्याएँ हो सकती हैं:
एक खाली पेज;
500 इंटरनल सर्वर एरर;
एक “यह साइट तकनीकी समस्याओं का सामना कर रही है” त्रुटि (WordPress 5.2.2 में पेश की गई);
आंशिक रूप से लोड या दृश्य रूप से “टूटी” पेज।
समस्या का निदान करने में सहायता के लिए, इस लेख के निम्नलिखित अनुभाग देखें: अपनी वेबसाइट की error_log फाइल जांचें और display_errors PHP विकल्प सक्षम करें।
आपको अपनी error_log या सीधे वेबसाइट पर निम्नलिखित जैसी त्रुटि संदेश दिखाई दे सकते हैं:
PHP Fatal error: Uncaught Error: Call to undefined function sample_function() in /home/cPaneluser/...
नीचे एक उदाहरण है जो किसी भ्रष्ट या गायब प्लगइन फाइल के कारण हुई त्रुटि को दर्शाता है:

गायब फाइल को पुनर्स्थापित करने के लिए, प्रभावित थीम या प्लगइन को बस पुनः इंस्टॉल करें।
नोट: थीम्स में functions.php फाइलों के गायब होने का संबंध अक्सर wp-vcd.php मैलवेयर से होता है, जो आमतौर पर /wp-includes डायरेक्टरी में स्थित होता है। नई थीम इंस्टॉल करने से पहले, यदि wp-vcd.php मौजूद है तो उसे हटा दें, या यदि आप पूरी सुरक्षा सुनिश्चित करना चाहते हैं, तो ऊपर वर्णित अनुसार सभी डिफ़ॉल्ट WordPress फाइलों को बदलें पहले।
दुर्भावनापूर्ण रीडायरेक्ट्स
कुछ मामलों में, जब आपकी वेबसाइट मैलवेयर से संक्रमित हो जाती है, तो यह विजिटर्स को हानिकारक या संदिग्ध पेजों पर रीडायरेक्ट करना शुरू कर सकती है। यह समस्या आमतौर पर असुरक्षित प्लगइन या थीम के कारण होती है, जो हमलावरों को डेटाबेस URLs बदलने या आपकी वेबसाइट की फाइलों को संशोधित करने की अनुमति देती है।
नोट: कभी भी किसी भी रीडायरेक्टेड लिंक पर क्लिक न करें। ऐसा करने से आपका व्यक्तिगत कंप्यूटर मैलवेयर से संक्रमित हो सकता है:
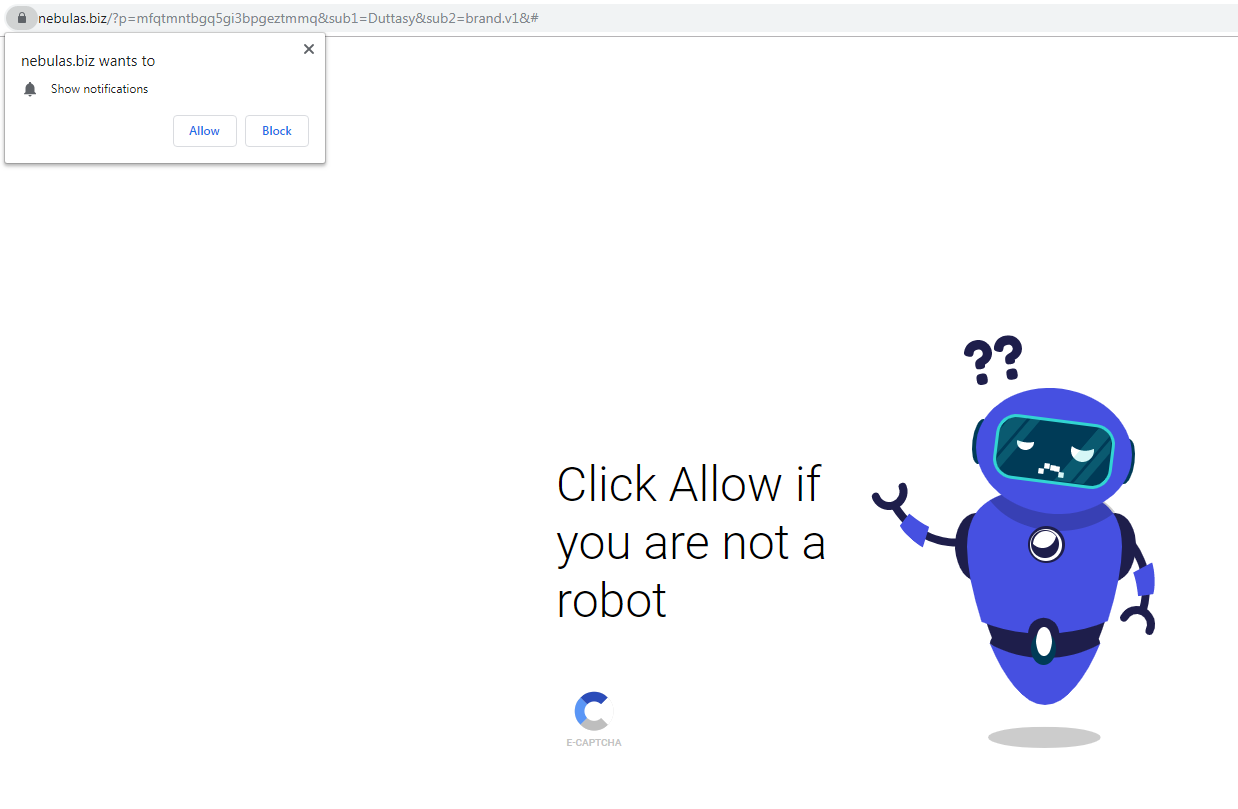
दुर्भावनापूर्ण रीडायरेक्ट्स को ठीक करने के लिए, नीचे दिए गए चरणों का पालन करें:
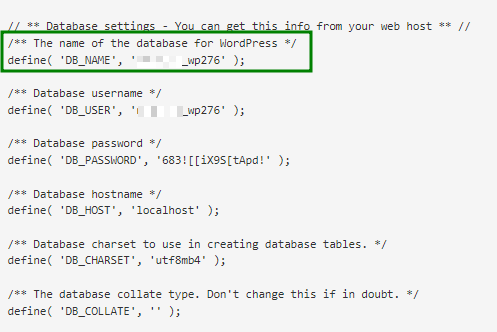
अपनी वेबसाइट के लिए एक डेटाबेस कॉन्फ़िगरेशन फाइल ढूंढें - wp-config.php अपने cPanel > File Manager > वेबसाइट के रूट फोल्डर में। फाइल खोलें और उसमें वेबसाइट का डेटाबेस नाम खोजें:
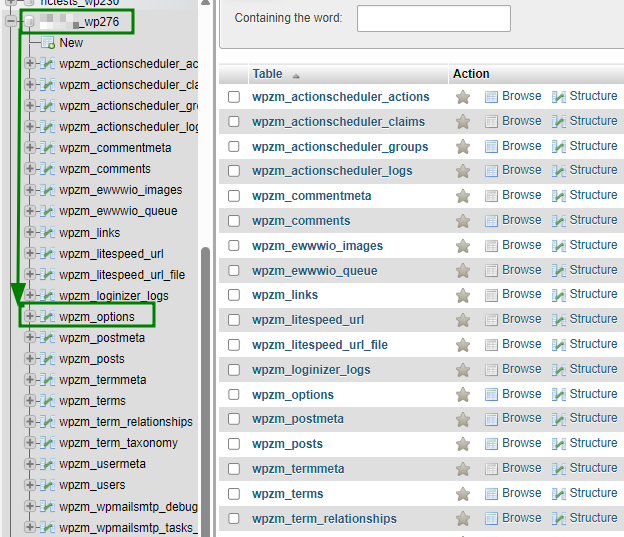
फिर, अपने cPanel के phpMyAdmin मेनू में वेबसाइट को असाइन किए गए डेटाबेस को खोलें, और wp_options टेबल पर जाएँ (“wp_” डिफ़ॉल्ट प्रीफिक्स है; आपका अलग हो सकता है):
siteurl siteurl और home फील्ड्स के मानों की समीक्षा करें, और यदि वहाँ कोई दुर्भावनापूर्ण या संदिग्ध URL दिखे, तो उन्हें अपने वास्तविक डोमेन नाम से बदल दें:

अपनी डेटाबेस के बाकी हिस्से को भी इसी तरह के दुर्भावनापूर्ण URLs के लिए स्कैन करें और उन्हें उसी अनुसार बदलें।
अस्थायी रूप से अपनी वर्तमान .htaccess को एक साफ डिफ़ॉल्ट संस्करण से बदलें। सबसे अच्छा है कि मौजूदा फाइल का नाम बदल दें (जैसे, .htaccess_old) और एक नई फाइल शुरू से बनाएं।
फाइल का नाम बदलने के लिए, उस पर डबल-क्लिक करें > सूची से Rename चुनें > नया फाइल नाम दर्ज करें > और Rename file दबाएँ।
इसके बाद, नई फाइल बनाने के लिए, + File पर क्लिक करें > नाम दें .htaccess > और Create New File चुनें।एक बार नई .htaccess बन जाने के बाद, उस पर राइट-क्लिक करके संपादित करें > सूची से Edit चुनें। एक बार संपादन विंडो खुलने के बाद, फाइल में निम्नलिखित डिफ़ॉल्ट WordPress नियम चिपकाएँ:
# BEGIN WordPressRewriteEngine OnRewriteBase /RewriteRule ^index\.php$ - [L]RewriteCond %{REQUEST_FILENAME} !-fRewriteCond %{REQUEST_FILENAME} !-dRewriteRule . /index.php [L]# END WordPressपर क्लिक करें Save Changes।
यदि आपकी वेबसाइट अभी भी रीडायरेक्ट करती है, तो सभी डिफ़ॉल्ट WordPress कोर फाइलों को बदलने का प्रयास करें।
आप WordPress डैशबोर्ड या डेटाबेस के माध्यम से सभी प्लगइन्स को अस्थायी रूप से अक्षम भी कर सकते हैं, और एक-एक करके उन्हें सक्षम करने का प्रयास करें। जब हर प्लगइन सक्षम हो जाए, तो वेबसाइट की जांच करें कि कौन सा प्लगइन दुर्भावनापूर्ण रीडायरेक्ट समस्या का कारण बनता है।