
Việc tùy chỉnh giao diện WordPress của bạn có thể mang lại lợi thế so với đối thủ, phù hợp với nhận diện thương hiệu và tạo ra trải nghiệm tốt hơn cho khách truy cập. Tuy nhiên, mặc dù 61% khách hàng mong đợi trải nghiệm web được cá nhân hóa, việc thay đổi giao diện WordPress của bạn rõ ràng là điều khiến nhiều người e ngại.
Có thể bạn lo mình sẽ làm hỏng thứ gì đó. Hoặc rằng bạn sẽ cần biết cách chỉnh sửa giao diện WordPress mà không cần viết mã. Điều đó có thể khiến bạn cảm thấy quá phiền phức, đặc biệt khi bạn đã phải xoay xở với vô số công việc khác nhau cho doanh nghiệp nhỏ của mình.
Bạn không hề đơn độc. Nhiều chủ sở hữu website giữ nguyên cài đặt giao diện mặc định vì sợ hãi, bối rối hoặc cho rằng chỉ nhà phát triển mới có thể thực hiện những thay đổi thiết kế thực sự. Thực tế là, việc tùy chỉnh giao diện WordPress của bạn không nhất thiết phải phức tạp, và bạn có thể tạo ra những thay đổi đáng kể chỉ trong vài bước.
Trước khi bắt đầu, bạn nên làm quen vớinhững kiến thức cơ bản về plugin và giao diện WordPress.
Khi bạn đã sẵn sàng, hãy cùng tìm hiểu các công cụ và phương pháp hay nhất để cá nhân hóa website WordPress của mình.
Tại sao nên tùy chỉnh giao diện WordPress?
Giao diện của bạn có thể trông gọn gàng và hoạt động tốt ngay từ đầu, nhưng điều đó không có nghĩa là nó được tối ưu cho bạn. Bố cục mặc định có thể không phù hợp với thương hiệu của bạn, không dẫn dắt khách truy cập hiệu quả hoặc không cung cấp các tính năng mà người dùng của bạn mong đợi.
Lý do đầu tiên để tùy chỉnh là xây dựng thương hiệu. Website của bạn nên phản ánh bản sắc riêng — từ màu sắc và phông chữ đến logo và giọng điệu. Thương hiệu nhất quán tạo dựng niềm tin và khiến trang web của bạn dễ được ghi nhớ.
Tiếp theo là trải nghiệm người dùng (UX). Việc tùy chỉnh giao diện WordPress để cải thiện điều hướng, bố cục và cấu trúc giúp khách truy cập tìm thấy thứ họ cần nhanh hơn. Điều này làm giảm tỷ lệ thoát và tăng mức độ tương tác.
Bạn cũng có thể muốn thêm hoặc xóa một số tính năng nhất định. Ví dụ, nếu đối tượng của bạn coi trọng lời chứng thực, việc thêm một phần riêng dành cho chúng là hợp lý. Hoặc có thể giao diện của bạn bao gồm một thanh trượt mà bạn không cần. Việc xóa nó có thể cải thiện thời gian tải và đơn giản hóa thiết kế của bạn.
Cuối cùng, việc tùy chỉnh giúp trang web của bạn trở nên khác biệt. Nhiều người dùng giữ nguyên các giao diện mặc định, dẫn đến những website trông khá giống nhau. Chỉ với vài điều chỉnh hợp lý, trang của bạn có thể nổi bật hơn và thể hiện sự chuyên nghiệp.
Sử dụng WordPress Customizer (phương pháp không cần mã)
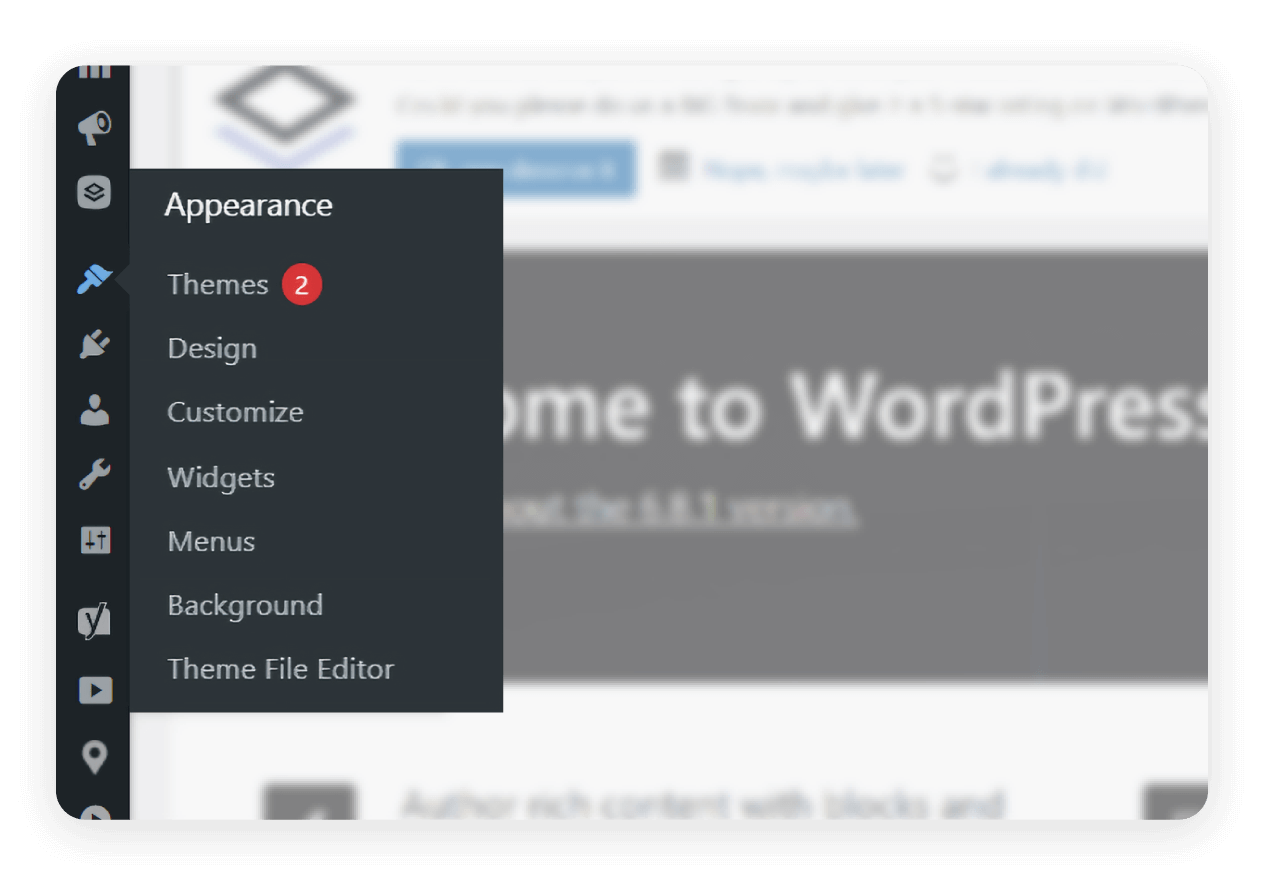
Đối với hầu hết giao diện WordPress, WordPress Customizer tích hợp sẵn là cách an toàn và dễ dàng nhất để thực hiện các thay đổi về mặt hiển thị. Bạn có thể truy cập công cụ này qua bảng điều khiển WordPress bằng cách đi tới Appearance > Customize.
Lưu ý: Nếu bạn đang sử dụng giao diện dựa trên block hỗ trợ Full Site Editing (FSE) (ví dụ: Twenty Twenty-Two hoặc Twenty Twenty-Three), Customizer có thể được thay thế bằng Site Editor. Trong trường hợp đó, bạn sẽ đi tới Dashboard> Appearance >Editor.
Khi vào bên trong, bạn sẽ thấy các tùy chọn được thiết kế riêng cho giao diện đã chọn. Chúng thường bao gồm các cài đặt cho nhận diện trang web của bạn, chẳng hạn như tiêu đề trang, khẩu hiệu và logo. Đây là nơi việc xây dựng thương hiệu bắt đầu.
Tải logo lên và viết khẩu hiệu
Đi tới Appearance > Customizetrên bảng điều khiển WordPress.
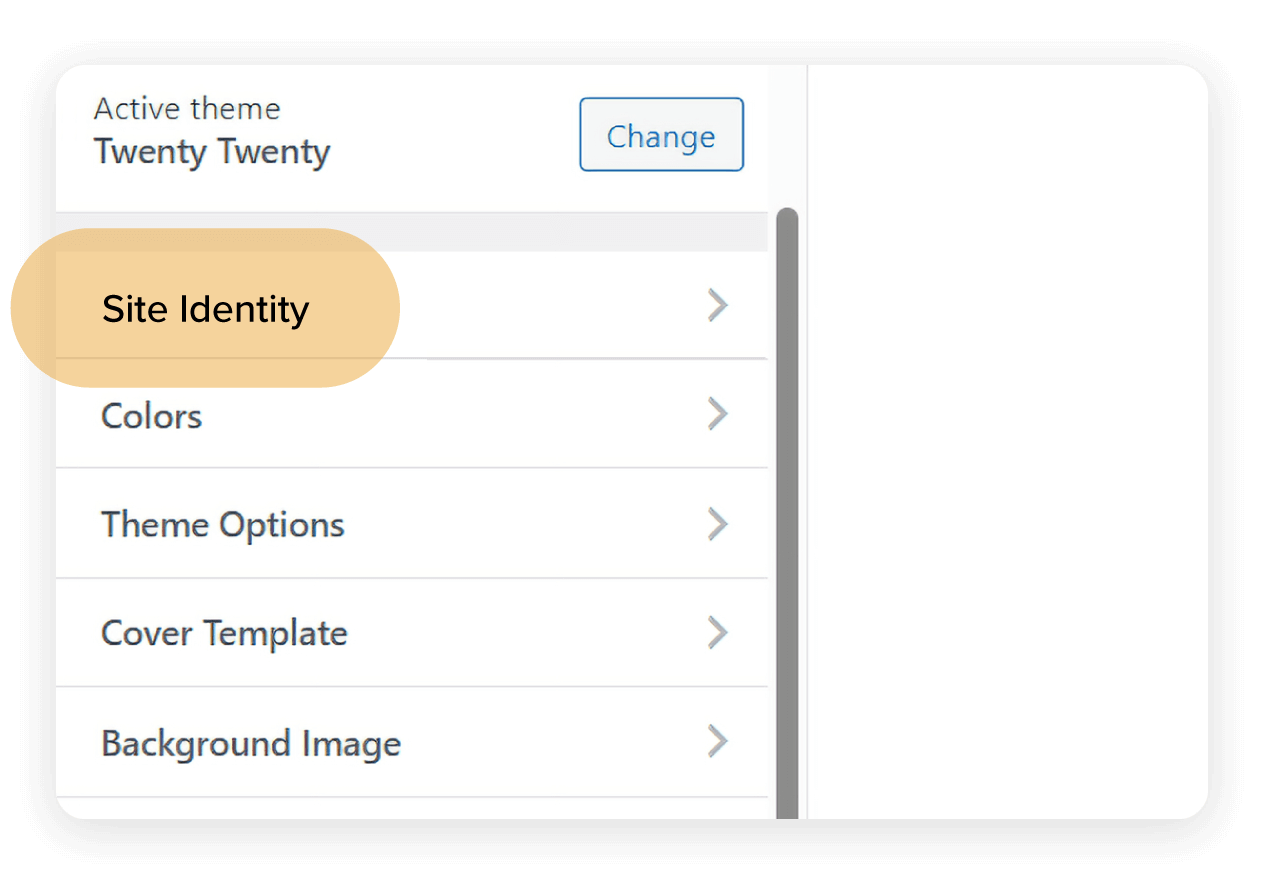
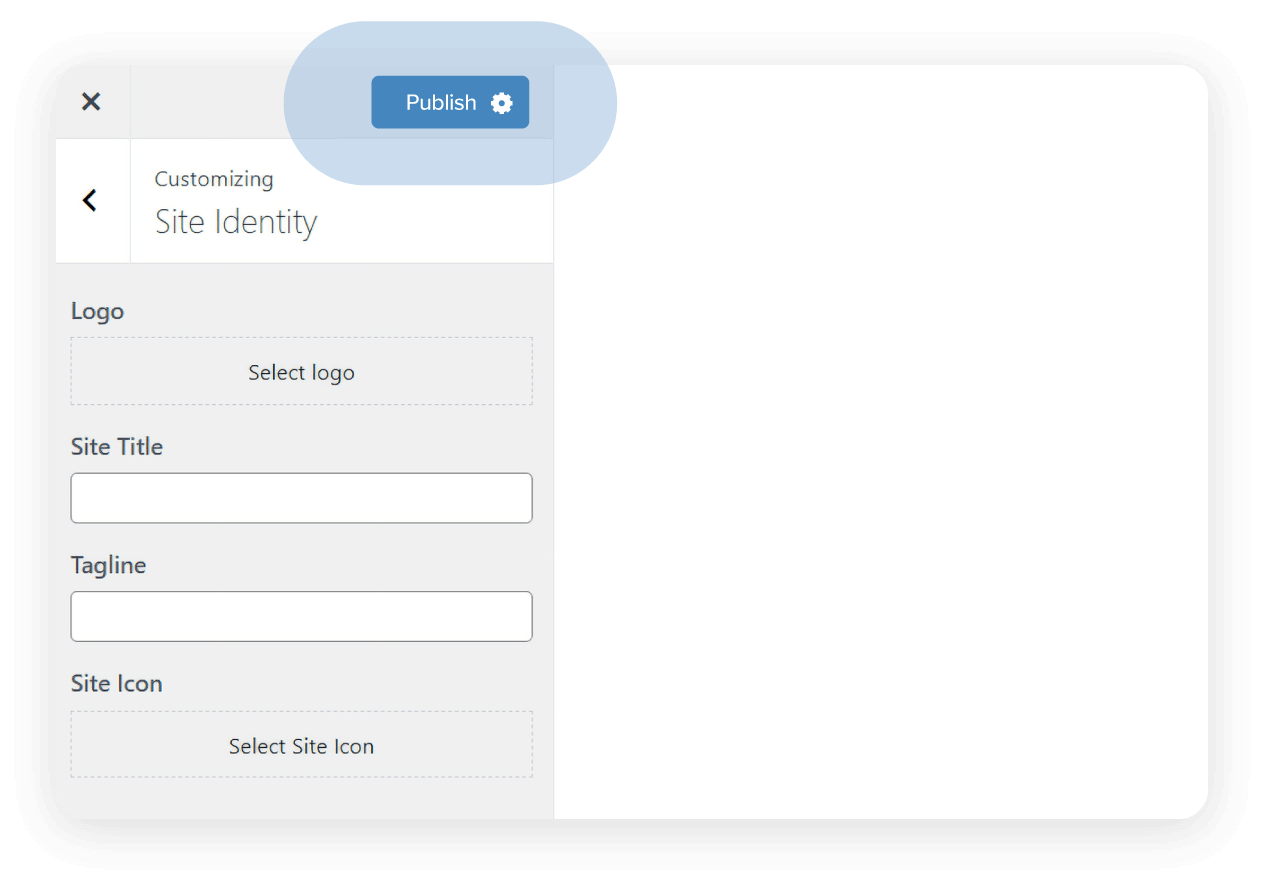
Chọn Site Identity, mục này cho phép bạn thay đổi tiêu đề và khẩu hiệu của website WordPress.
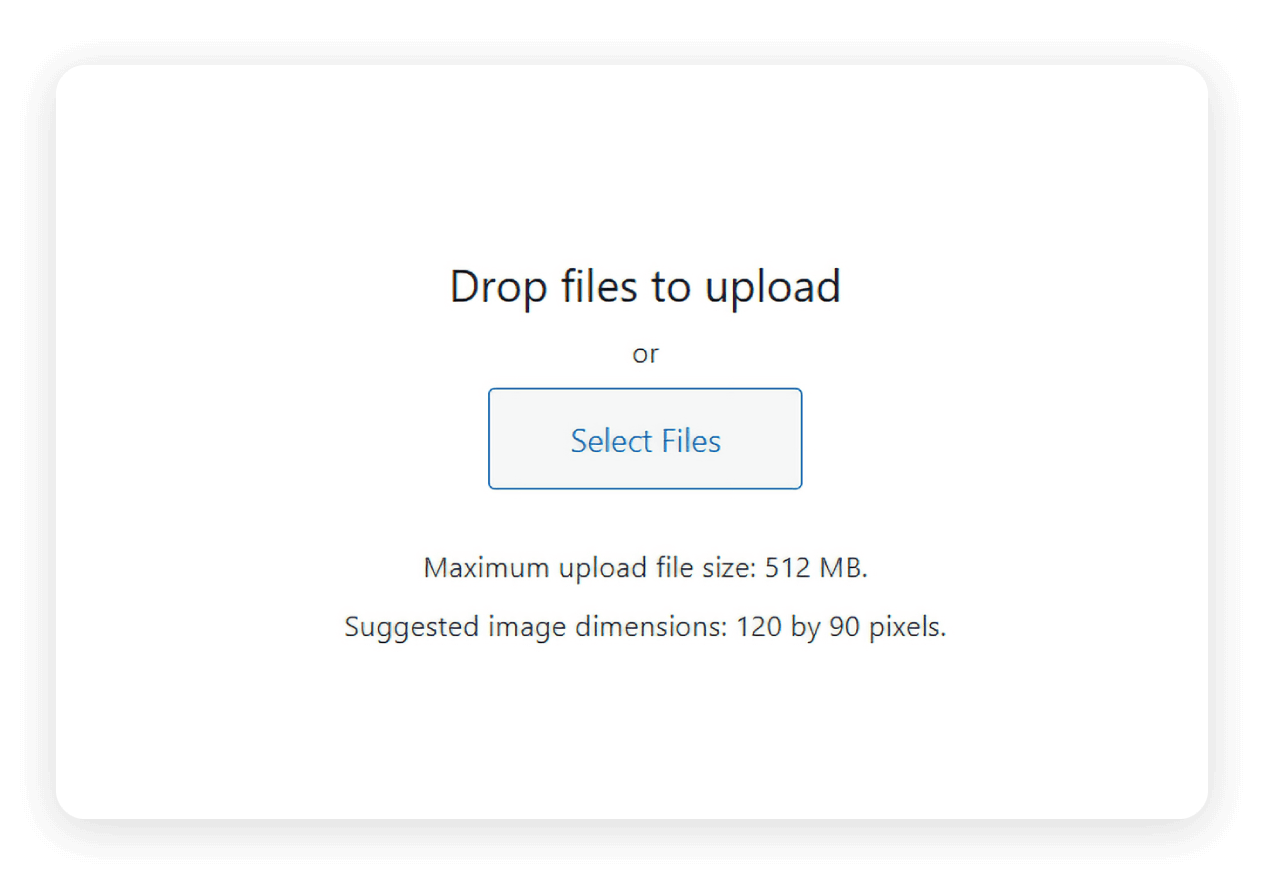
Trong phần Logo, nhấn Select logo > Select filesvà tìm hình ảnh phù hợp trên PC của bạn. Hãy đảm bảo hình ảnh đáp ứng kích thước tệp tải lên tối đa và kích thước ảnh được đề xuất, được nêu rõ trên trang Select logo.
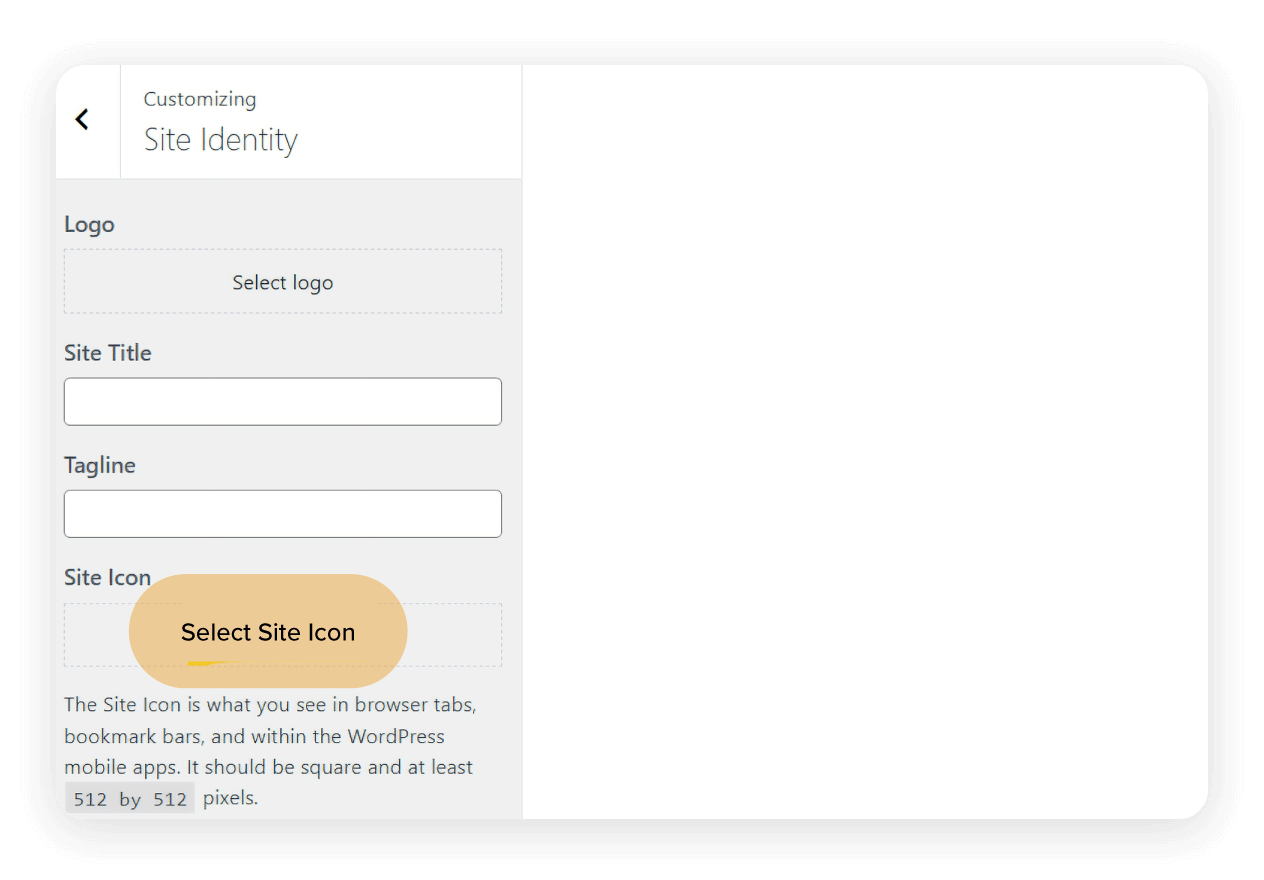
Trong khi đang ở bảng Site Identity, bạn cũng có thể muốn thêm favicon cho trang web của mình. Hơi khó hiểu một chút, WordPress gọi chúng là “Site icons”, nhưng chức năng vẫn như nhau – hiển thị trên thanh dấu trang, tab trình duyệt và ứng dụng di động.
Nhấp vào Publish để lưu thay đổi của bạn.
Thay đổi màu sắc của giao diện (ví dụ với Twenty Twenty)
Cài đặt màu sắc và phông chữ cũng có thể khả dụng, tùy thuộc vào giao diện của bạn. Một số giao diện cung cấp bảng màu phong phú và khả năng kiểm soát kiểu chữ sâu hơn, trong khi những giao diện khác giữ mọi thứ ở mức tối giản. Dù vậy, ngay cả những thay đổi cơ bản cũng có thể tạo ra khác biệt rõ rệt.
Dưới đây là cách thay đổi màu sắc của giao diện Twenty Twenty:
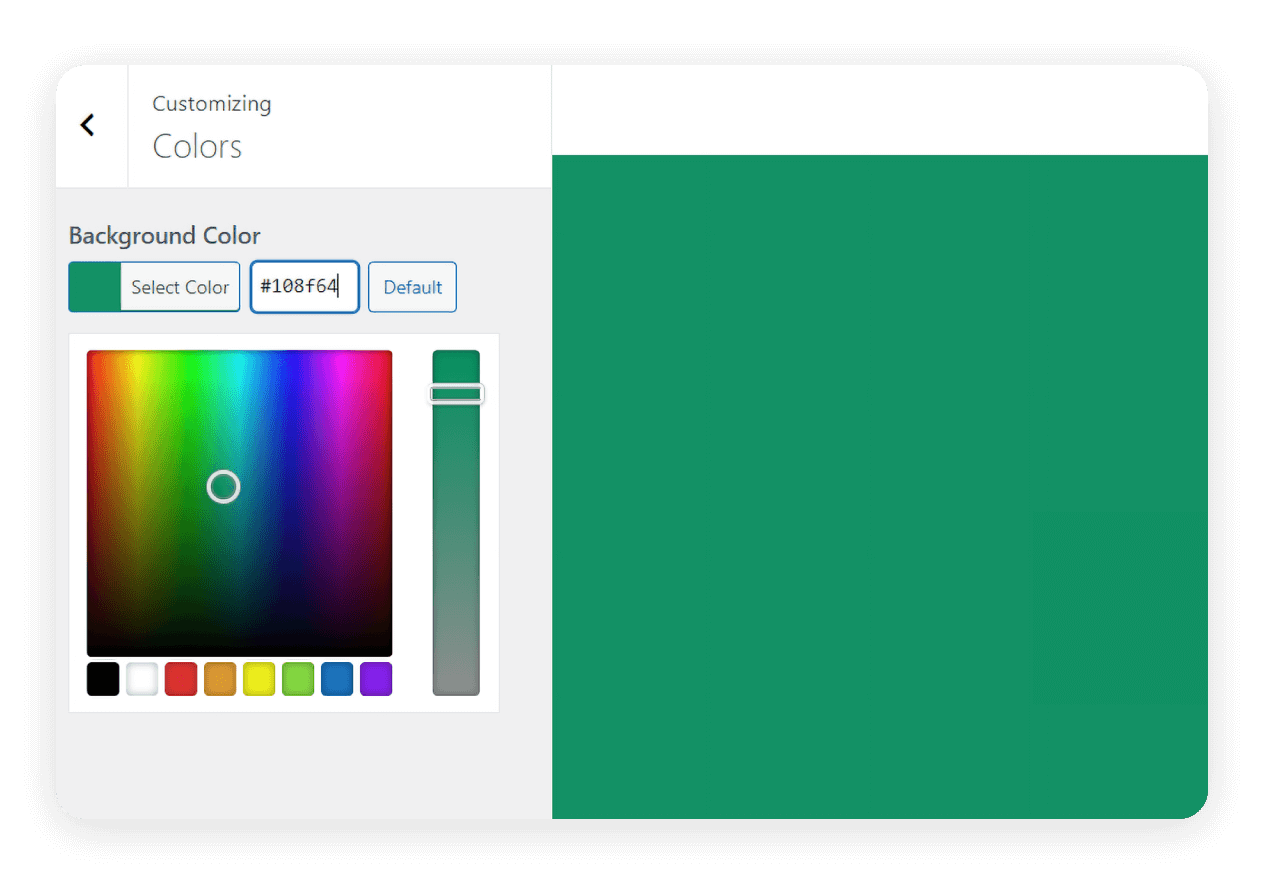
Đi tới Appearance > Customizetrên bảng điều khiển WordPress.
Để thay đổi màu giao diện, hãy sử dụng công cụ chọn màu hoặc thay vào đó dùng mã màu Hex để thay đổi màu nền của bạn.
Tạo menu điều hướng (ví dụ với Twenty Twenty)
Bảng Menus trong WordPress Customizer cho phép bạn dễ dàng thêm nhiều mục menu và sắp xếp lại chúng để phù hợp với phong cách website của mình. Widget cho phép bạn điền nội dung hữu ích vào thanh bên hoặc chân trang như bài viết gần đây, thông tin liên hệ hoặc liên kết mạng xã hội.
Dưới đây là cách tạo menu cho giao diện Twenty Twenty:
Đi tới Appearance > Customizetrên bảng điều khiển WordPress.
Chọn Menus > Create new menu.
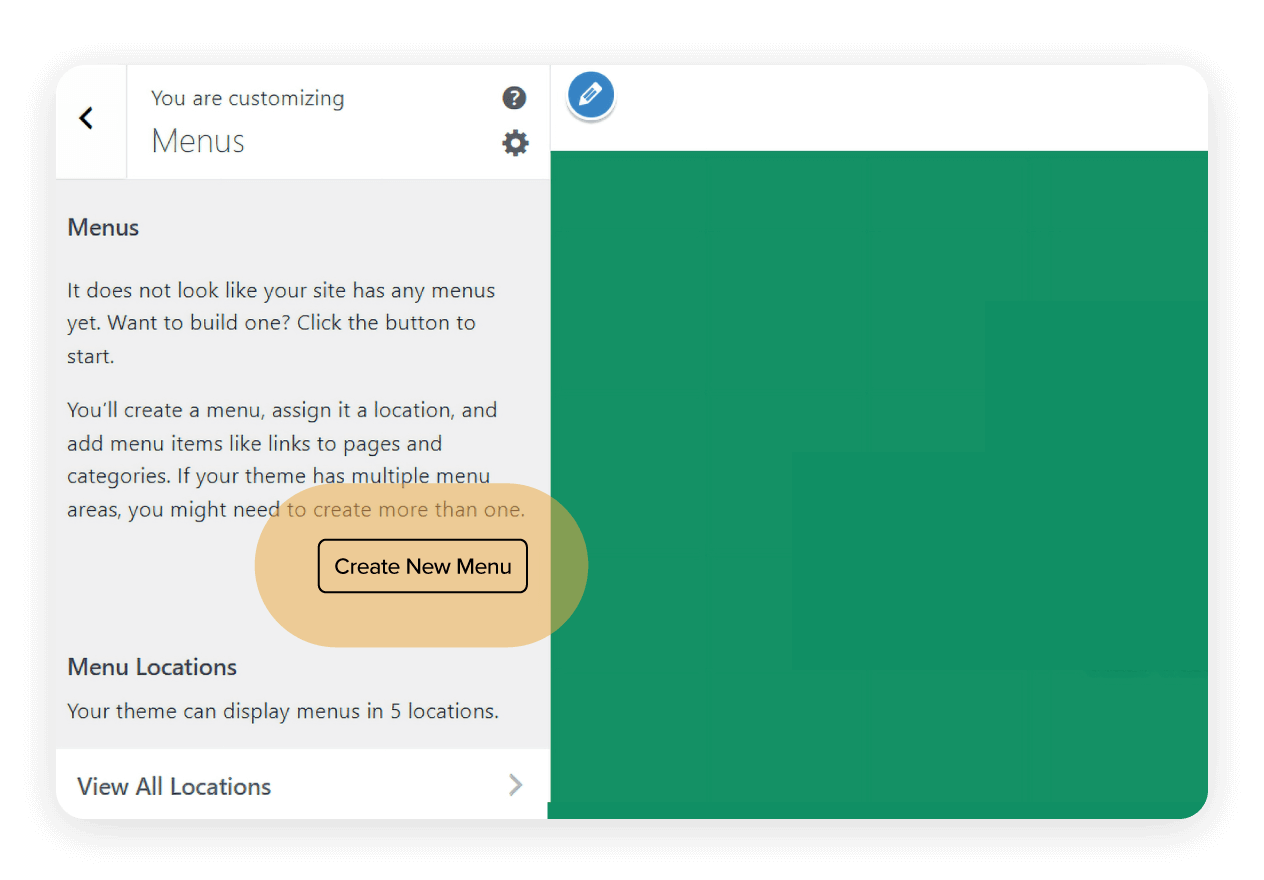
Nhập tên menu của bạn vào mục Menu name.
Tiếp theo, chọn nơi bạn muốn menu xuất hiện bằng cách sử dụng các hộp kiểm. Bạn có thể chọn nhiều vị trí. Chọn Nextkhi bạn đã sẵn sàng tiếp tục.
Bây giờ là lúc bắt đầu thêm mục vào menu của bạn. Chọn Add Items.Một bảng mới sẽ mở ra ở bên phải. Tại đây, bạn có thể thêm liên kết tùy chỉnh, bài viết, trang, danh mục, thẻ và các mục menu.
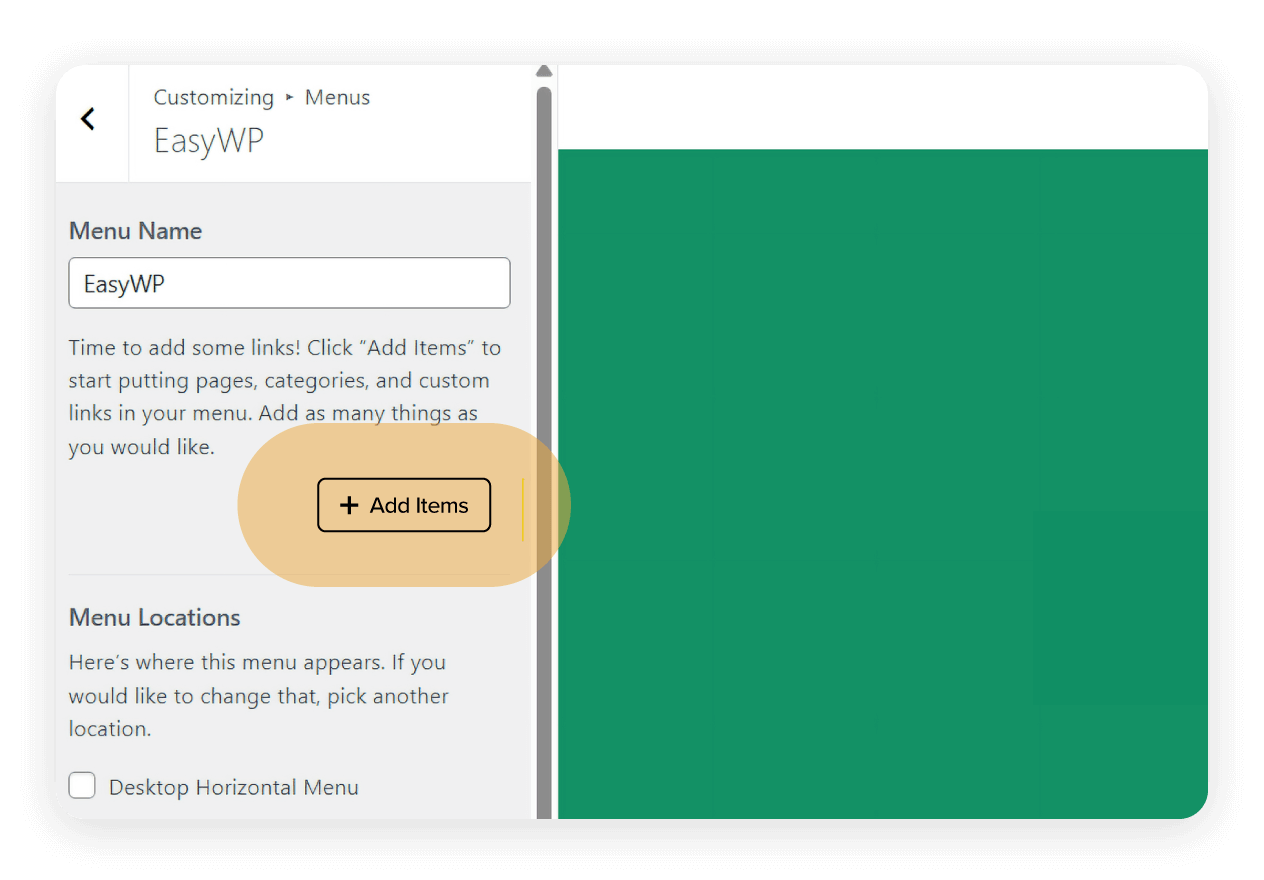
Giờ đây bạn có thể bắt đầu chọn những mục mình muốn đưa vào menu mới. Việc chọn một mục trong phần Pages sẽ biến dấu cộng thành dấu tích. Bạn có thấy các mục bắt đầu xuất hiện dưới Menu Name không?
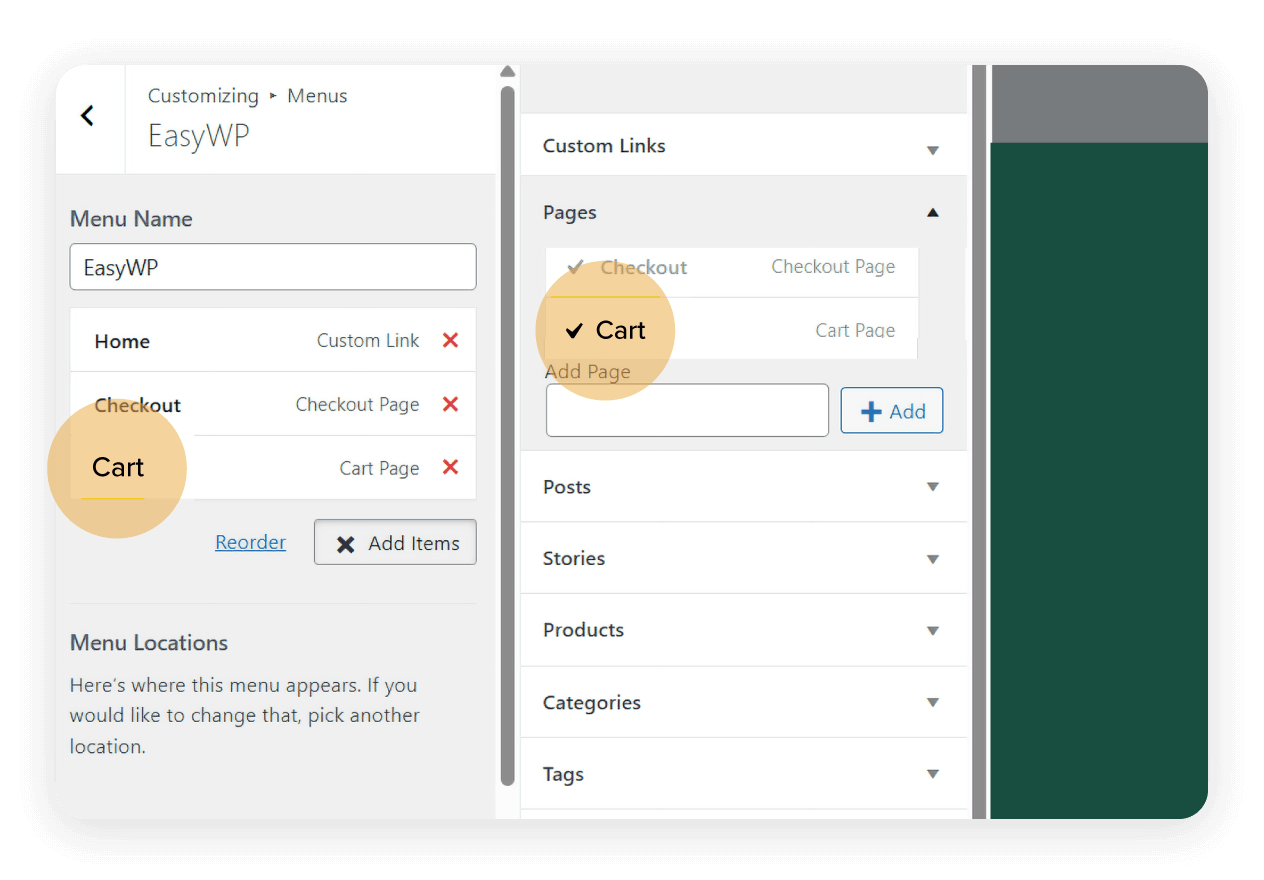
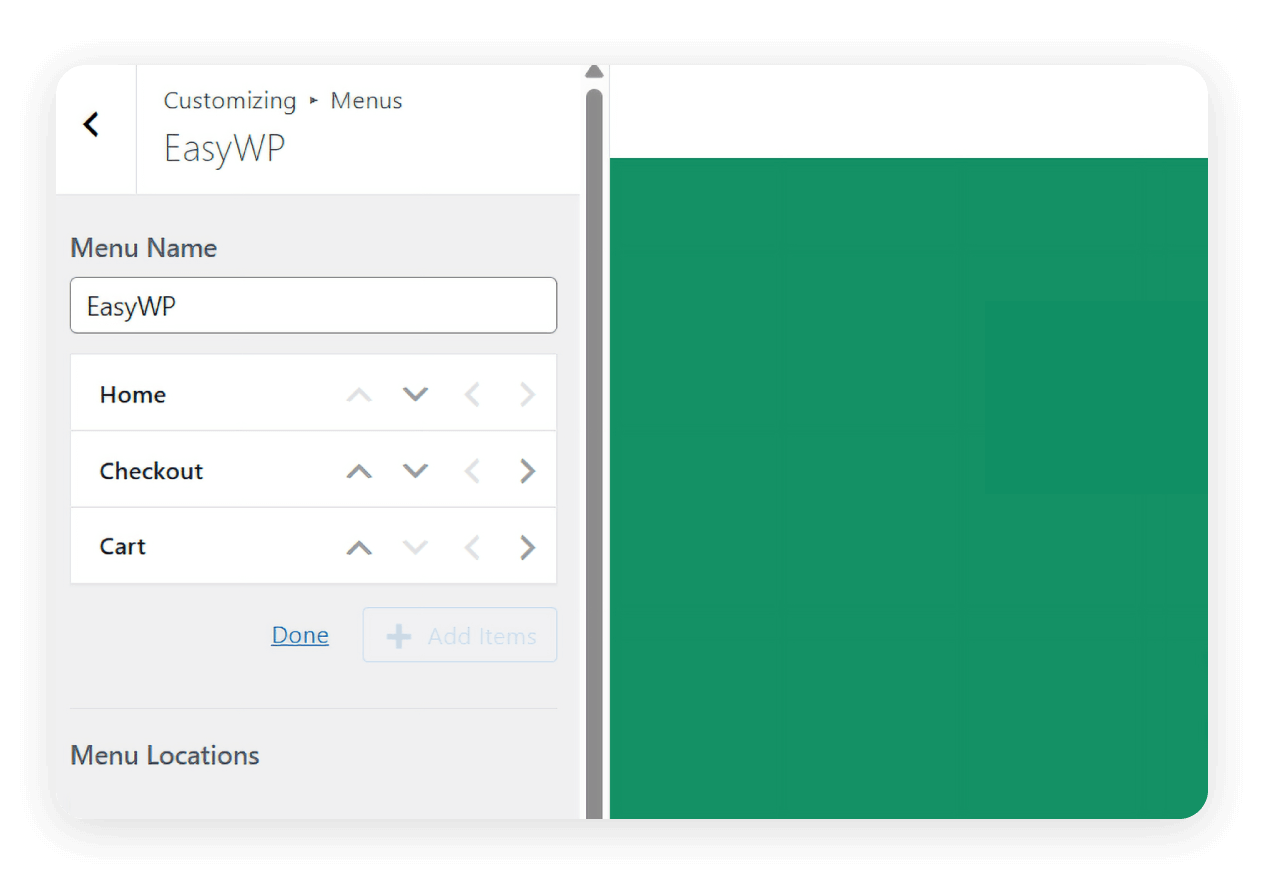
Bạn có thể sắp xếp lại các mục menu bằng cách chọn Reorder. Hộp sẽ thay đổi để hiển thị một số mũi tên. Các mũi tên dọc thay đổi thứ tự xuất hiện của các mục menu, trong khi các mũi tên ngang biến một mục menu thành mục menu con. Hãy tự thử để xem cách hoạt động. Hãy nhớ rằng bạn có thể xem các thay đổi của mình được phản ánh theo thời gian thực bằng cửa sổ xem trước trực tiếp.
Tùy chỉnh trang chủ của bạn thành trang đích
Cài đặt hiển thị trang chủ cho phép bạn quyết định có hiển thị các bài viết mới nhất hay sử dụng một trang tĩnh làm trang đầu. Điều này đặc biệt hữu ích nếu bạn đangtạo website doanh nghiệp hoặc trang đích trên WordPress.
Dưới đây là cách thay đổi trang chủ để hiển thị một trang tĩnh thay vì các bài blog mới nhất:
Đi tới Appearance > Customizetrên bảng điều khiển WordPress.
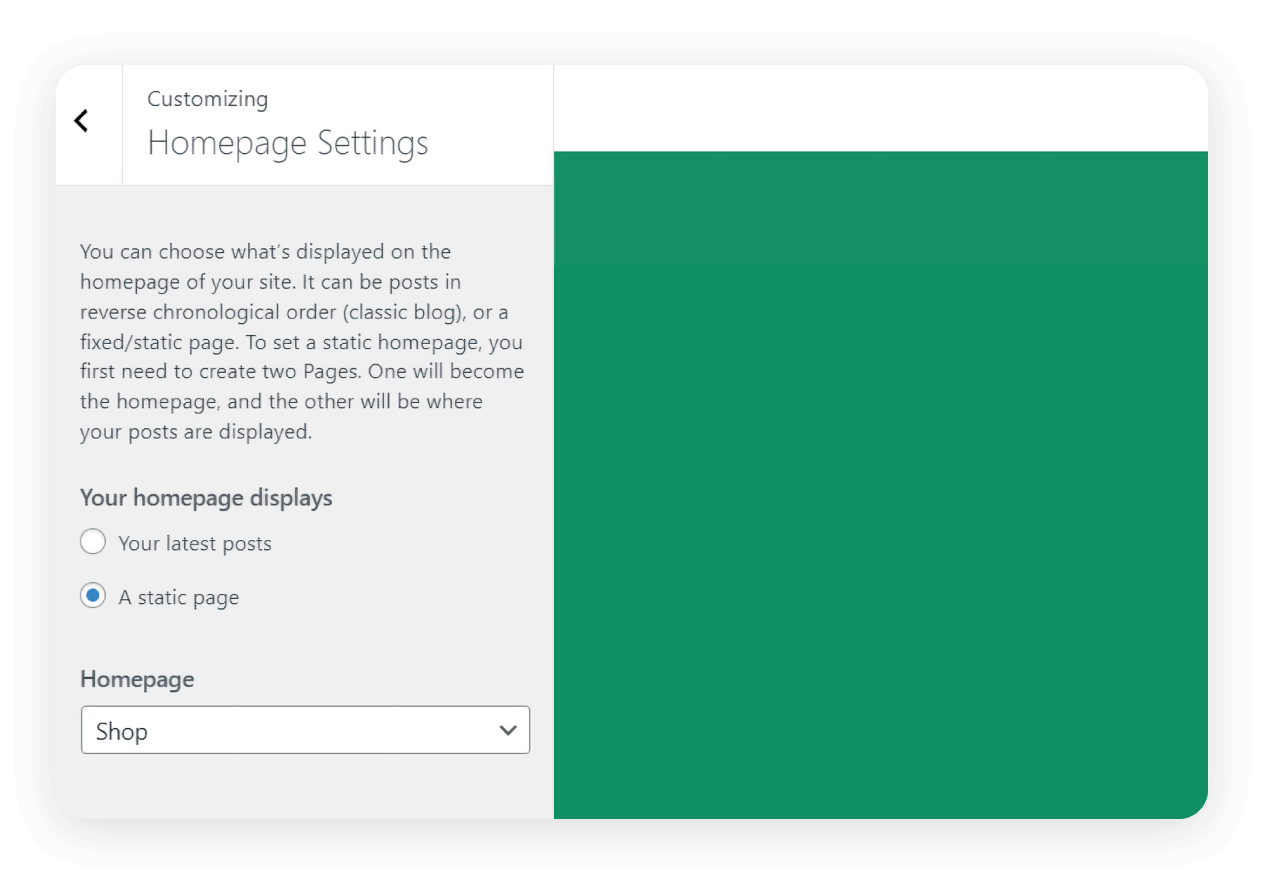
Chọn Homepage settings.
Trong phần Your homepage displays, chọn nút radio A static page.
Đừng quên tính năng xem trước trực tiếp
Có lẽ tính năng hữu ích nhất là xem trước trực tiếp. Khi bạn thực hiện thay đổi, bạn có thể thấy chúng sẽ trông như thế nào theo thời gian thực. Điều này cho phép thử nghiệm và lặp lại mà không có rủi ro.
Customizer là bước khởi đầu tuyệt vời cho người mới bắt đầu. Nó trực quan, an toàn với giao diện và cho phép bạn thực hiện những điều chỉnh thiết yếu có tác động ngay lập tức đến giao diện và cảm nhận của trang web.
Chỉnh sửa giao diện WordPress bằng trình dựng trang hoặc block
Bạn đang tìm kiếm nhiều tự do sáng tạo hơn? Trình dựng trang WordPress cho phép bạn thiết kế trang web bằng các công cụ kéo và thả. Linh hoạt hơn WordPress Customizer tiêu chuẩn, chúng thường hoạt động tốt với các giao diện phổ biến.
Một trong những trình dựng được sử dụng rộng rãi nhất là Elementor. Nổi tiếng với giao diện trực quan và khả năng thiết kế chuyên sâu, Elementor cho phép bạn tùy chỉnh bố cục đến từng pixel, chèn widget động và thậm chí tạo hoạt ảnh mà không cần đụng đến mã.
Brizy Website Builder là một lựa chọn tuyệt vời khác, đặc biệt nếu tốc độ và sự đơn giản là ưu tiên của bạn. Giao diện của nó hiện đại và thân thiện với người dùng, rất lý tưởng cho những ai muốn có các tùy chọn thiết kế mạnh mẽ mà không phức tạp.
Ngoài ra còn có Gutenberg, trình chỉnh sửa block mặc định của WordPress. Dù có thể không giàu tính năng như Elementor, nó vẫn cung cấp một cách nhẹ nhàng để xây dựng bố cục tùy chỉnh bằng các block nội dung. Mỗi đoạn văn, hình ảnh, nút bấm hoặc trích dẫn đều trở thành một block có thể kéo thả để bạn sắp xếp theo nhu cầu.
Trình dựng trang rất hữu ích khi bạn muốn vượt ra ngoài những gì giao diện của mình cho phép. Ví dụ, khi bạn đang xây dựng trang đích, phễu bán hàng hoặc trang chủ tùy chỉnh — bạn có thể thử nghiệm với cấu trúc, phong cách và vị trí nội dung.
Khả năng tái sử dụng cũng là một điểm cộng lớn của trình dựng trang. Bạn có thể lưu block hoặc phần và tái sử dụng chúng trên nhiều trang, giúp tiết kiệm thời gian và tạo sự nhất quán.
Chỉnh sửa tệp (để tùy chỉnh giao diện nâng cao)
Một lời cảnh báo
Khi Customizer và trình dựng trang không thể mang lại mức độ kiểm soát bạn cần, có lẽ đã đến lúc đi sâu vào chính các tệp giao diện. Cách tiếp cận này nâng cao hơn và đi kèm rủi ro, vì vậy điều quan trọng là phải tiến hành cẩn thận.
Việc chỉnh sửa trực tiếp các tệp giao diện của bạn có thể có vẻ là cách nhanh nhất để thực hiện thay đổi, nhưng hiếm khi là cách an toàn nhất. Khi giao diện của bạn cập nhật, mọi thay đổi bạn đã thực hiện trực tiếp trên các tệp cốt lõi của nó sẽ bị ghi đè.
Đó là lý do vì sao việc chỉnh sửa tệp giao diện theo cách này chỉ phù hợp hơn với những người dùng WordPress có kinh nghiệm.
Child theme là gì?
Child theme là một giao diện riêng biệt kế thừa chức năng và kiểu dáng của một giao diện khác, được gọi là parent. Bằng cách tạo child theme, bạn có thể thay đổi mẫu, kiểu và chức năng mà không cần chạm vào giao diện parent.
Để thiết lập child theme, bạn có thể tạo thủ công một thư mục giao diện mới trong thư mục wp-content/themes. Thư mục này nên bao gồm ít nhất hai tệp: style.css (có tham chiếu đến giao diện parent) và functions.php(để nạp stylesheet của giao diện parent). Nếu bạn không thấy thoải mái với quy trình này, các plugin như Child Theme Configurator sẽ đơn giản hóa đáng kể.
Khi child theme của bạn được kích hoạt, bạn có thể an toàn thêm CSS tùy chỉnh, ghi đè các tệp mẫu hoặc thậm chí viết các hàm PHP tùy chỉnh. Những thay đổi này sẽ vẫn được giữ nguyên ngay cả khi giao diện parent cập nhật.
Chỉnh sửa tệp giao diện cho phép tùy chỉnh giao diện ở mức chi tiết nhất — nhưng cũng nguy hiểm nhất nếu thực hiện bất cẩn. Điều này đưa chúng ta đến với các mẹo tùy chỉnh WordPress.
Mẹo tùy chỉnh WordPress ngắn gọn
Dù bạn đang kéo thả block, chỉnh sửa kiểu hay viết mã — việc bảo vệ dự án của bạn nên là ưu tiên số một. Chúng tôi đã tổng hợp một số mẹo ngắn gọn để giảm khả năng xảy ra sự cố.
1. Sao lưu trang web của bạn
Quy tắc đầu tiên là sao lưu trang web của bạn. Trước khi thực hiện bất kỳ thay đổi lớn nào, hãy đảm bảo bạn có một bản sao lưu gần đây. Hãy cân nhắc chọn cloud hosting cho WordPress cho phép bạn dễ dàng tạo bản sao lưu mới và xem các bản cũ từ một bảng điều khiển tập trung.
2. Làm việc với môi trường staging
Tiếp theo, hãy cân nhắc làm việc trong môi trường staging. Trang staging là bản sao của trang đang hoạt động, nơi bạn có thể thử nghiệm thay đổi mà không ảnh hưởng đến khách truy cập. Điều này đặc biệt quan trọng đối với các chỉnh sửa phức tạp liên quan đến mã tùy chỉnh hoặc thay đổi lớn về bố cục.
3. Ưu tiên cách tiếp cận mobile first
Việc kiểm thử trên nhiều trình duyệt và thiết bị thường bị bỏ qua. Các tùy chỉnh có thể trông rất đẹp trên laptop của bạn nhưng lại lỗi trên thiết bị di động. Hãy luôn kiểm tra trên nhiều kích thước màn hình và trình duyệt để đảm bảo tính nhất quán.
4. Theo dõi những gì bạn đã làm
Việc ghi lại các thay đổi của bạn có thể giúp tiết kiệm hàng giờ khắc phục sự cố về sau. Dù bạn đang chỉnh sửa CSS hay sắp xếp lại widget, việc ghi chú bạn đã thay đổi gì và khi nào có thể giúp lần ra lỗi hoặc tái tạo thành công.
Khi nào nên dùng từng phương pháp tùy chỉnh
Các phương pháp tùy chỉnh giao diện khác nhau phù hợp với những nhu cầu, trình độ kỹ năng và mục tiêu khác nhau. Dưới đây là tổng quan đơn giản để giúp bạn quyết định:
|
Tùy chỉnh an toàn theo ý muốn của bạn

Việc chỉnh sửa giao diện WordPress không nhất thiết phải đáng sợ hay tốn thời gian. Với hiểu biết rõ ràng về WordPress Customizer, trình dựng trang và cả các phương pháp nâng cao như child theme, bạn có thể xây dựng một trang web trông và hoạt động đúng như mong muốn.
Hãy nhớ: những thay đổi nhỏ có thể tạo ra tác động lớn. Dù bạn đang cập nhật logo, thay đổi bố cục hay xây dựng lại trang chủ từ đầu, mỗi điều chỉnh đều là một bước tiến tới một trang web thực sự phản ánh thương hiệu của bạn.Nếu bạn đang xây dựng một website WordPress tùy chỉnh, việc chọn cloud hosting cho WordPress với các tính năng sao lưu dễ dùng sẽ mang lại sự an tâm tối đa. Với cập nhật tự động, bảo vệ tích hợp và bảng điều khiển tất cả trong một, bạn có thể tập trung vào việc tùy chỉnh trang web của mình một cách an toàn để hoàn toàn phù hợp với thương hiệu.
Câu hỏi thường gặp
Phương pháp an toàn nhất là sử dụng child theme. Cách này giúp giữ các tùy chỉnh của bạn tách biệt với các tệp giao diện chính, vì vậy các bản cập nhật sẽ không xóa mất công sức của bạn.
Trước tiên, hãy làm theo hướng dẫn của chúng tôi để biết các mẹo tùy chỉnh an toàn. Nếu bạn đã tạo bản sao lưu, bạn có thể sử dụng tính năng khôi phục hoặc dùng môi trường staging của mình để khắc phục sự cố. Chúng tôi khuyên bạn nên chọn nhà cung cấp WordPress cloud hosting có công cụ sao lưu và khôi phục dễ sử dụng.
Có, điều đó có thể xảy ra. Việc tùy chỉnh hiệu quả có thể cải thiện UX (trải nghiệm người dùng), tốc độ tải trang và cấu trúc. Tuy nhiên, tùy chỉnh kém, đặc biệt nếu làm hỏng khả năng sử dụng trên thiết bị di động, có thể làm giảm thứ hạng của bạn trên Google.

Bài viết đề xuất



Chia sẻ suy nghĩ của bạn