How to manage website scripts with Softaculous
Softaculous is a built-in script installer available in Spaceship’s Hosting cPanel. It allows you to quickly install and manage popular CMSs (Content Management Systems) such as WordPress, Joomla, Magento, and many others.
Beyond quick installations, Softaculous provides a full set of tools for maintaining and updating your websites. Spending a few minutes getting familiar with its features can help you manage your installations more effectively.
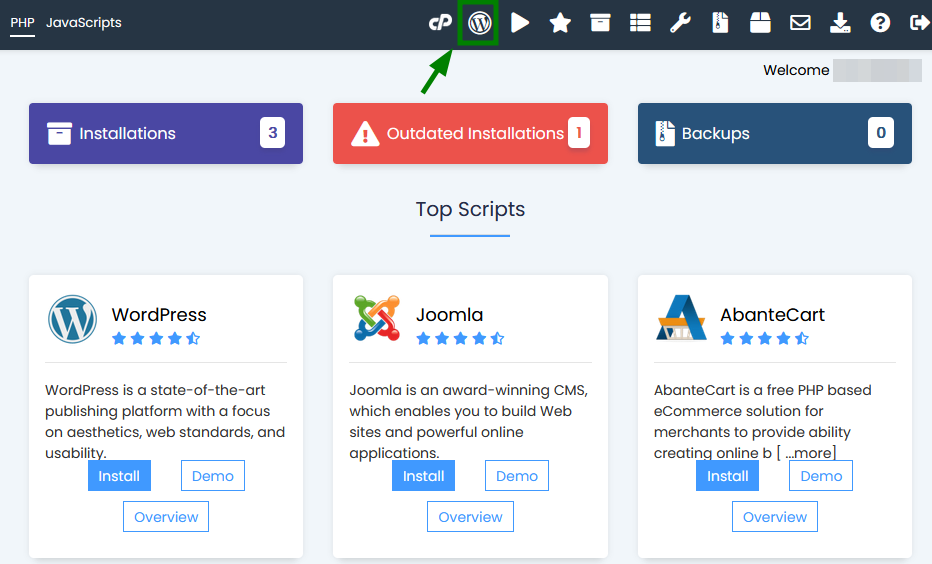
To access Softaculous, log in to your cPanel and navigate to the Exclusive section, then open Softaculous Apps Installer. Or go to the preferred CMS from the Softaculous Apps Installer menu right away:
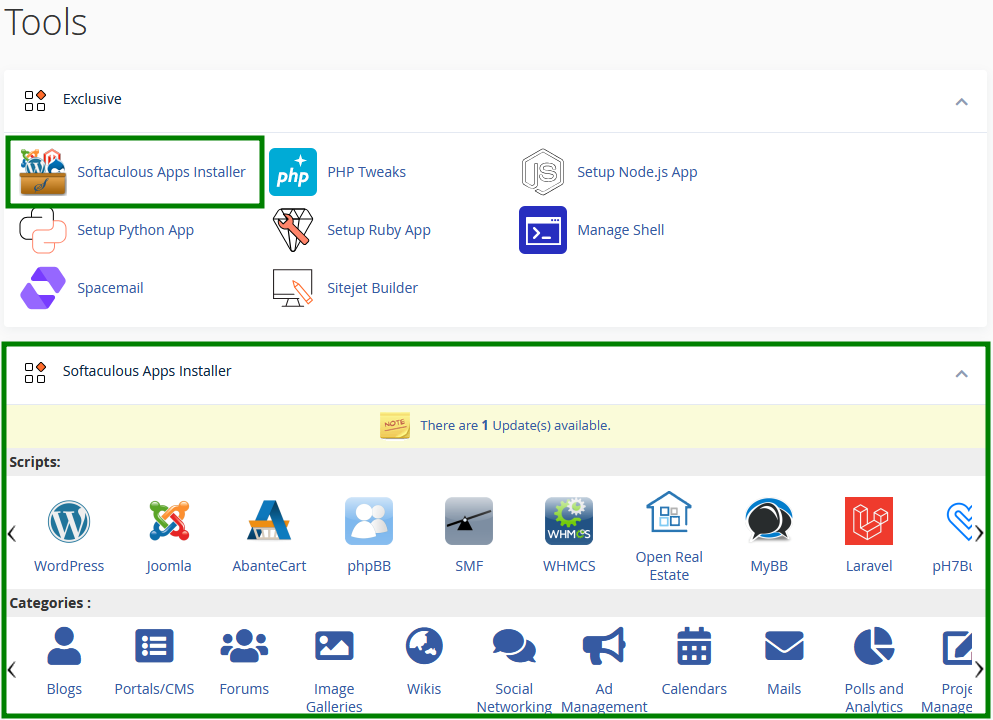
From there, you can manage your scripts using the available options, including:
Installing new software
Importing installations
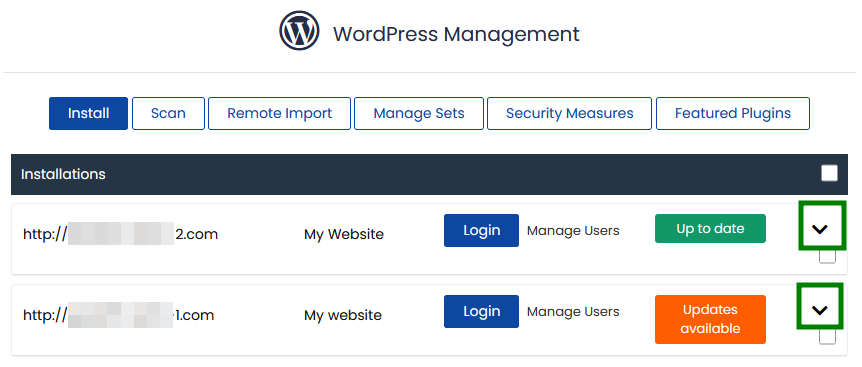
Managing WordPress sites via WordPress Manager
Configuring automatic backups and auto-updates
Creating backups
Restoring websites from backups
Updating installed scripts
Cloning existing installations
Creating and managing staging environments
Creating installation templates
Removing scripts
Install new software
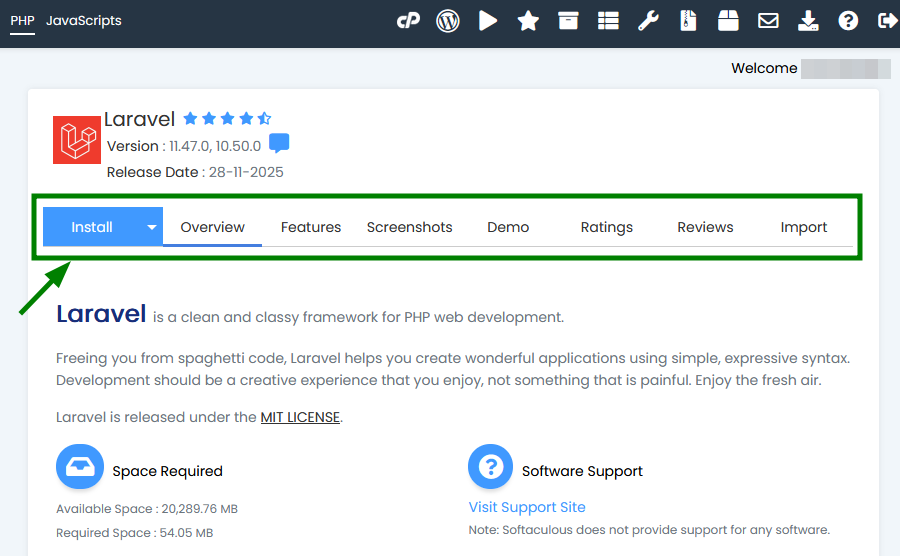
In the left-hand sidebar, you’ll find a list of available apps grouped into categories such as Blogs, E-Commerce, and others. You can browse these categories or use the Search field to quickly find a CMS that fits your needs. Also, you can select a CMS from the Top Scripts section on the main page:

After selecting an application, click its icon to open the overview page. It provides useful information about the software, including a brief description, key features, user ratings, reviews, and a demo. Click Install to begin the installation process:
On the next page, you will need to fill out the details of your installation:
Choose the domain where you want to install the CMS.
In the In Directory field, specify the folder for the installation. By default, this field is empty, which installs the application directly on yourdomain.tld. To install it in a subfolder (for example, yourdomain.tld/blog), enter the folder name (e.g., blog).
Select the software version you want to install.
Creation of an admin account may also be needed for some CMS.
Optional: In Advanced Options, you can set the Database Name, enable auto-backups, and auto-upgrades:
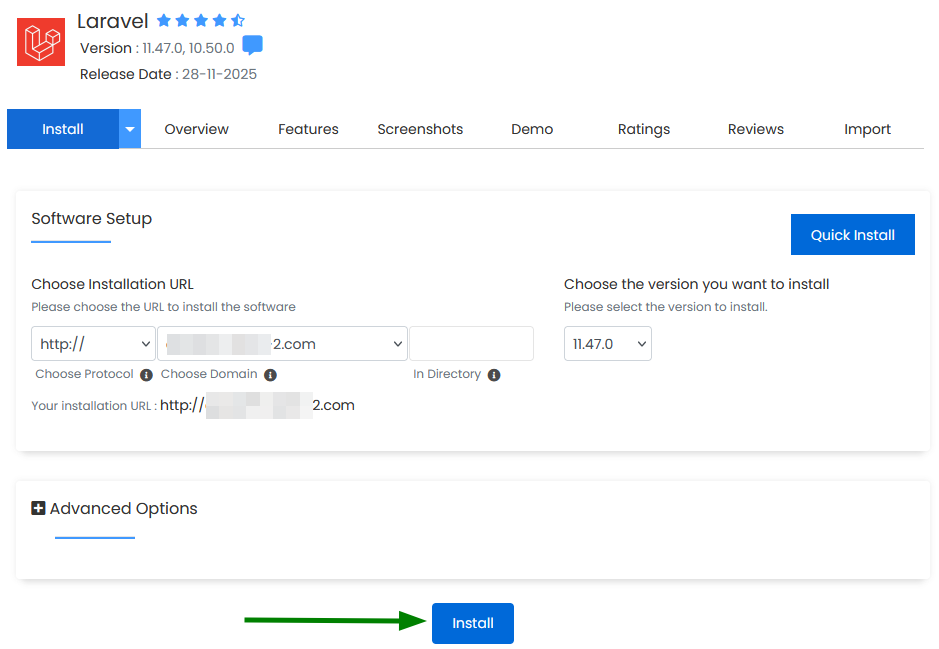
Once all required fields are filled in, click Install to proceed. After a few moments, you’ll see a confirmation message indicating that your CMS has been successfully installed.
Import an installation
If your website uses a CMS that is supported by Softaculous, but the application was installed manually or via a different installer, you can add it to Softaculous by importing the existing installation.
Before you begin, make sure you know which script is installed (for example, WordPress, PrestaShop, etc.) and where the website is currently hosted.
To import an existing installation, follow these steps:
Locate the required script using the Search field or browse the available categories.
Click the script name to open its overview page, then switch to the Import tab.
Now, Softaculous offers two options depending on the location of your website:
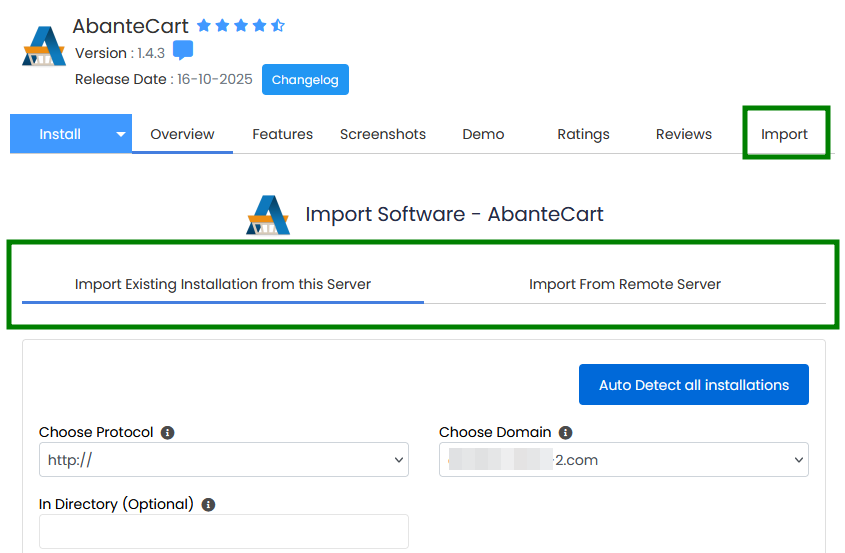
• Import Existing Installation from This Server
Select the domain name from the drop-down list and specify the directory where the application is installed.
If the application is installed in the root directory (for example, yourdomain.tld), leave the In Directory field empty.
If it is installed in a subfolder (for example, yourdomain.tld/wordpress), enter the folder name (e.g., wordpress).
Click Import to start the process.
Tip: Use Auto Detect all installations to scan for supported CMS installations across all domains and directories. Any detected installations can then be added to Softaculous without specifying each location manually, making it easier to register multiple existing websites at once.
• Import From Remote Server
Here, provide FTP connection details for the remote server additionally (such as domain name, server host, protocol, port, FTP username, password, and FTP path). Softaculous will then copy the website files and database to the current server and automatically add the installation.
If the import is successful, you’ll see a confirmation message indicating that the installation has been added to Softaculous.
WordPress Manager
WordPress Manager in Softaculous allows you to manage all your WordPress installations from one place without logging in to the WordPress admin dashboard:
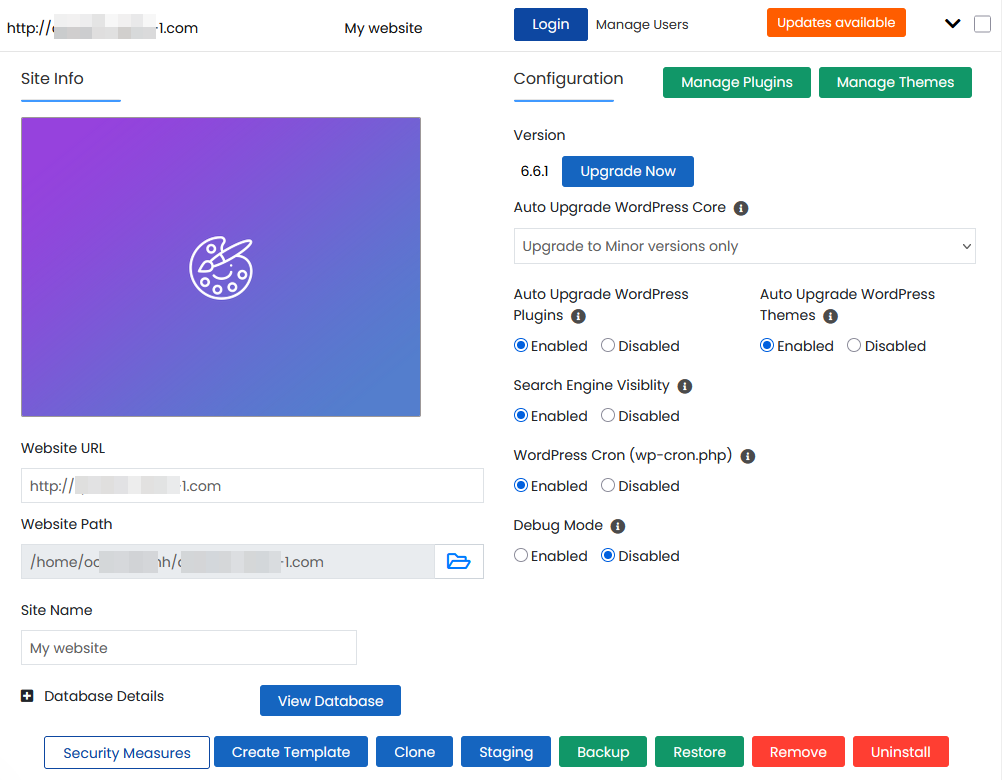
From this section, you can quickly access the dashboard, update the WordPress core, plugins, and themes, adjust update settings, control search engine visibility, enable or disable WordPress cron jobs and debug mode, change site details such as the URL or title, reset admin passwords, and manage installed plugins and themes:
Automatic backups and auto-upgrades
Softaculous lets you configure automatic backups and auto-upgrades during application installation. If these options were not enabled at that stage, you can turn them on later.
To manage automatic backups and updates for an existing installation, follow these steps:
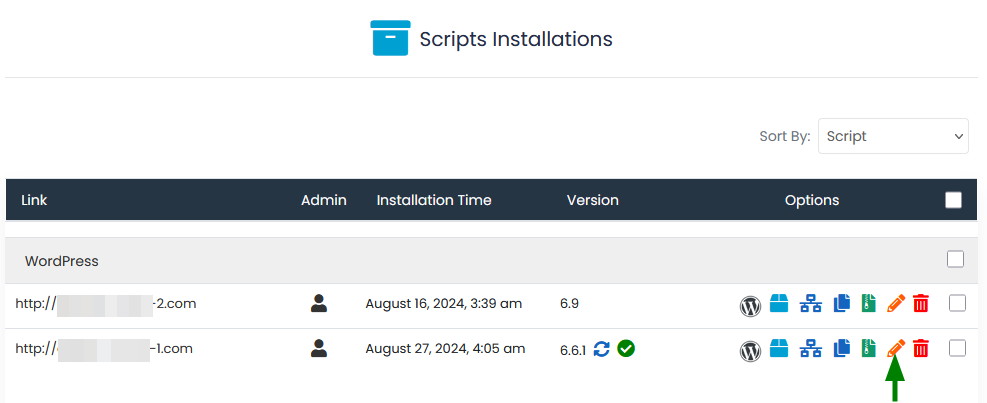
Open the All Installations page in Softaculous:

Locate the required installation and click the Edit icon next to it:
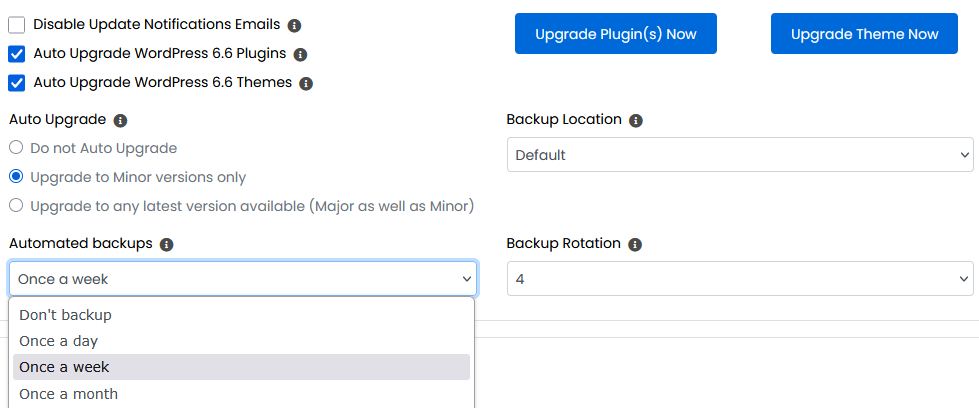
Enable the relevant checkboxes to configure:
Automatic backups
Auto-upgrades for the core, plugins, or themes (depending on the application)
Click Save Installation Details at the bottom of the page to apply the changes.
PLEASE NOTE:
Automatic updates may occasionally fail or cause compatibility issues. To prevent data loss, Softaculous creates a backup of your website before performing an auto-upgrade, allowing you to restore the previous working version if needed.
The Backup Rotation option lets you control how many automatic backup copies are stored for each installation. When the maximum number is reached, the oldest backup is automatically replaced with a new one. Softaculous allows up to 10 backup copies per installation.
To avoid excessive disk usage, it’s recommended to keep the number of stored backups relatively low (for example, 3-4 copies), especially on shared hosting plans.
Automatic backups are stored on the server for a limited time (up to 28 days). After this period, older backups are removed automatically. If you need to keep backups for a longer period, we recommend downloading them to your local device or to an external storage device.
Creating backups
Softaculous makes it easy to create a backup of your website installation at any time.
To generate a backup, follow these steps:
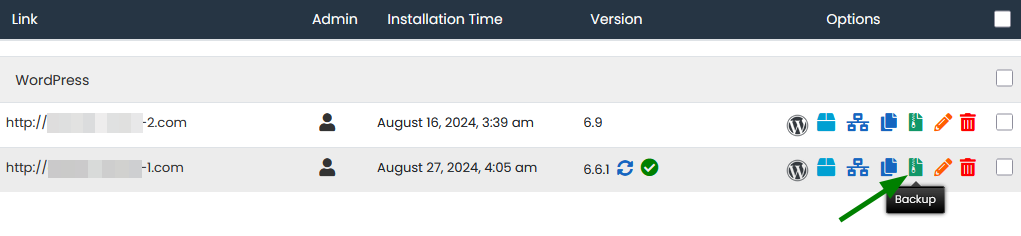
Open the All Installations section in Softaculous.
Locate the required installation and click the Backup icon next to it:
Choose what you would like to back up:
The entire installation
Database only
Files only
You can also add a short note to the backup, select the backup location, and review general information about the installation: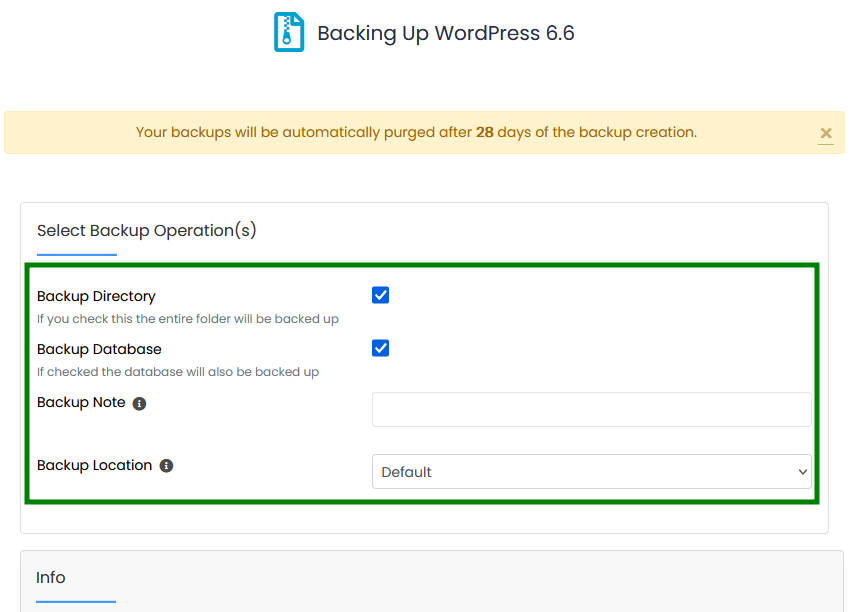
Click Backup Installation at the bottom of the page to start the backup process.
Once completed, the backup will be available for download or restoration through Softaculous.
Restoring backups
Restoring a backup lets you roll your website back to a previous working state using a Softaculous backup.
To restore a website from a backup, follow these steps:
Open the Backups and Restore section in Softaculous:

You’ll see a list of all available backups for your installations. From here, you can:
Restore a backup
Download a backup
Delete a backup
If a note was added during backup creation, you can view it by hovering over the notepad icon.Click the Restore icon

next to the required backup. You’ll be prompted to choose what to restore:
Database only
Directory (files) only
Both files and the database
Once the desired options are selected, click Restore Installation to start the process:

Upgrade software
Softaculous allows you to update installed applications with just a few clicks. If automatic updates are not enabled for your installation, you can perform a manual upgrade at any time.
To upgrade an app, follow these steps:
Open All Installations in Softaculous.
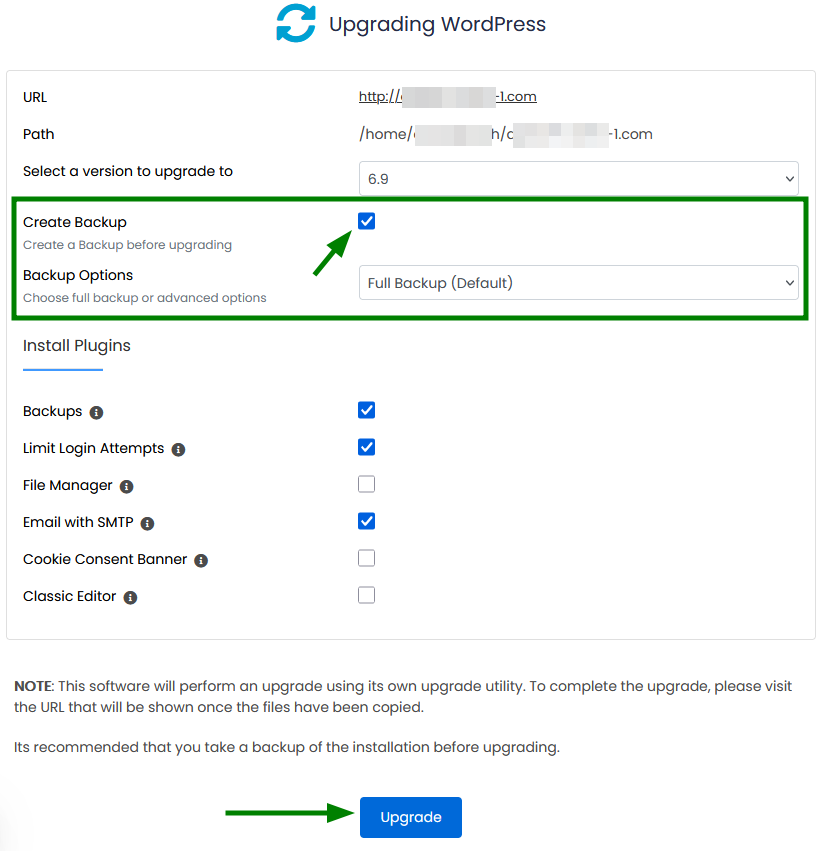
If a newer version of the CMS is available, an Upgrade icon

will appear next to the current version. Click this icon to continue.
On the next screen, make sure the Create Backup option is enabled. This step is strongly recommended, as updates may occasionally cause compatibility issues or affect website functionality.
Click Upgrade to start the update process:
The upgrade may take a few minutes to complete. Once finished, you’ll see a confirmation message. After the upgrade, we recommend checking your website to ensure everything is working as expected.
If the website does not function correctly after the update, you can restore the previous version from the backup using the steps described in the Restoring backups section.
Installation cloning
The Clone feature in Softaculous lets you copy an existing application to another directory or to a different domain. This is useful when you need to relocate a website, create a test duplicate, or correct an installation path.
Important:
The Clone option is available only for certain apps. Common CMSs such as WordPress, Joomla, Drupal, PrestaShop, OpenCart, and several others include the Clone option in Softaculous.
After cloning, some links or paths stored in the database may require manual adjustment, as not all values can be updated automatically.
Let’s say WordPress is installed in a subdirectory (e.g., /wp) and you want to move it to the root directory of your domain. For this purpose, you can use the Clone feature.
To clone an installation, follow these steps:
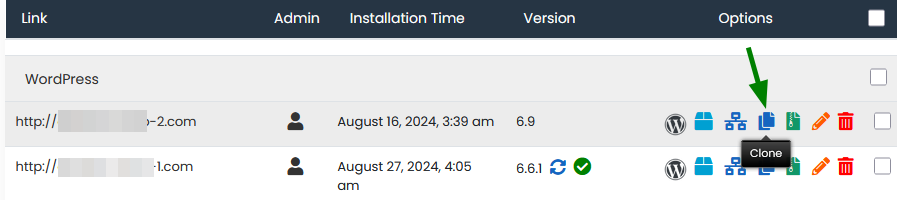
Open All Installations in Softaculous.
Locate the required installation and click the Clone option next to it:
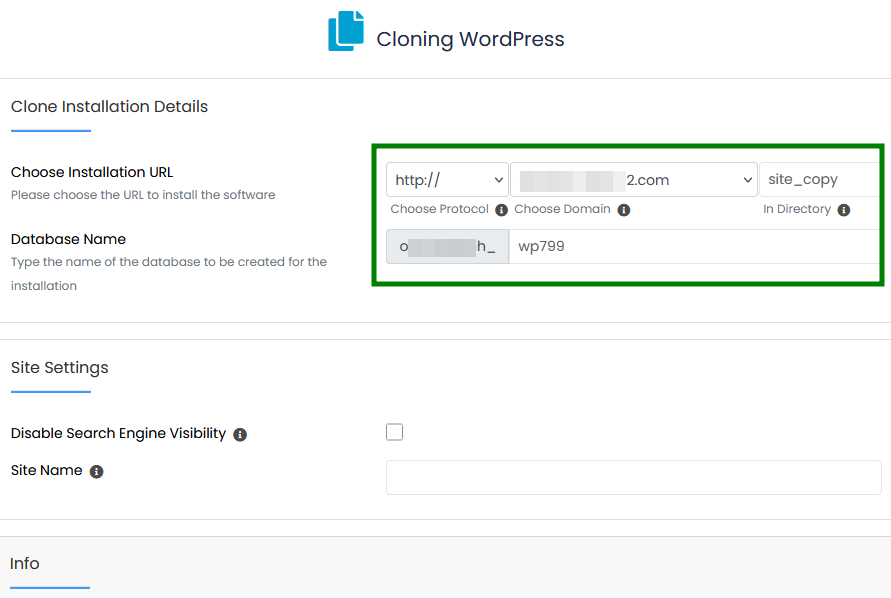
On the next page, review the details of the current installation and configure the clone settings:
Select the destination domain
Specify the In Directory field
Leave this field empty to clone the application to the root directory
Enter a folder name to clone it into a subdirectory
Adjust additional options if needed, such as search engine visibility or the site name:
Click Clone Installation to start the process.
Once completed, the cloned copy will be available at the specified domain or directory.
Create staging
The Create Staging feature allows you to test updates, new plugins, themes, or other changes in a separate environment before applying them to your live website. This helps reduce the risk of breaking a production site.
To create a staging copy of your website, follow these steps:
Open All Installations to view your existing installations.
Locate the installation you want to use and click the Create Staging button

Configure the staging installation details:
Select the protocol
Choose the domain
Specify the directory for the staging site
Set a database name
Additionally, you can Disable Search Engine Visibility (to prevent the site from indexing) and set the Site Name for staging: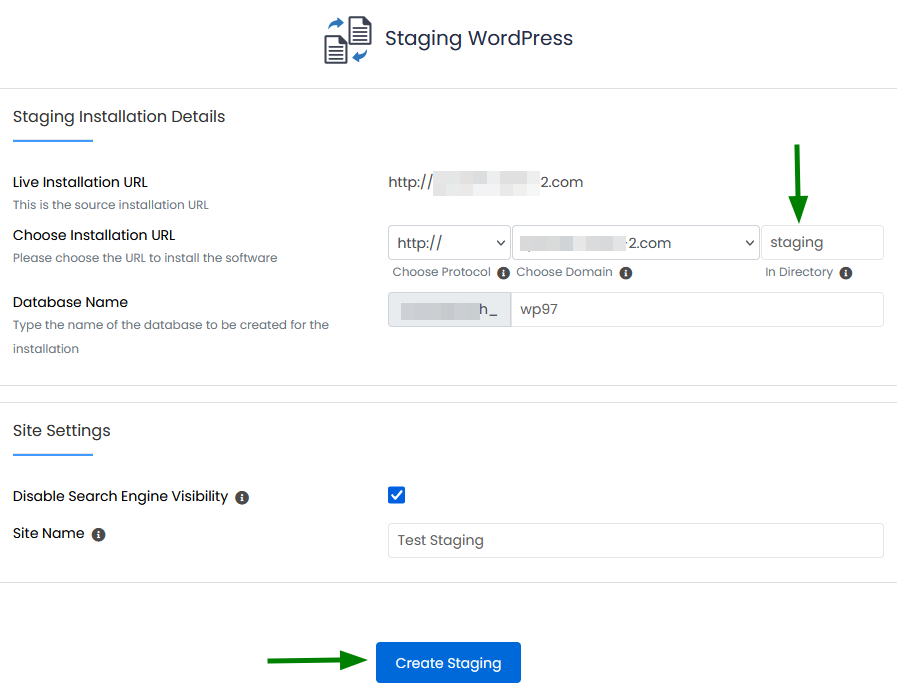
Click Create Staging to begin the process.
Once the staging environment is created, you’ll see the staging website URL along with a link to its admin dashboard:
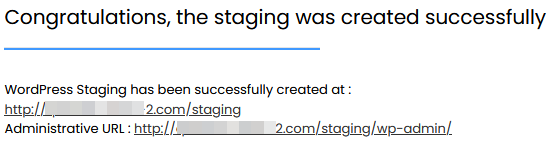
Note: The admin login details for the staging site are the same as those used for the original (live) installation.After testing your changes in the staging environment, you can apply them to the live website. Click the Push to Live button

when you’re ready.
Note: Softaculous automatically creates a backup of the live website each time you use the Push to Live option.Choose how you want to push the changes:
Default Options - replaces all files and database data of the live installation with the staging version.
Customize - allows you to select specific files, database tables, or table data to apply to the live site.

Tip: Unlink this installation from live - this option separates the staging site from the live website. After unlinking, you won’t be able to push changes from staging to live, but both sites will continue to work independently.8. Click Push to Live to start the process. The time required will depend on the size of the website and the selected options. Once completed, the live website will reflect the changes made in the staging environment.
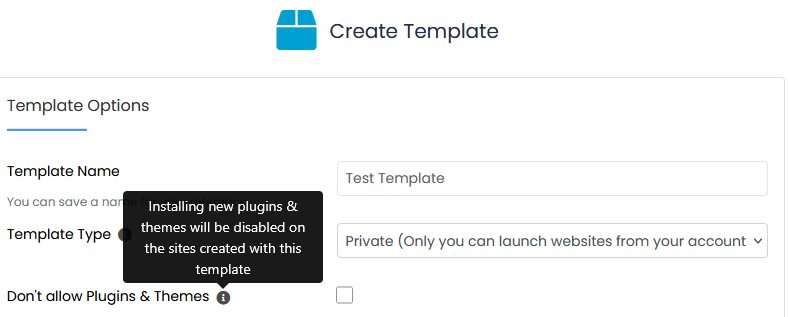
Create template
The Create Template option lets you save an existing installation as a reusable setup. This template can then be used to deploy new installations with the same configuration quickly.
To create a template:
Open All Installations.
Locate the installation you want to use and click Create Template

Set the Template Name, Template Type (private or public), and decide on plugins and themes allowance:
Scroll down and click Create Template to save it.
Once created, the template will be available in the Templates section and can be used when installing new applications.
Remove an installation
To delete an application in Softaculous:
Open All Installations.
Find the installation and click the Remove icon

Select which data to delete (files, database, database user, or all).
Click Remove Installation to confirm.
Note: Removal is permanent. Create a backup first if you may need the data later.