How to migrate my emails to Spacemail?
Want to migrate business email? There are two ways to migrate your emails to Spacemail: using our Migration tool or a third-party email client.
The Migration tool allows transferring emails via the IMAP protocol, no backup files are needed.
Transferring via third-party email clients is done by connecting your mailbox to an email client like Outlook or Thunderbird and performing the transfer using their interface.
Transferring emails with the Spacemail Migration tool
Once you’ve unboxed your subscription and created the mailbox for migration, log in to Spacemail webmail, go to Settings > Email migration section, and click Migrate to Spacemail.

Fill in the details
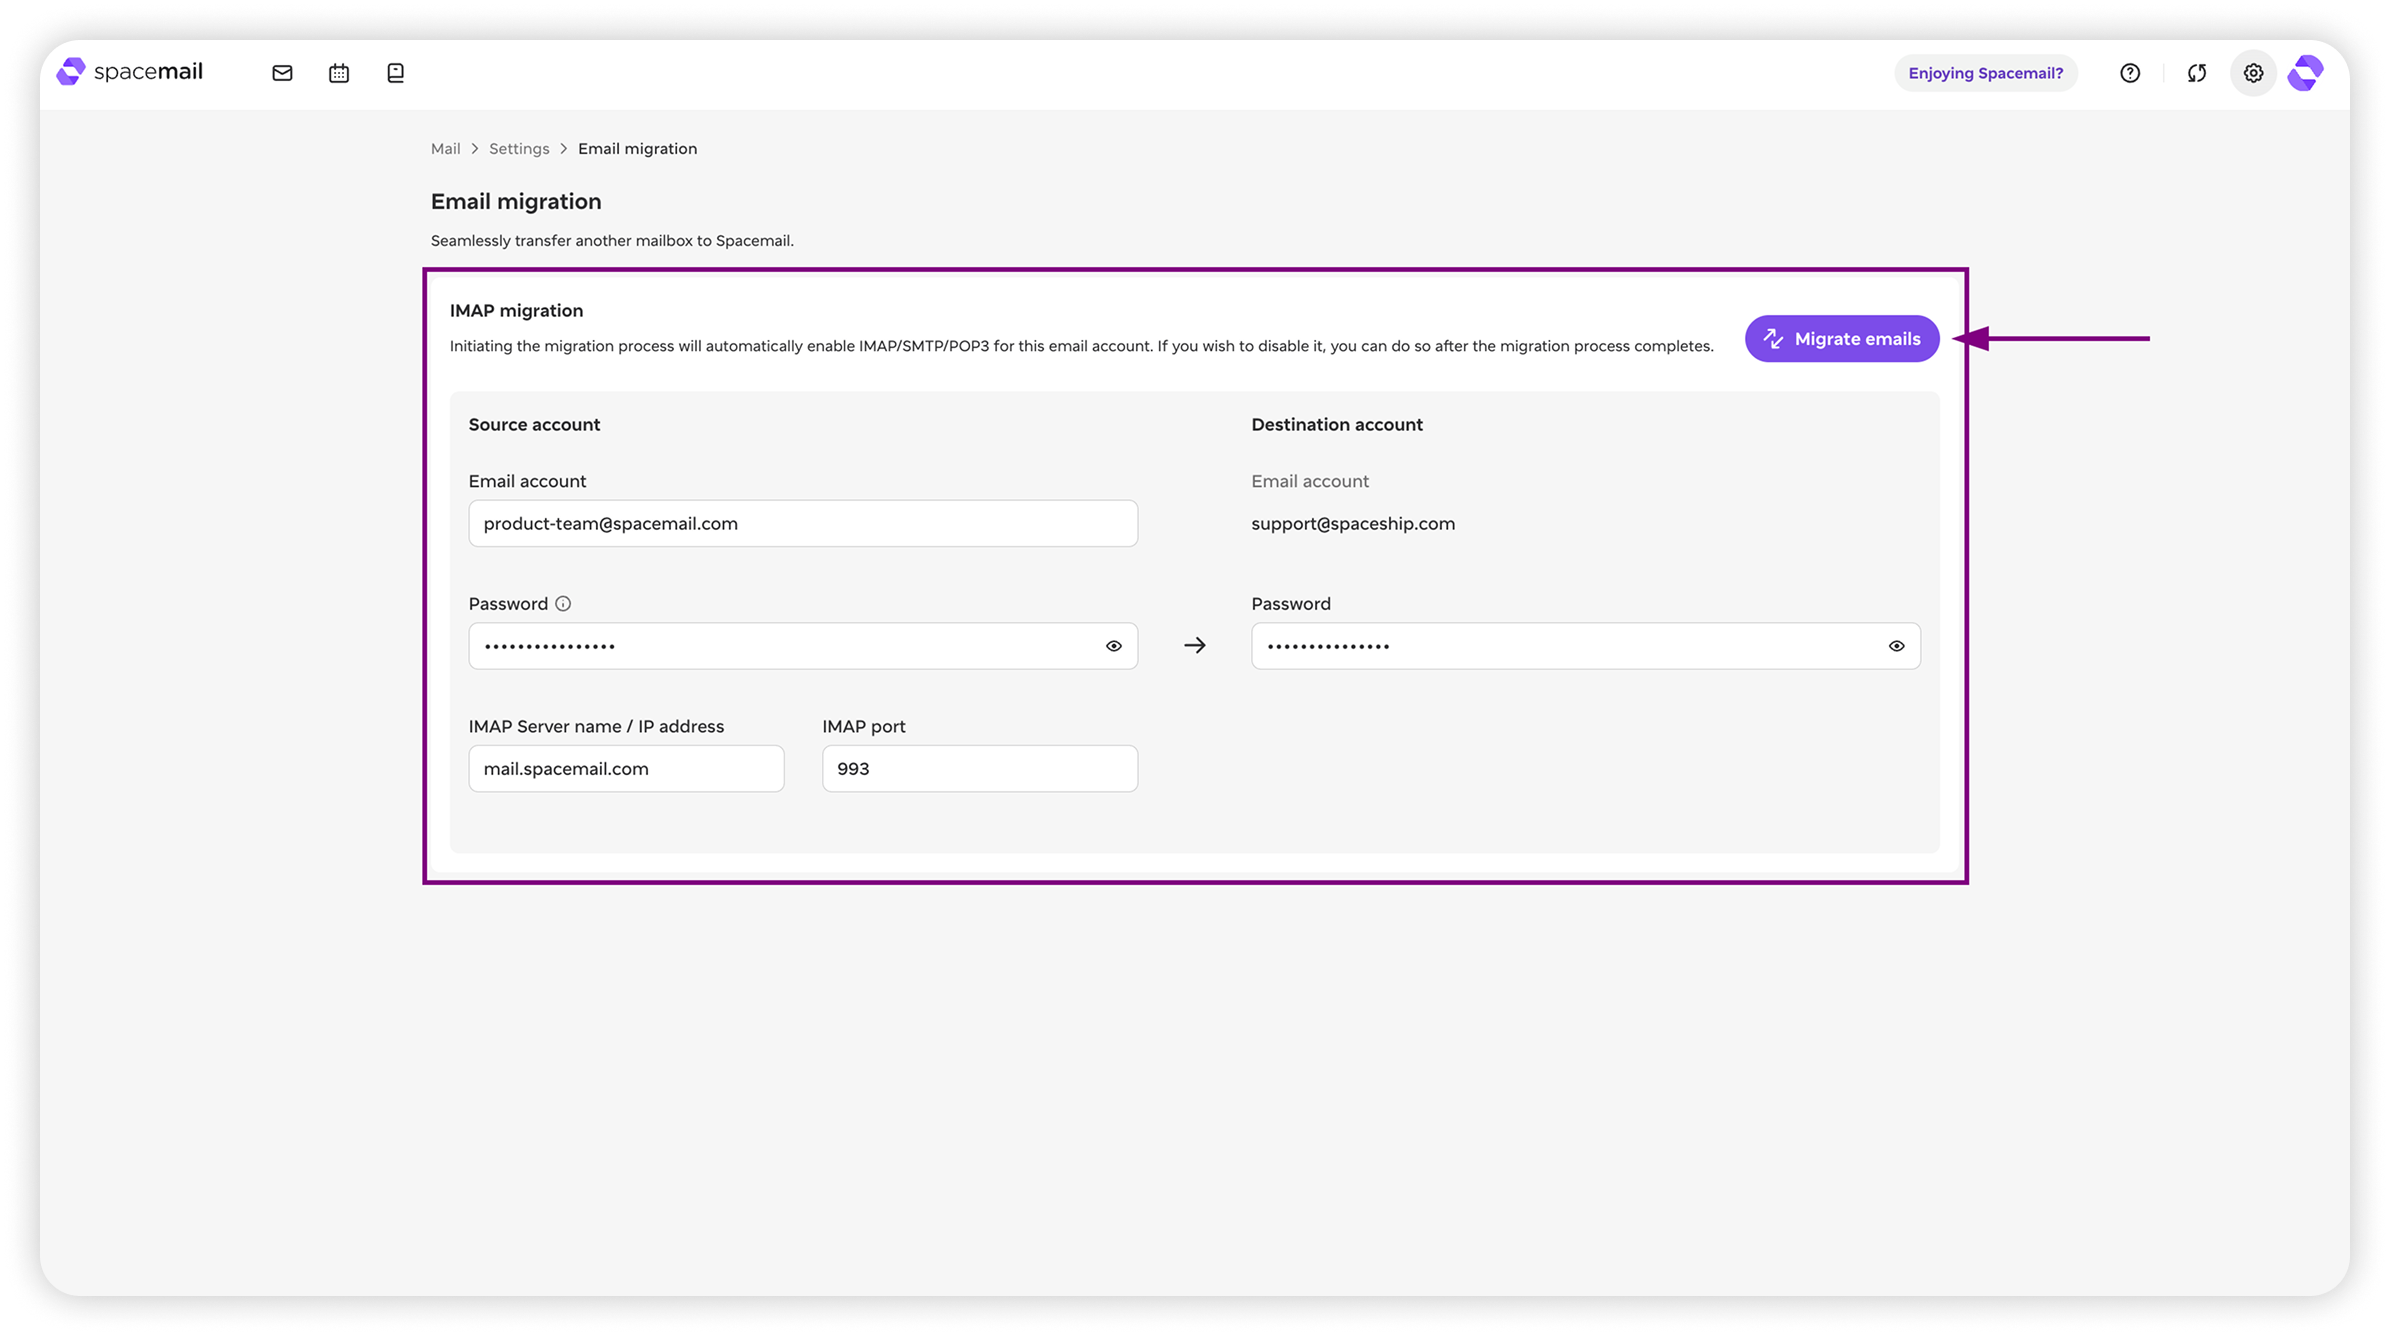
In the Migration tool window, enter the following details related to the source account:
Email account - full address as it's in the placeholder.
Password - password of that account
Note: Some email providers don't accept your regular account password for this connection:
Gmail — turn on 2-Step Verification for your Google account, then generate an app password and enter it in the Password field.
Yahoo — generate an app password and enter it in the Password field. This works whether 2FA is on or off.
Outlook / Microsoft 365 — Microsoft accounts aren't supported by the Migration tool because Microsoft no longer supports password-based IMAP authentication. To transfer your emails, use a third-party email client instead. See “Transferring emails with a third-party client” below for instructions.
IMAP server name and IMAP port - these vary depending on your provider, so check them with your service provider directly. Alternatively, you can usually find their IMAP settings by typing IMAP server and port for [provider name] in a search engine.
Once you have filled in the details, enter the password for the Spacemail account.
Migrate emails
Note: before starting the migration, you will need to turn on IMAP settings for the source mailbox (from which the emails are transferred) on your email provider's side first. Otherwise, the migration will fail.
Once all the details are filled in, you can click Migrate emails. In the pop-up window, you will see how much space is required for the source account to migrate and the available space. If you have enough space, click Migrate to start the process.
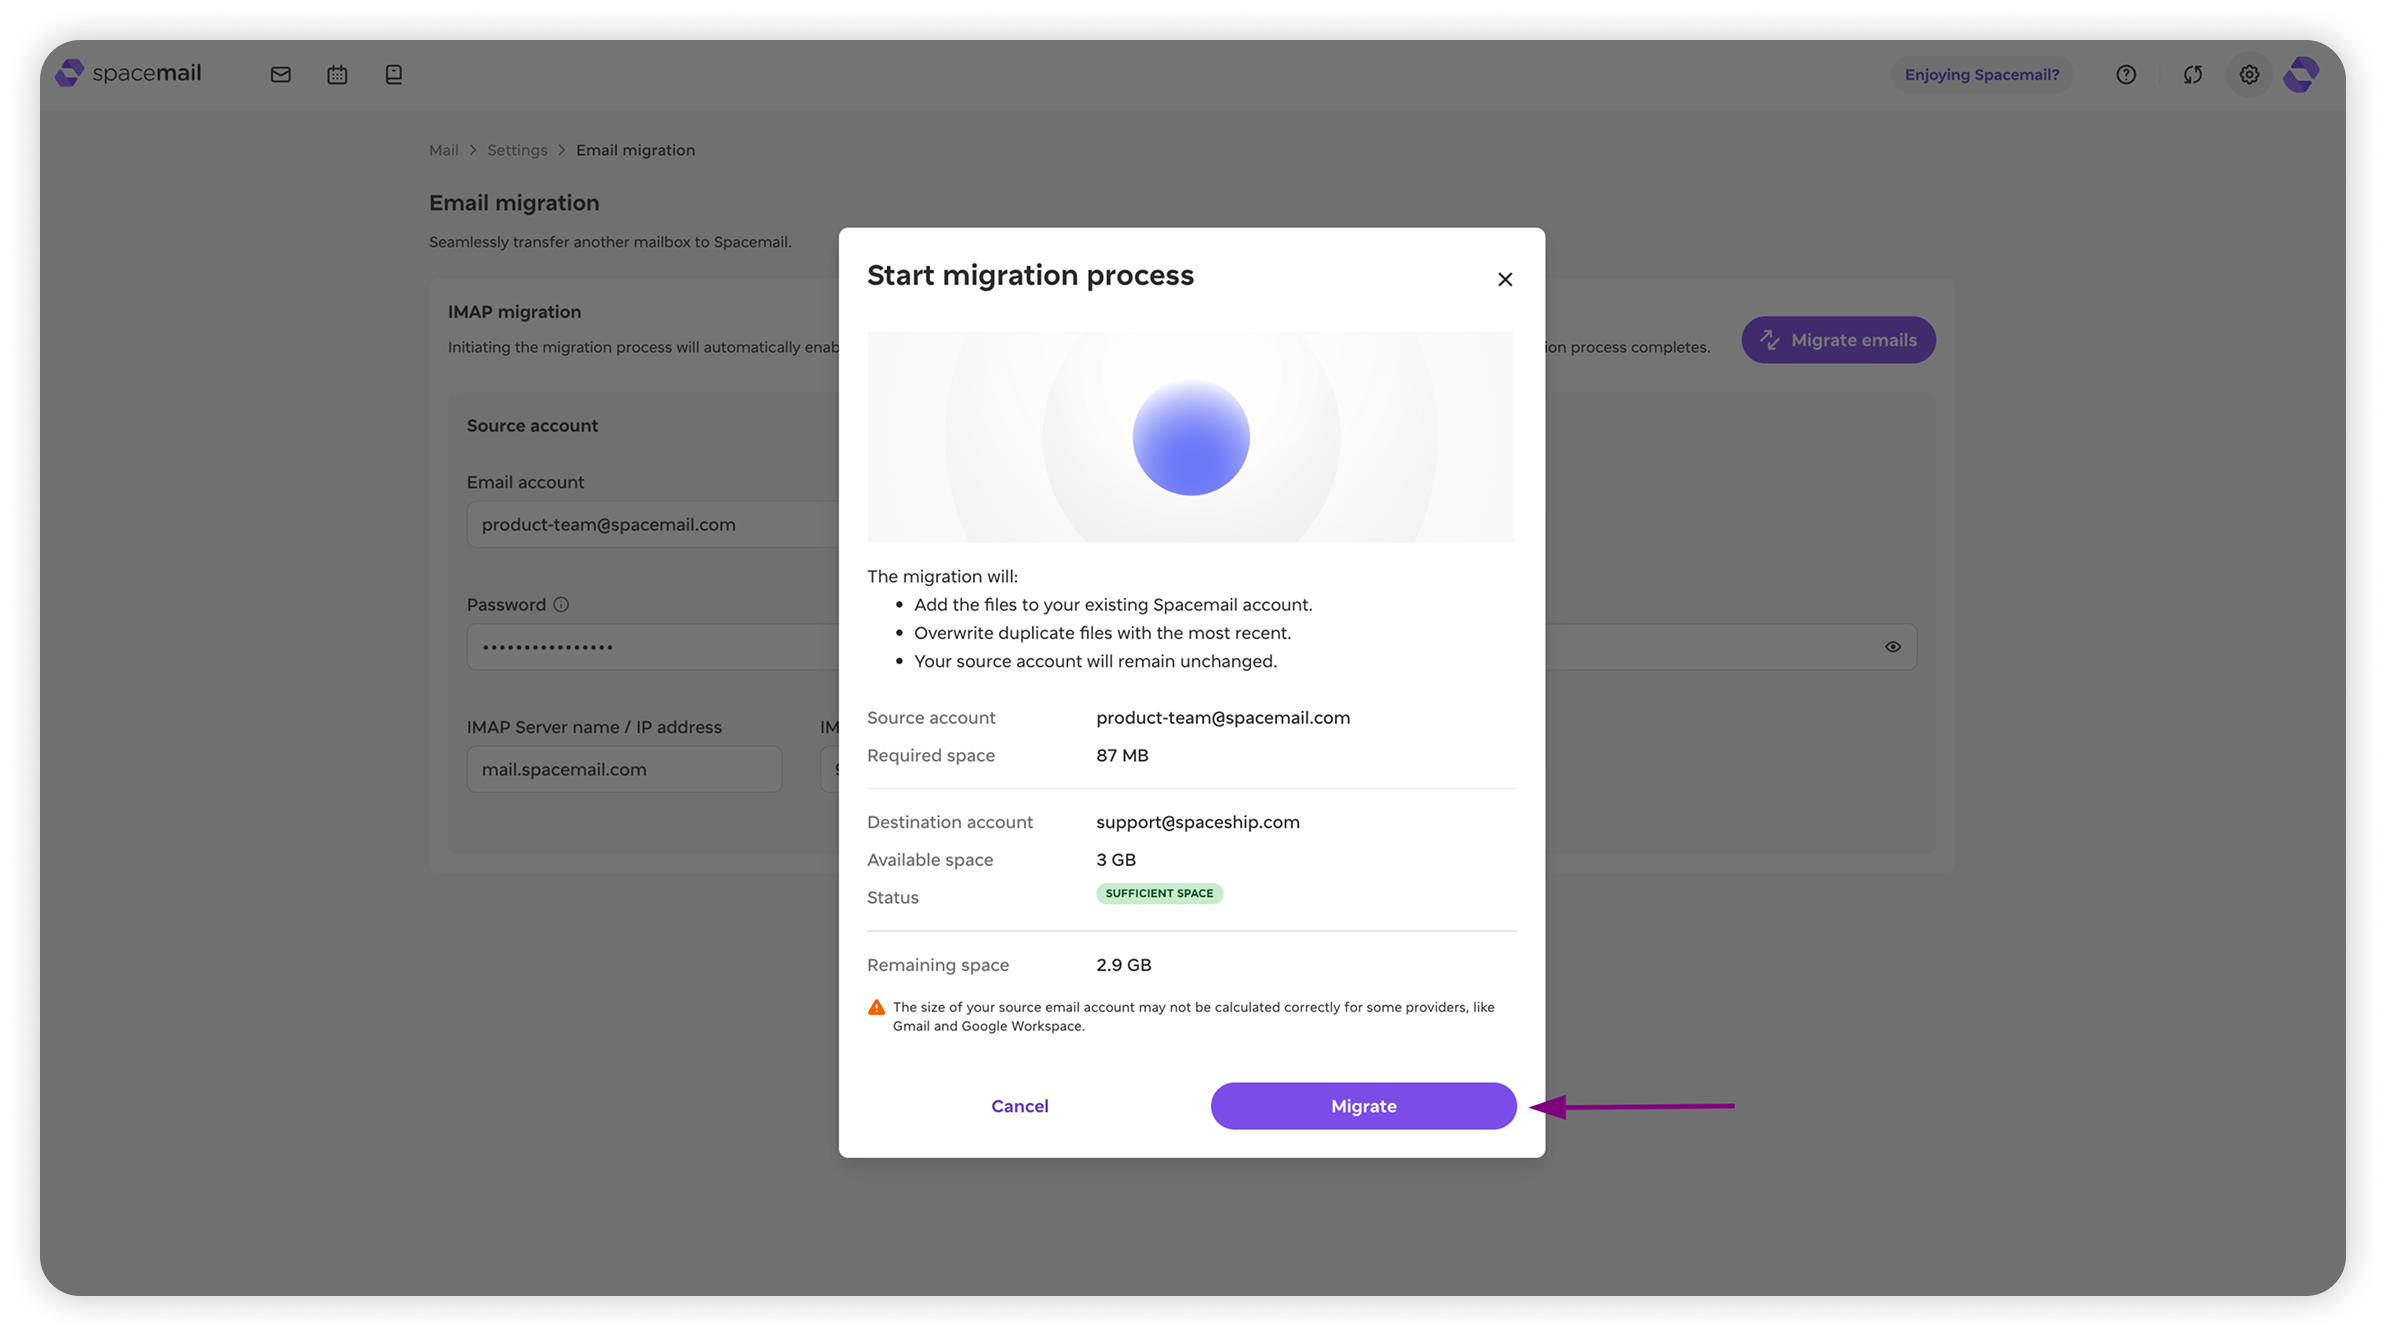
Not enough space issue
In case it shows that there’s not enough space, you can try the following:
Try upgrading to the next plan up. We have three plans ranging from Starter to Advanced. Each step up offers greater storage.
To upgrade your plan, go to Spacemail Manager, click Manage next to the subscription you want to upgrade, followed by Change plan. Proceed with the plan that best suits your needs.
If you’re already on our Advanced plan, you have the most storage available. To proceed with the migration, you’ll need to either delete some emails from your source mailbox or buy additional storage for the subscription. To do it, open Spacemail Manager, click the three dots next to your subscription, and select Add more storage.
Email address or password is incorrect. Please try again. error
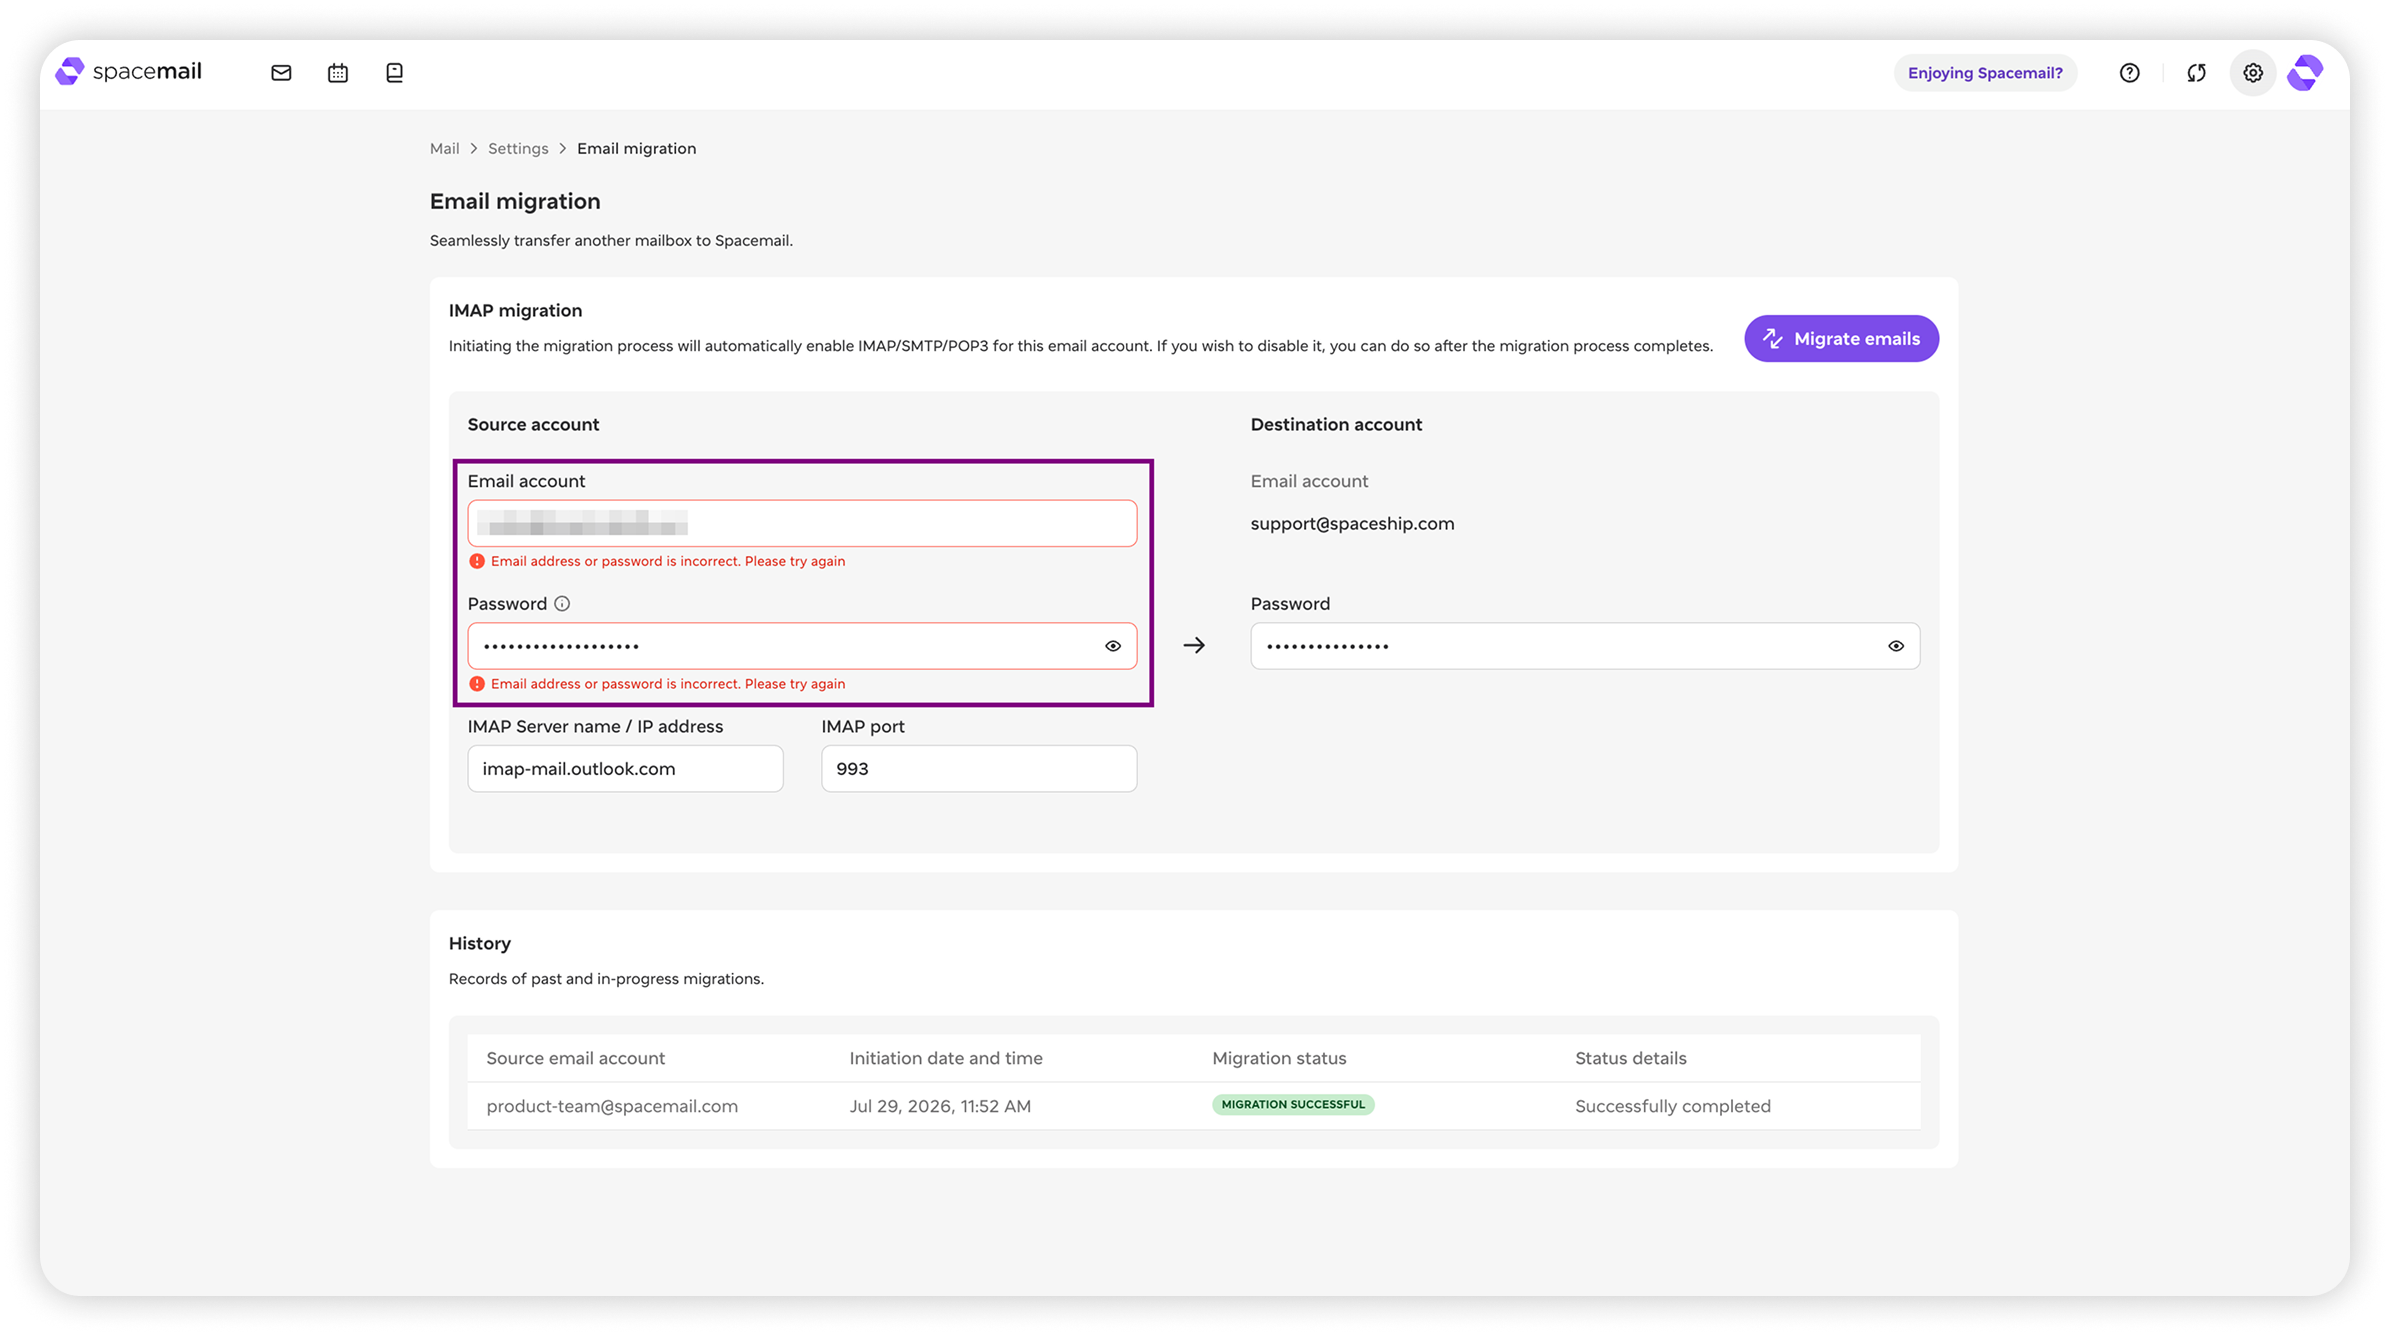
If you encounter this error during migration, please check that your credentials are correct and try again. If the error still appears despite the correct details, here are some more steps you can take to try to resolve the issue:
Try using your app password
You might need to use your app password rather than your account password. If you don’t know what it is, you may need to set it at the end of the provider you're migrating from (e.g., Gmail).
If you are using an app password, you may need to turn on 2FA for the source mailbox.
If you are not using the app password, please turn off 2FA for the source mailbox during migration (you can turn it back on after the migration is completed).
Check your IMAP settings
Check that the IMAP server name and Port match the ones in your source account.
Check that IMAP is turned on on the side of your source email account.
If the issue persists, please submit a request to us — we’re here for you 24/7.
Tracking progress
Note: It's possible to run only 1 migration at once.
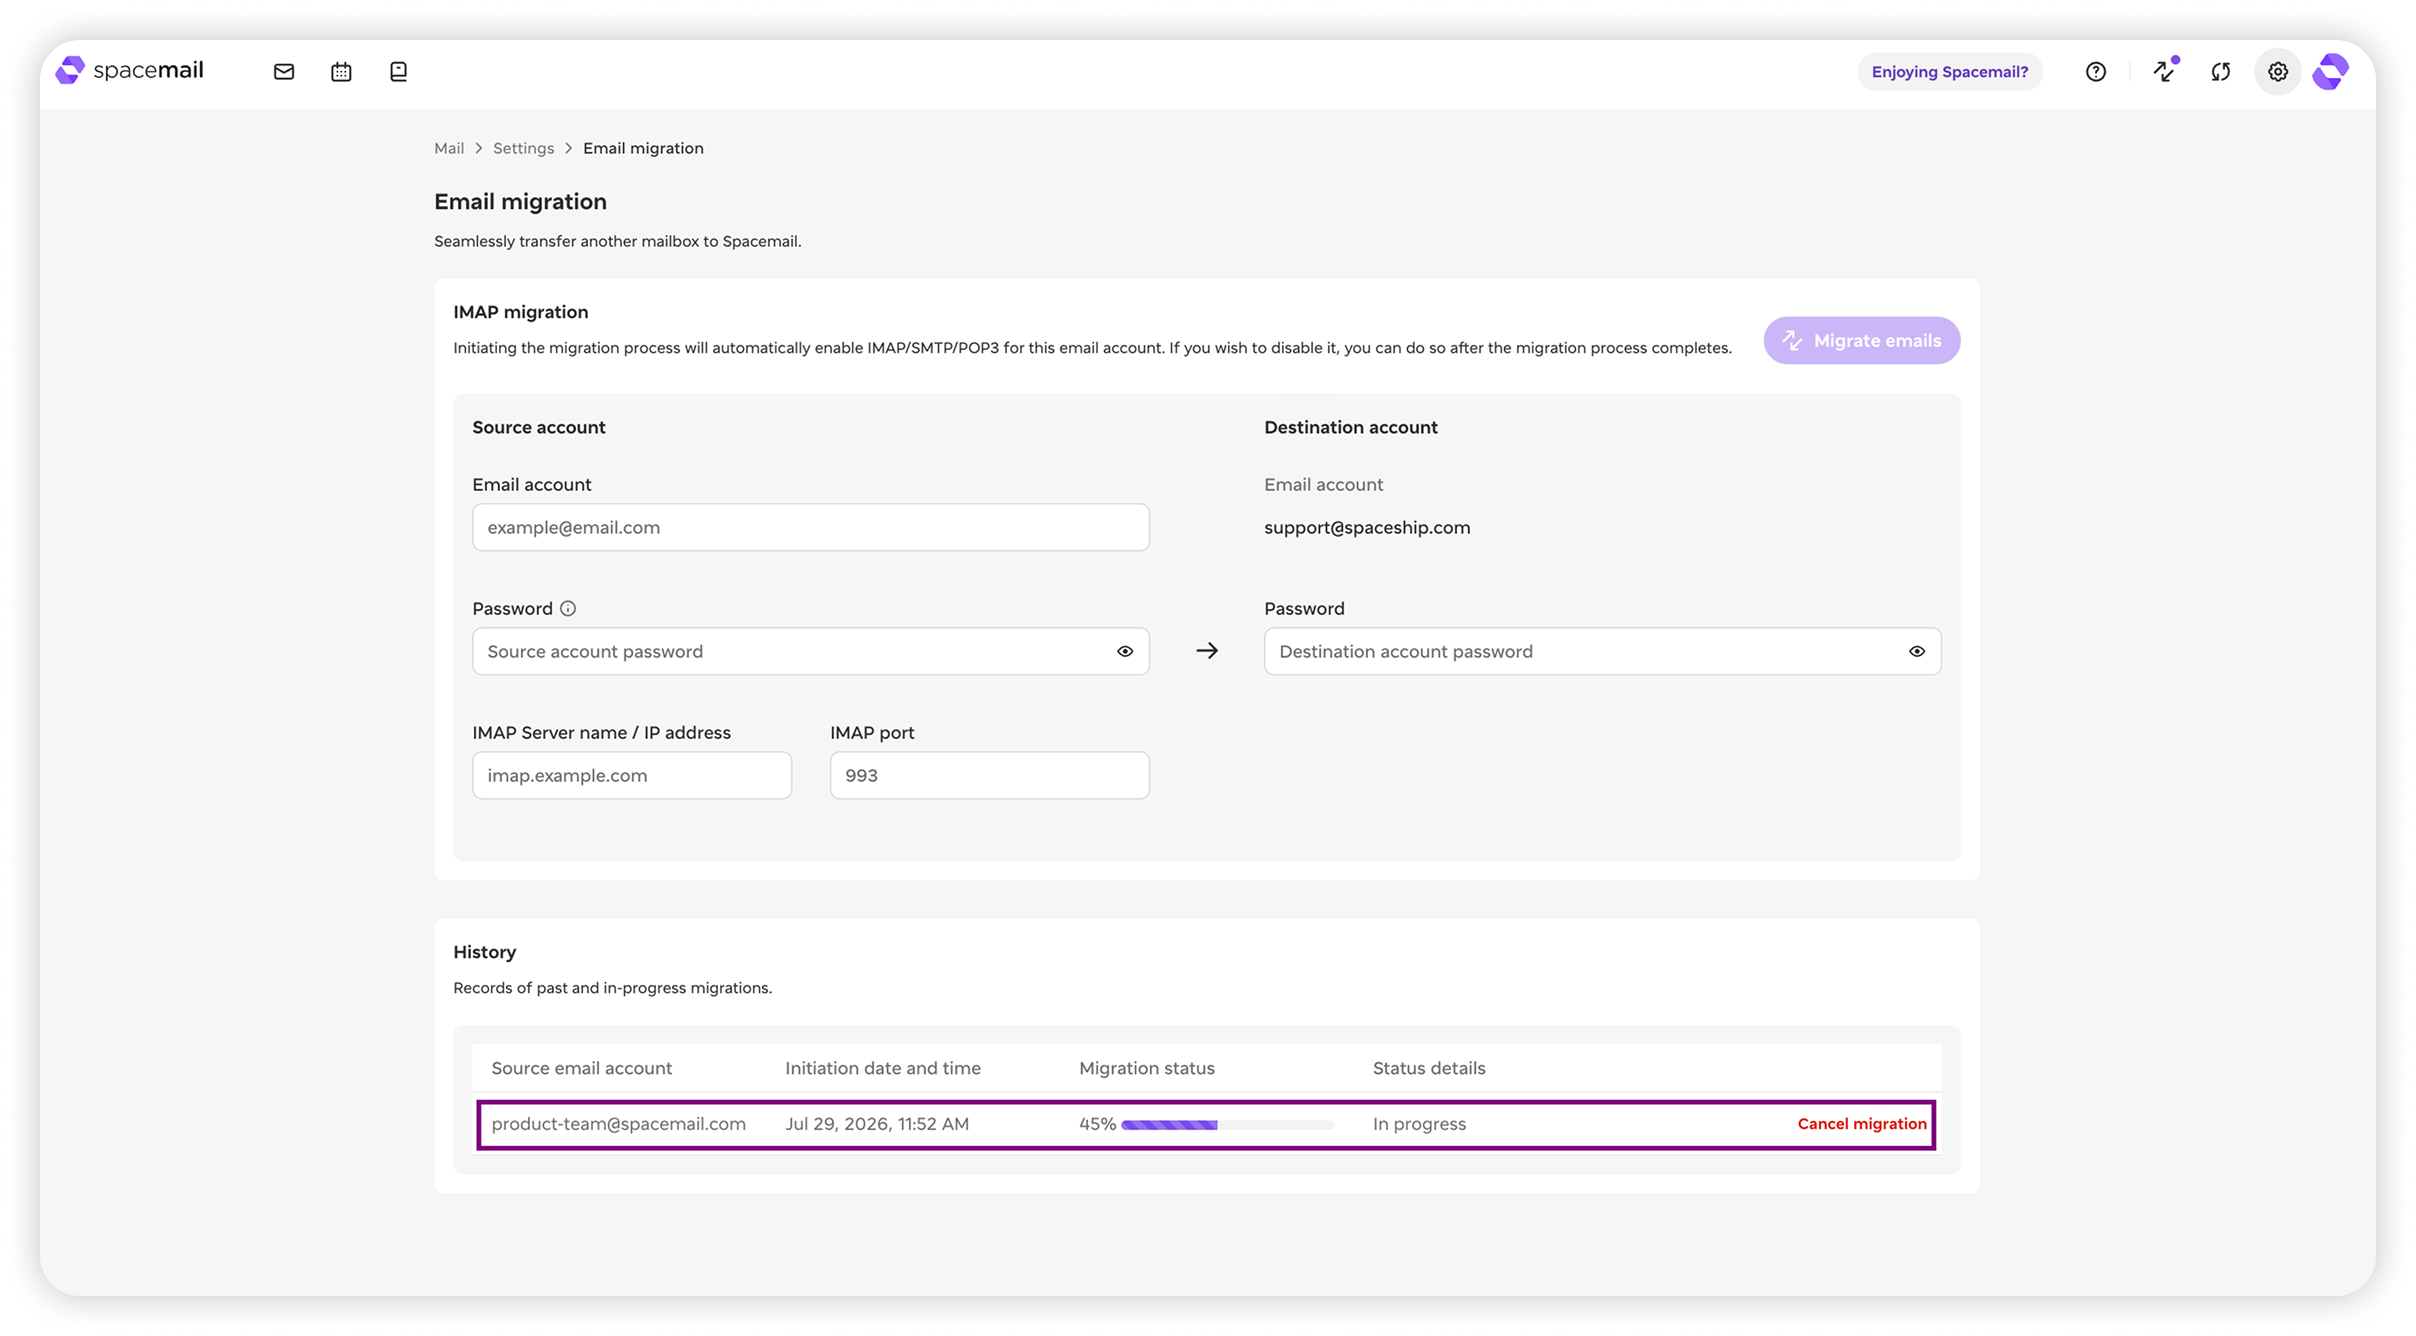
The duration of migration depends on factors like the size of the mailbox you are migrating, the Internet speed, and other variables — so it’s not possible to name the exact time frame. However, after you start the migration, you will see the progress in the History section below. This section will show all your migrations and their statuses. Sometimes the status may say Failed when the emails were successfully migrated. It’s always worth double-checking, just in case.
If no emails were transferred, please submit a request to us — we’re here for you 24/7.
If you decide to cancel the migration, click Cancel migration. Emails that have already been transferred will remain in your Spacemail mailbox. You will be able to initiate the migration again later.
Transferring emails with a third-party client
Once you unbox your subscription and create a mailbox you want to migrate to, log in to your Spacemail webmail.
Connect to an email client
Once logged in, go to Settings and enable IMAP/SMTP connections. Click See configuration to get the details to configure an email client. You can also use the following configuration details:
Username: full Spacemail email address
Password: password for this email account
Incoming/Outgoing server: mail.spacemail.com
IMAP server port: 993
SMTP server port: 465
Connection security: SSL
Use any email client (we recommend Thunderbird) to add both your mailboxes you want to migrate from and to to a single interface.
Migrate emails
Within the email client, select all messages in your old account and move them (by simply dragging and dropping) from your old inbox folder into your new inbox folder. You can move subfolders the same way to keep your folder structure intact. The process may take a while, depending on the number of messages.