Bir WordPress web sitesini hızlandırmak ve optimize etmek
WordPress, en popüler ve çok yönlü içerik yönetim sistemlerinden (CMS) biridir. Ancak varsayılan kurulumunda, özellikle siteniz çok fazla trafik alıyorsa, büyük miktarda medya içeriyorsa veya özellik açısından zengin bir tema kullanıyorsa, her zaman en hızlısı değildir. 2010'dan beri Google, sayfa hızını arama sıralamalarında dikkate alıyor; bu da yavaş bir sitenin hem kullanıcı deneyimine hem de arama sonuçlarındaki görünürlüğüne zarar verebileceği anlamına geliyor.
İyi haber şu ki, WordPress birçok şekilde optimize edilebilecek kadar esnektir ve yükleme sürelerini gözle görülür şekilde azaltmanıza olanak tanır. İlerlemenizi ölçmek için, her değişiklikten sonra aşağıdaki gibi çevrimiçi araçlarla hız testleri yapabilirsiniz:
Google PageSpeed Insights – Yeni başlayanlar için harika, kolay takip edilebilen optimizasyon önerileri sunar.
GTmetrix – Hem performans puanları hem de uygulanabilir ipuçları sunar.
Pingdom – Ayrıntılı yükleme süresi dökümleri sunar, ancak biraz daha fazla teknik bilgi gerektirebilir.
Bu araçlar, sitenizin hangi bölümlerinin yavaşladığını vurgular ve önce neyi düzeltmeniz gerektiğini anlamanızı kolaylaştırır.
Aşağıda, WordPress sitenizi daha hızlı hale getirmek için uygulayabileceğiniz pratik adımları bulacaksınız—bir web sitesi oluştururken en baştan uygulamaya değer ipuçları.
NOT: Değişiklik yapmadan önce sitenizi yedeklediğinizden emin olun.
Bir web sitesini hızlandırmak için ipuçları
Doğru temayı seçmek
WordPress temanız sadece görünüşle ilgili değildir – sitenizin ne kadar hızlı yüklendiği üzerinde doğrudan etkisi vardır. Yoğun trafikli bir blog veya içerik ağırlıklı bir site çalıştırmayı planlıyorsanız, araştırma ve test için zaman ayırmak karşılığını verecektir. İyi optimize edilmiş, hafif bir tema hem kullanıcı deneyimini hem de arama sıralamalarını önemli ölçüde iyileştirebilir.
Tema seçerken altın kural, tasarımı içeriğinizle eşleştirmektir. Önce web sitenizin neye odaklanacağını ve hangi tür içerik yayınlayacağınızı belirleyin. Ancak o zaman bu hedefleri destekleyen bir tema seçmelisiniz.
Çoğu WordPress teması kapsamlı özelleştirme imkanı sunarken, kötü kodlanmış seçenekler ileride sorunlara yol açabilir; özellikle de daha sonra tema değiştirmeye karar verirseniz. Görsel olarak çekici bazı tasarımlar ilk bakışta harika görünebilir, ancak gereksiz özelliklerle dolu olup sitenizi yavaşlatabilir.
Hem şık hem de hızlı bir tema seçmenize yardımcı olacak birkaç ipucu:
Basit tutun – Aşırı karmaşık düzenlerden ve ağır animasyonlardan kaçının.
Duyarlı olun – Mobil, tablet ve masaüstü ekranlara sorunsuz uyum sağlayan bir tema seçin.
Eklenti uyumluluğunu kontrol edin – Temanın, temel ve yüksek puanlı eklentilerle ve mevcut WordPress sürümünüzle iyi çalıştığından emin olun.
Sayfa oluşturucuları değerlendirin – Dahili sayfa oluşturuculu temalar kullanışlı olabilir, ancak fazladan yük getirebilir. Karar vermeden önce performansı test edin.
SEO dostu kodlama arayın – Temiz, semantik bir kod yapısı arama motorlarının sitenizi daha iyi anlamasına yardımcı olur.
Son olarak, çoğu tema geliştiricisi ürünlerinin canlı demolarını sunar. Satın almadan önce demo sitesini hız test araçlarıyla analiz ederek bundan faydalanın. Bu, temanın gerçek dünya koşullarında nasıl performans gösterdiği hakkında size gerçekçi bir fikir verecektir.
Görselleri optimize etme
Büyük, sıkıştırılmamış görseller, yavaş yüklenen sayfaların en yaygın nedenlerinden biridir. Hem eklenti hem de çevrimiçi hizmet olarak, kaliteyi gözle görülür şekilde etkilemeden dosya boyutlarını küçültebilen birçok araç vardır.
Otomatik bir yaklaşımı tercih ediyorsanız, EWWW Image Optimizer ve benzeri eklentiler sıkıştırmayı doğrudan WordPress içinde gerçekleştirebilir. EWWW Image Optimizer kendi özellik setine sahiptir ve esnek ayarlar ile toplu optimizasyon sunar.
Not: Eklenti, çalışmak için exec() fonksiyonuna ihtiyaç duyar.
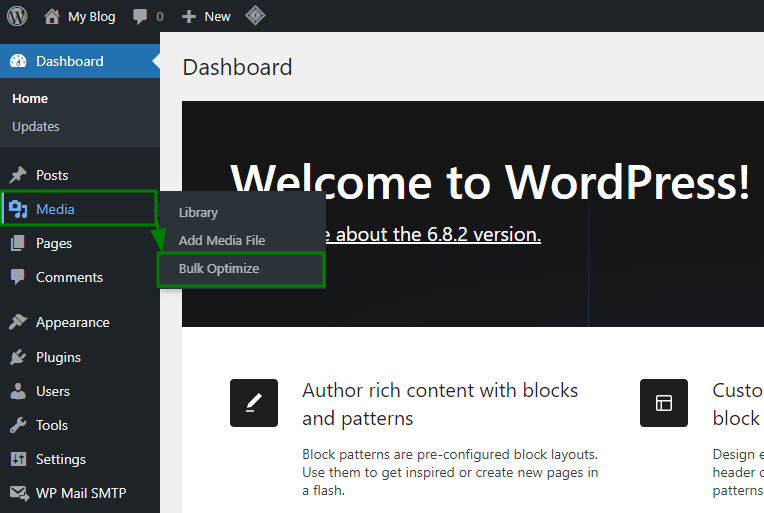
Kurulum ve etkinleştirmeden sonra, Medya > Toplu Optimize Et bölümüne gidebilirsiniz:
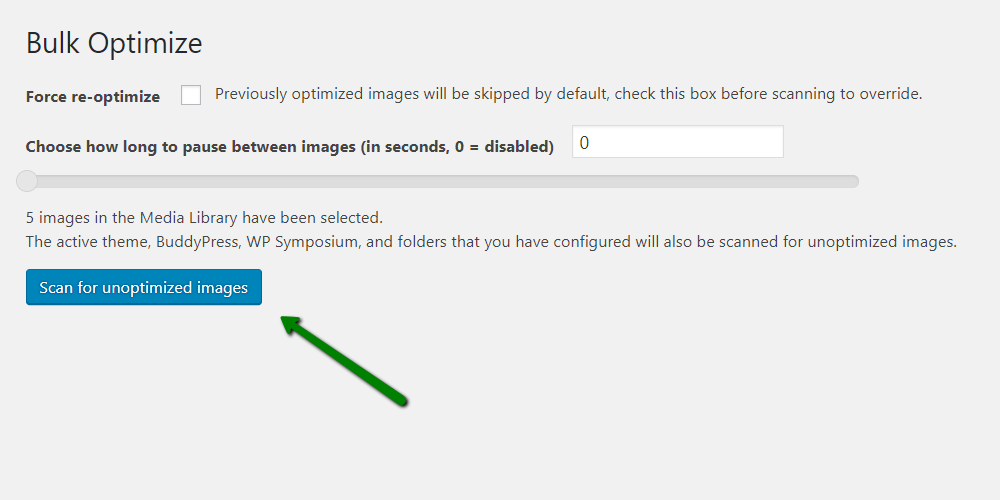
Tüm sıkıştırılmamış görselleri bulmak için Sıkıştırılmamış görselleri tara seçeneğine tıklayın:
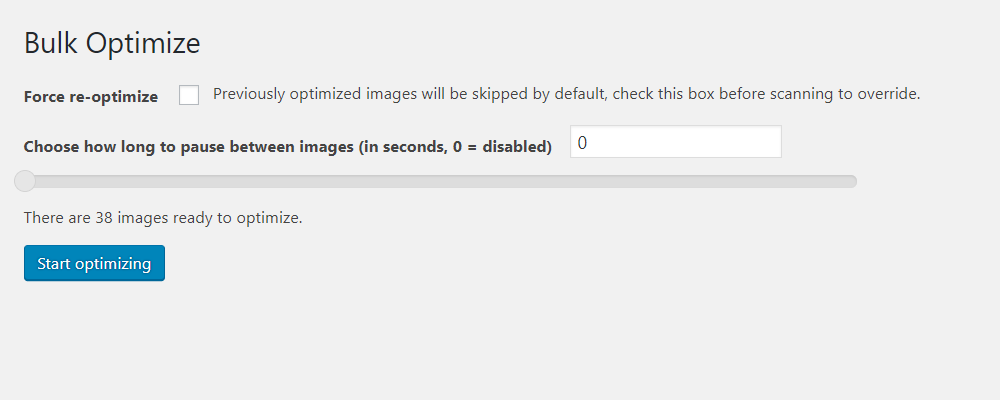
Taramadan sonra, boyutlarını toplu olarak küçültmek için Optimizasyona başla seçeneğine tıklayın:
Eklentiyi, "Gelişmiş Ayarlar" menüsünden zamanlanmış optimizasyonlar çalışacak şekilde de ayarlayabilirsiniz.
Dikkat edilmesi gerekenler:
Toplu optimizasyon geçici olarak çok fazla sunucu kaynağı kullanabilir ve CPU sınırlarına ulaşabilir.
Daha yüksek sıkıştırma seviyeleri daha küçük dosya boyutları sağlar, ancak agresif sıkıştırma özellikle görsel ağırlıklı sitelerde gözle görülür kalite kaybına yol açabilir.
Eklentiler hızlı ve kullanışlı olsa da, her zaman en iyi sıkıştırma oranlarını sunmayabilir. Maksimum sonuç için, görselleri yüklemeden önce aşağıdaki gibi çevrimiçi araçlarla manuel olarak işleyebilirsiniz:
TinyPNG – PNG ve JPEG sıkıştırması için mükemmel.
Compressor.io – Birden fazla formatla çalışır ve güçlü optimizasyon sunar.
Evet, manuel sıkıştırma fazladan zaman alır, ancak genellikle daha keskin, daha hafif görseller elde edilir ve ziyaretçilerinize kaliteyi feda etmeden daha iyi bir deneyim sunar.
Önbellekleme eklentileri
Önbellekleme eklentileri, bir WordPress web sitesini hızlandırmanın en etkili yollarından biridir. Sayfalarınızın önceden oluşturulmuş sürümlerini depolayarak ve sunarak, sunucunuzun her ziyaretçi için yapması gereken işi azaltır ve yükleme sürelerini büyük ölçüde iyileştirir.
En popüler ve güvenilir seçeneklerden bazıları şunlardır:
Tarayıcı önbellekleme
Tarayıcı önbellekleme, ziyaretçilerinizin tarayıcılarına belirli web sitesi dosyalarını (görseller, stil dosyaları ve komut dosyaları gibi) belirli bir süre boyunca yerel olarak saklamalarını söyler. Böylece, sitenize tekrar geldiklerinde, bu dosyaları kendi cihazlarından yükleyebilirler ve tekrar indirmeleri gerekmez. Bu, sunucu yükünü azaltır, tekrar ziyaretlerde hızı artırır ve genel gezinme deneyimini iyileştirir.
Tarayıcı önbelleklemesini birkaç farklı şekilde ayarlayabilirsiniz:
1. W3 Total Cache Kullanarak
Zaten W3 Total Cache kullanıyorsanız, tarayıcı önbelleklemesini etkinleştirmek oldukça kolaydır:
WordPress kontrol panelinizde Performans > Tarayıcı Önbelleği bölümüne gidin.
Aşağıdaki gibi seçeneklerin kutularını işaretleyin:
Last-Modified başlığını ayarla.
Expires başlığını ayarla.
HTTP (gzip) sıkıştırmasını etkinleştir.
Ayarlarınızı kaydedin:
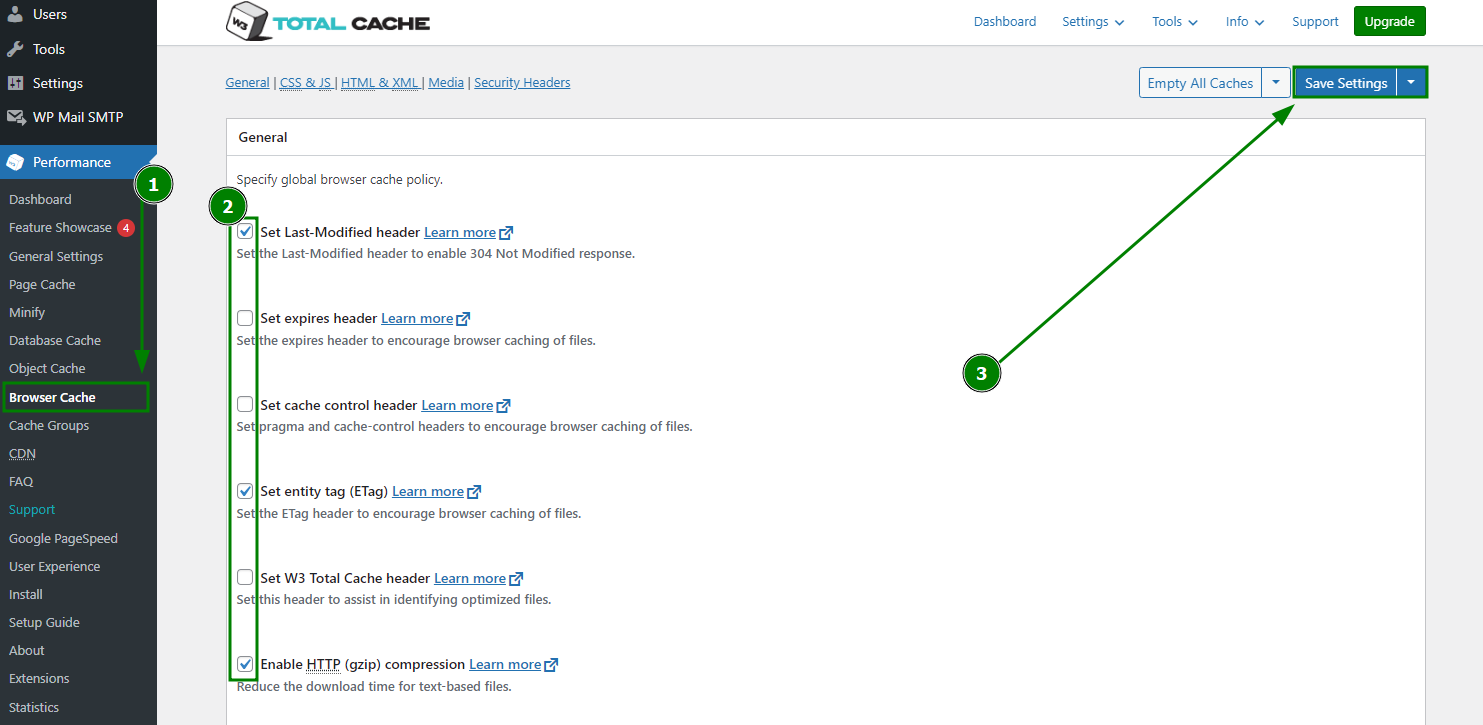
W3TC, gerekli kuralları otomatik olarak .htaccess dosyanıza ekleyecektir.
2. Kuralları Manuel Olarak Eklemek
Bir eklenti kullanmak istemiyorsanız, tarayıcı önbelleklemesini doğrudan .htaccess dosyanızı (Apache sunucuları için) düzenleyerek etkinleştirebilirsiniz. Aşağıdaki gibi kod eklemek, farklı dosya türleri için "son kullanma" sürelerini ayarlar:
ExpiresActive on
ExpiresByType image/jpg "access plus 60 days"
ExpiresByType image/png "access plus 60 days"
ExpiresByType image/gif "access plus 60 days"
ExpiresByType image/jpeg "access plus 60 days"
ExpiresByType text/css "access plus 2 weeks"
ExpiresByType image/x-icon "access plus 2 weeks"
ExpiresByType application/pdf "access plus 1 month"
ExpiresByType audio/x-wav "access plus 1 month"
ExpiresByType audio/mpeg "access plus 1 month"
ExpiresByType video/mpeg "access plus 1 month"
ExpiresByType video/mp4 "access plus 1 month"
ExpiresByType video/quicktime "access plus 1 month"
ExpiresByType video/x-ms-wmv "access plus 1 month"
ExpiresByType application/x-shockwave-flash "access 1 month"
ExpiresByType text/javascript "access plus 2 weeks"
ExpiresByType application/x-javascript "access plus 2 weeks"
ExpiresByType application/javascript "access plus 2 weeks"
Dosyalarınızı ne sıklıkta güncellediğinize bağlı olarak zaman değerlerini ayarlayabilirsiniz.
Bir web sitesini optimize etmek için ipuçları
Ana sayfa optimizasyonu
Ana sayfanız, ziyaretçilerin ilk gördüğü ve genellikle sitenizdeki en ağır sayfadır. İyi optimize edilmiş bir ana sayfa yalnızca harika bir ilk izlenim bırakmakla kalmaz, aynı zamanda daha hızlı yüklenir ve ziyaretçilerin ilgisini çeker.
Ana sayfa hızında önemli bir faktör, sitenizin yaptığı HTTP isteklerinin sayısıdır. Sayfada yüklenen her görsel, komut dosyası, stil veya widget, sunucuya ayrı bir istek gerektirir. Gerekli istek sayısı ne kadar azsa, sayfanız o kadar hızlı görüntülenir.
İstekleri Azaltmak ve Yükleme Sürelerini Artırmak İçin Araçlar
WP Asset Clean Up
Bu eklenti, sayfalarınızı tarar ve gereksiz komut dosyalarını ve stilleri tespit ederek, ihtiyaç duyulmayan yerlerde yüklenmelerini engeller. Ayrıca, daha temiz ve hafif sayfalar için HTML kodunu da küçültebilir.JavaScript to Footer
JavaScript dosyalarını başlıktan alt bilgiye taşır, böylece ilk sayfa görüntülemesini geciktirmezler. Bu, sayfanızın görünen bölümlerinin önce yüklenmesini sağlar ve algılanan hızı artırır.
Hızlı Bir Ana Sayfa İçin En İyi Uygulamalar
Aşırı widget kullanımından kaçının – Örneğin, sosyal paylaşım butonları ana sayfa yerine tekil blog yazılarında daha iyi konumlandırılır.
Tam yazılar yerine özet gösterin – Bu, aynı anda yüklenen içerik miktarını azaltır ve sayfanın daha kolay taranmasını sağlar.
Görüntülenen yazı sayısını sınırlayın – Optimum hız ve okunabilirlik için yaklaşık beş yeni yazı ile sınırlayın.
Render-Blocking JavaScript ve CSS'i Düzeltme
Sitenizi Google PageSpeed Insights ile test ettiğinizde şu uyarıyı görebilirsiniz:
"Yukarıda görünen içerikte render-blocking JavaScript ve CSS'i ortadan kaldırın"
Bu, bazı JavaScript veya CSS dosyalarının sayfanızın görünen (üstteki) kısmının görüntülenmesini geciktirdiği anlamına gelir. Basitçe söylemek gerekirse, ziyaretçilerinizin tarayıcıları bu dosyaları yüklemeden önce sayfa içeriğini görüntüleyemez ve bu da her şeyi yavaşlatır.
W3 Total Cache (W3TC) ile Çözüm
Bunu, W3 Total Cache'deki Minify ayarlarını değiştirerek düzeltebilirsiniz:
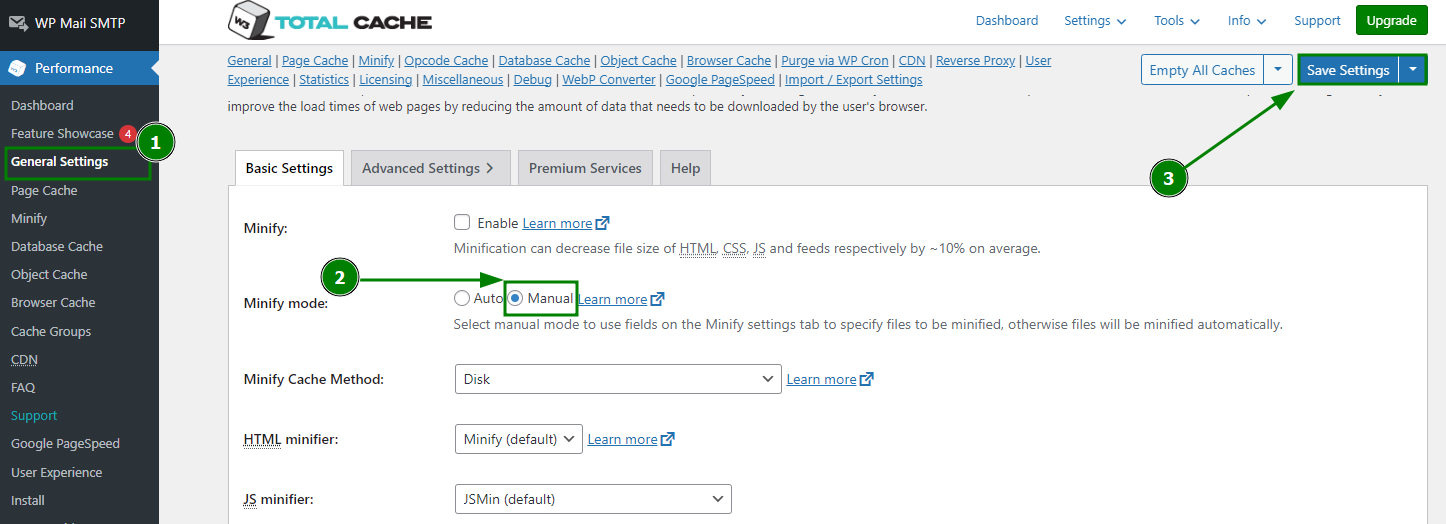
WordPress kontrol panelinizde Performans > Genel Ayarlar bölümüne gidin.
Minify bölümünde, Minify modu olarak Manuel seçin ve değişiklikleri kaydedin:
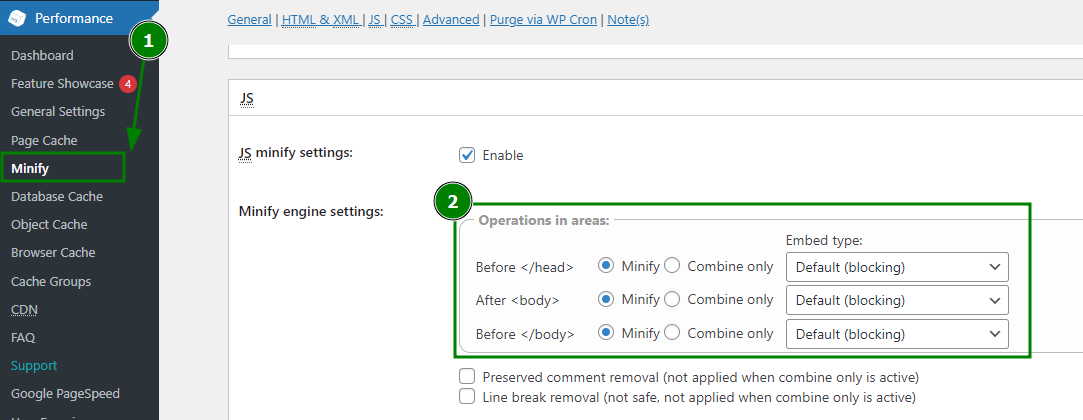
Ardından, Performans > Küçült menüsünü açın ve JavaScript küçültme ayarlarının önerilen yapılandırmayla eşleştiğinden emin olun:
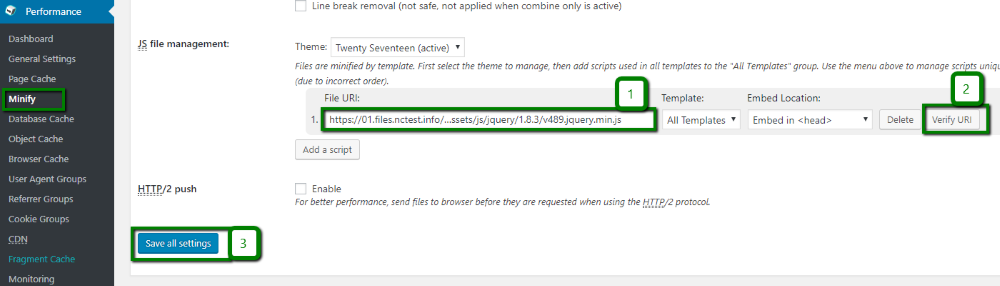
Google PageSpeed tarafından işaretlenen JavaScript dosyası URL'lerini JS dosya yönetimi bölümüne ekleyin:
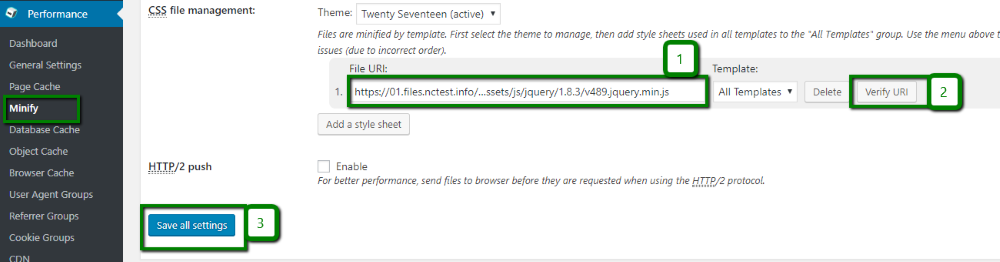
CSS dosyaları için de aynı işlemi tekrarlayın – işaretlenen CSS URL'lerini CSS dosya yönetimi bölümüne ekleyin:
Bu işlem tamamlandığında, sitenizi tekrar PageSpeed Insights'ta test edin. Her şey doğru şekilde ayarlandıysa, engelleyici uyarısı kaybolacaktır.
Alternatif: Autoptimize Eklentisi
Daha basit bir araç tercih ediyorsanız, Autoptimize engelleyici kaynakları azaltmak için başka mükemmel bir seçenektir. Şunları yapabilir:
JavaScript ve CSS dosyalarını birleştirir ve küçültür
Yükleme sırasını iyileştirmek için CSS ve JS'yi taşır
Daha hafif sayfalar için HTML'yi küçültür
Daha iyi sonuçlar için WP Super Cache gibi önbellek eklentileriyle birlikte çalışır.
Autoptimize'ın temel ayarları şunlardır:
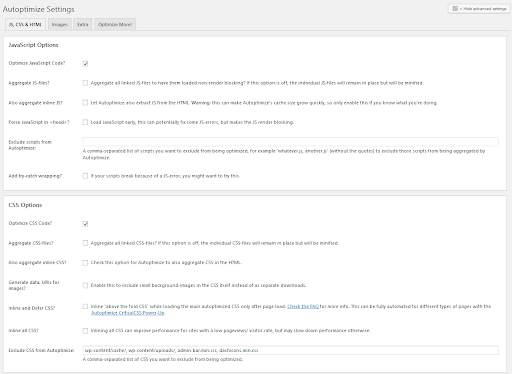
JavaScript Seçenekleri – Birden fazla JS dosyasını tek bir dosyada birleştirerek istekleri azaltır
CSS Seçenekleri – Kritik CSS'yi satır içine alır, küçük görselleri doğrudan CSS'ye kodlar ve daha fazlası
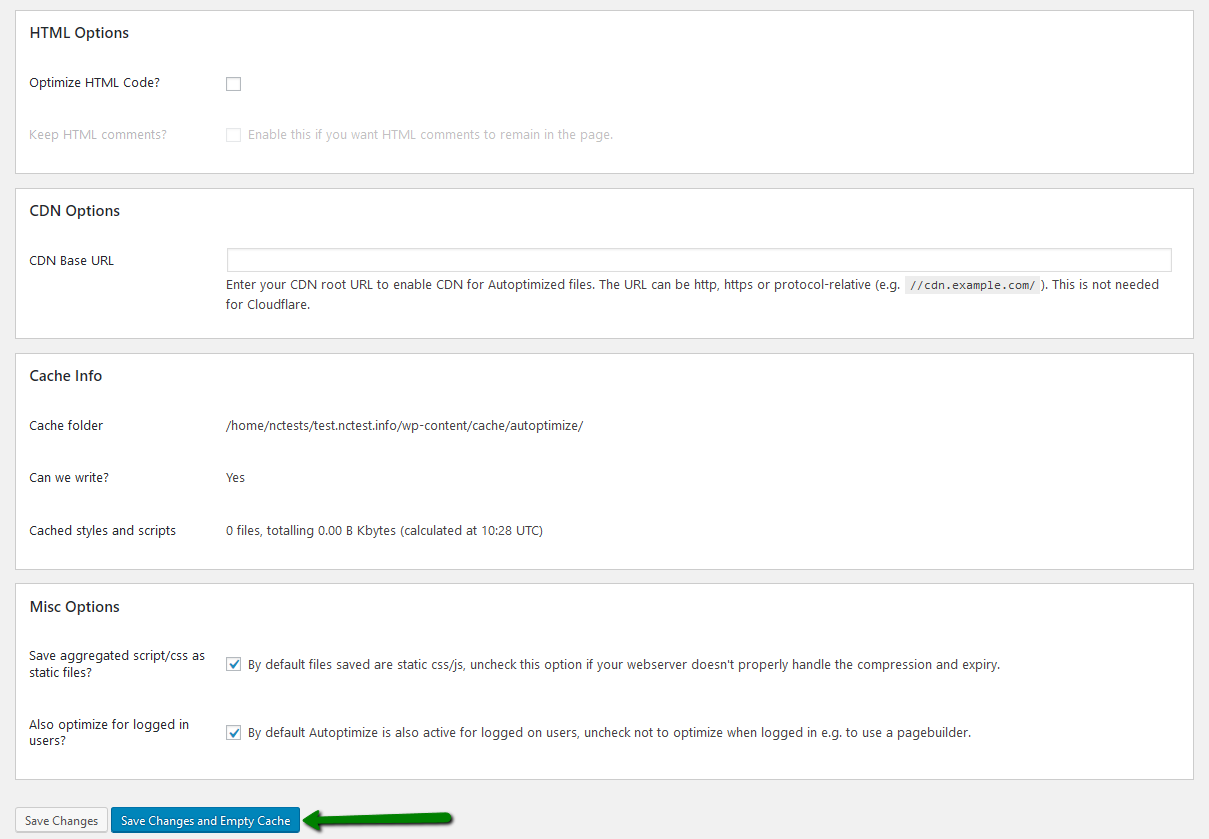
HTML Seçenekleri – Yorumları isteğe bağlı olarak koruyarak HTML'yi küçültür
CDN Seçenekleri – Statik dosyaların daha hızlı yüklenmesi için bir CDN taban URL'si ayarlayın
Görseller Sekmesi – Görselleri otomatik olarak sıkıştırır ve optimize eder
Ekstra / Daha Fazla Optimize Et – Güçlü kullanıcılar için ek gelişmiş ayarlar.
Tüm özellikleri açmak için:
Şuraya gidin: Ayarlar > Autoptimize > Gelişmiş ayarları göster'e tıklayın:
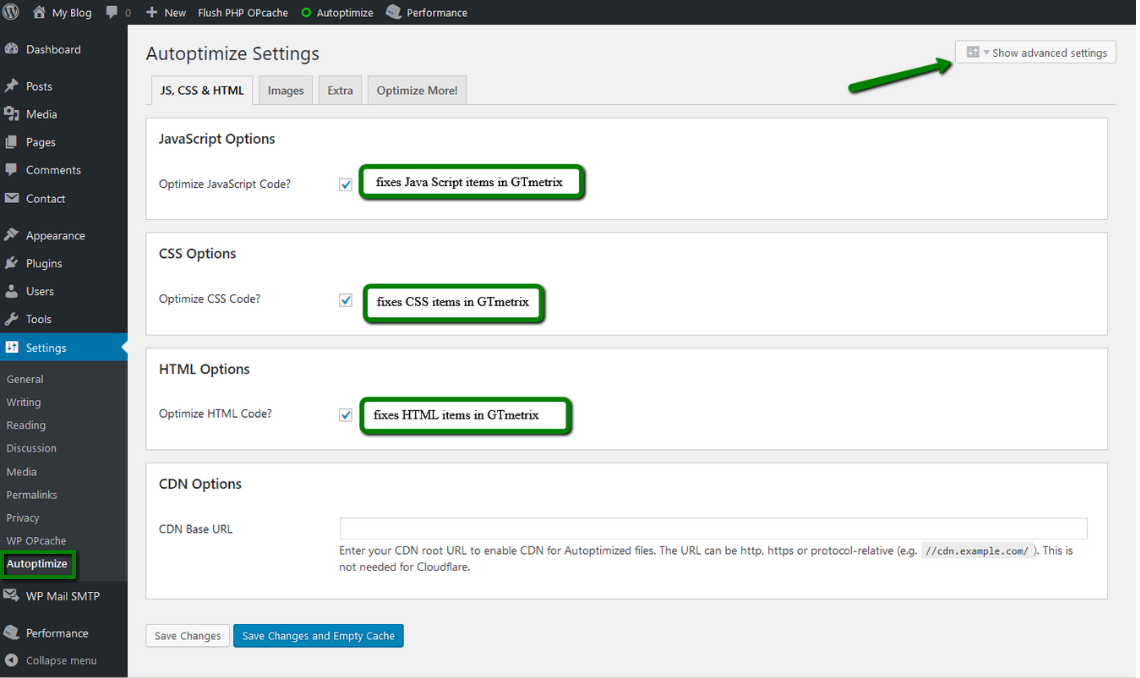
Seçenekleri sitenizin ihtiyaçlarına göre ayarlayın:
Optimizasyonları uygulamak için Değişiklikleri Kaydet ve Önbelleği Boşalt'a tıklayın:
Hotlink korumasını etkinleştirme
Başka bir web sitesi, sunucunuzda barındırılan bir görsele doğrudan bağlantı verdiğinde (örneğin, görselinizi kendi sayfalarında barındırmadan gösterdiklerinde), buna hotlinking denir.
Bu zararsız görünebilir, ancak ziyaretçileri her o görseli yüklediğinde, sunucunuz çalışır ve bant genişliğiniz kullanılır, bu da sitenizi yavaşlatır ve barındırma maliyetlerinizi artırır.
Hotlinking'i durdurmanın en kolay yolu, cPanel'inizde hotlink korumasını etkinleştirmektir. Bu, Hotlink Koruması menüsünden yapılabilir:
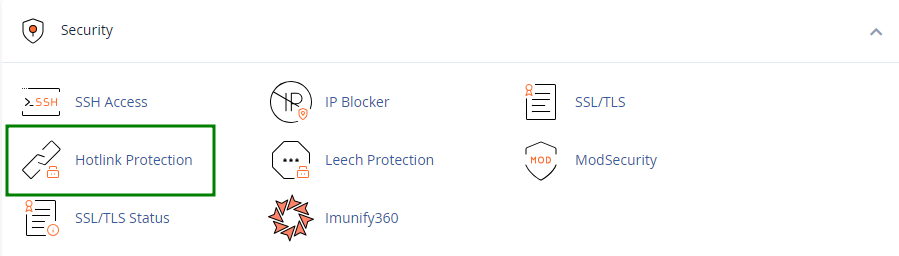
Etkinleştirildiğinde, diğer web siteleri artık görsellerinizi doğrudan sunucunuzdan yükleyemeyecek, böylece kaynaklarınızı koruyacak ve sitenizin ziyaretçileriniz için hızlı kalmasını sağlayacaktır.
Veritabanı optimizasyonu
Zamanla, WordPress veritabanınızda eski revizyonlar, spam yorumlar ve eklentilerden kalan ayarlar gibi gereksiz veriler birikebilir ve bu da web sitenizi yavaşlatabilir.
Varsayılan olarak WordPress 11 çekirdek tablo kullanır, ancak çoğu sitede eklentiler ve temalar tarafından oluşturulan ek tablolar bulunur. Düzenli veritabanı optimizasyonu, her şeyin temiz, verimli ve hızlı kalmasına yardımcı olur.
WordPress veritabanınızı optimize etmek için:
Sadece silinmesi güvenli olanları kaldırdığınızdan emin olmak için bir veritabanı optimizasyon rehberi izleyin
Hızlı ve güvenli optimizasyon için aşağıdakiler gibi özel bir eklenti kullanın:
WP-Optimize – Temizlik için doğrudan SQL sorguları çalıştırır (hızlıdır, ancak yetim veri bırakabilir).
Optimize Database after Deleting Revisions – Yazı revizyonlarını temizlemeye odaklanır.
WP-Sweep – Resmi WordPress silme fonksiyonlarını kullanır, yetim veri bırakma riskini azaltır.
WP-DB Manager – Optimizasyon ve yedekleme özellikleri sunar.
WordPress web sitesi performansını tahmin etme
Eklentiler, WordPress sitenize ekstra özellikler ve özelleştirme seçenekleri ekler. Ancak bazı eklentiler, aşırı CPU ve I/O kaynakları tüketerek performansı olumsuz etkileyebilir.
Web sitenizin verimli çalışmasını sağlamak için eklenti ve temaların etkisini ölçmek önemlidir.
Adım 1 – Kaynak Kullanımını Analiz Et
Web sitenizi PHP düzeyinde taramak için Code Profiler eklentisini kullanın. Grafikler ve tablolarla birlikte net, ayrıntılı raporlar sunar ve şunları gösterir:
Hangi eklenti veya temaların sitenizi yavaşlattığı;
En çok kaynağı tüketen belirli PHP betikleri, sınıfları, metodları ve fonksiyonları.
Adım 2 – Eklenti Yüklemesini Kontrol Et
Şunu yükleyin: Plugin Organizer eklentisi ile:
Belirli eklentileri seçili sayfa veya yazılarda devre dışı bırakın
Eklentilerin yüklenme sırasını değiştirin
Yalnızca gerekli eklentilerin ihtiyaç duyulan yerde çalışmasını sağlayarak performansı artırın.
Adım 3 – Genel Web Sitesi Optimizasyonunu Kontrol Et
Yukarıdaki iyileştirmeleri uyguladıktan sonra, optimizasyon puanınızı ölçmek için GTmetrix for WordPress eklentisini kullanın. Bu araç, web sitenizin hızını ve performansını değerlendirir ve ilerlemenizi takip etmek için net metrikler sunar.