Spaceship Blog

How to safely switch WordPress themes without breaking your layout

Safe WordPress theme migration: how to prevent layout problems | Spaceship

Even the best, highest-performing WordPress websites need a visual refresh from time to time, and one of the best ways to do that is with a new theme. But themes can be tricky, and not everyone knows how to safely switch WordPress themes without breaking the fine-tuned layout of your pages. 

Changing your theme on a live WordPress site does not have to be daunting, as long as you prepare properly, test safely, and have a rollback plan ready. 

Why theme changes can break your layout

A WordPress theme controls far more than colors and fonts. It defines templates for posts and pages, widget areas, menus, and the arrangement of your content on screen. When you activate a new theme, WordPress keeps your content, but it drops that content into a different structure. That is why layouts sometimes appear “broken.”

Here are some of the most common elements that can shift when you switch themes:


What the theme controls

Where to manage it in WordPress Admin

Global layout (page width, columns, areas)

Editor (block themes)

Typography (fonts, sizes, text styles)

Typography or Global Styles

Color palette and background colors

Colors or Global Styles

Header layout and site identity

Site Identity / Header or Editor

Navigation menus and their locations

Menus

Widget areas (sidebars, footers, etc.)

Widgets or via the Site Editor in block themes

Blog archive and single post templates

Homepage/Blog or Templates in Editor

Page templates and special layouts

Page editor (Template dropdown) and Templates in Site Editor


The good news is that with backups and a simple 7-point checklist, you can switch themes without unwanted surprises.

Step 1: Back up your site before you touch anything

Before you install or activate a new theme, make a full backup of your site, including both files and database. That way, if something goes wrong, you can restore everything in a few clicks.

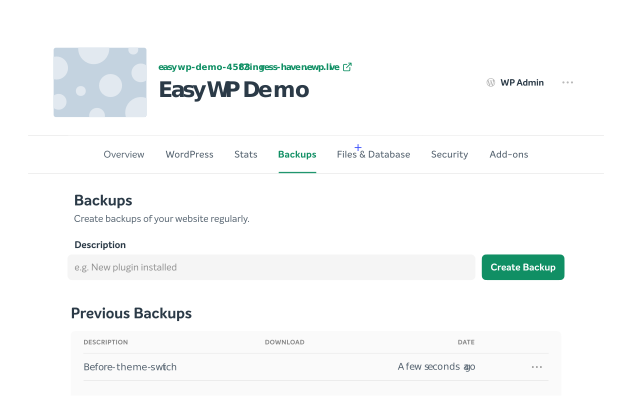
If you’re using EasyWP WordPress hosting, you can create and restore backups directly from your EasyWP dashboard:​

  • Log in to EasyWP and select your site.

  • Open the Backups tab.

  • Create a new backup with a clear name like “Before-theme-switch”.

  • Wait for the backup to complete before moving on.

EasyWP Demo


Make it a habit: for big changes like theme switches, think backup, edit, backup, repeat so you’re never more than one step away from safety.​

Step 2: Create a staging copy to test the new theme (optional)

The safest way to switch themes is to test everything on a staging copy first. A staging site is a private clone of your site where you can experiment with new themes, plugins, or layouts without affecting your live visitors’ experience. While this is highly recommended, it’s time-consuming, and isn’t always necessary for sites with only a few pages. 

EasyWP works smoothly with popular staging plugins, but each will require slightly different steps. Refer to the wizard and support documentation from any staging plugin you decide to use. 

Once your new theme looks good on staging, you can repeat the steps on your live site with much more confidence.

Step 3: Audit your current layout and key elements

Before you flip the switch, take inventory of how your current theme is set up. This gives you a checklist to compare against after you activate the new theme.​

Walk through your site and note:

  • Menus

    • Which menus exist (header, footer, mobile, secondary)?

    • Which pages and custom links are included?

  • Widgets and sidebars

    • Which widget areas are in use (blog sidebar, footer columns, header bar)?

    • Which widgets (search, recent posts, newsletter signup, etc.) live in each area?

  • Key templates and pages

    • Homepage layout (static page vs. blog feed).

    • Blog archive and single post layout.

    • Landing pages, sales pages, or custom templates.

  • Custom CSS or design tweaks

    • Any CSS added under Appearance → Customize → Additional CSS or in a child theme.​

Taking a few fulpage screenshots of your homepage, a typical blog post, and an important landing page will also help you quickly spot what changed after the switch.

Step 4: Install and preview your new theme safely

Next, install your new theme. But don’t activate it right away on your live site. First, you want to do a Preview.

  1. Go to Appearance → Themes → Add New in your WordPress dashboard.

  2. Search for your new theme or upload the theme ZIP if you bought a premium one.

  3. Click Install, then Live Preview instead of Activate.

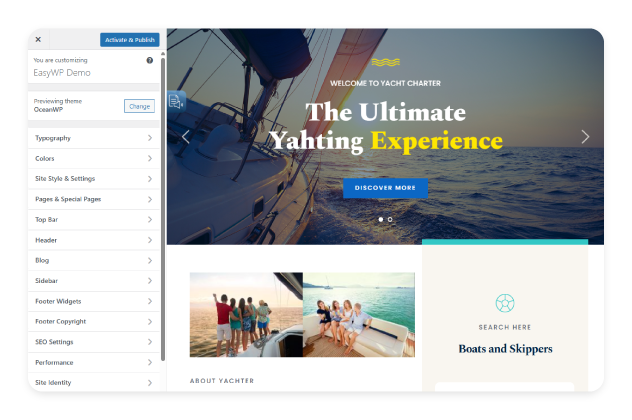
The Live Preview (or Site Editor preview for block themes) lets you see a demo example of how your site will look with the new theme before visitors see anything. Use this view to:​

  • Check how your homepage and key pages render.

  • Confirm that menus and widgets appear where you expect.

  • Adjust basic settings such as the logo, colors, typography, and homepage selection.

If you’re working in staging, you can go ahead and Activate and tweak more deeply without worrying about visitors seeing a broken page. Keep in mind that live preview may not give you the full picture with some themes, but it will give you clues as to whether this theme is a good choice for your site. 

If the preview seems to work properly, it’s safe to Activate & Publish

Step 5: Re-map menus and widget areas

Activate & Publish button

Step 5: Re-map menus and widget areas

When you activate a new theme, your existing menus and widgets are still there, but they may not be assigned to any locations.​ This is expected, and no reason to panic. You simply need to re-map your menus.  

After activation, immediately check the following elements. 

  • Menus

    • Go to Appearance → Menus (or Appearance → Customize → Menus).

    • Assign your main menu to the new theme’s Primary, Header, or Mobile location.

    • Repeat for footer or secondary menus.

  • Widgets / Blocks

    • Open Appearance → Widgets (Classic themes) or the Site Editor (block themes).

    • Look for any “inactive widgets” or unassigned widget areas and drag them into the new theme’s sidebars or footer areas.

Step 6: More things to check after a WordPress theme change

Once the new theme is active, spend time browsing your site the way a visitor would, rather than only checking settings in the dashboard. Focus on your most important pages and user paths, such as the homepage, a few representative blog posts, key landing or services pages, and any checkout, booking, or contact flows. 

Pay attention to whether content is readable, layouts feel consistent, and key actions like subscribing, buying, or getting in touch are still clear and easy to complete. 

This kind of real-world testing matters because even if everything is technically working, small design shifts can hurt trust, confuse visitors, or quietly lower conversions if you do not catch them early.

Step 7: Watch how your site performs with the new theme

After you are happy with how your site looks, pay attention to how it feels to use. Notice whether pages load as quickly as before, if scrolling and animations stay smooth, and whether anything feels glitchy or heavy. Keep an eye on core interactions, such as submitting forms, loading images and galleries, and navigating between key sections, and compare them to your previous theme. 

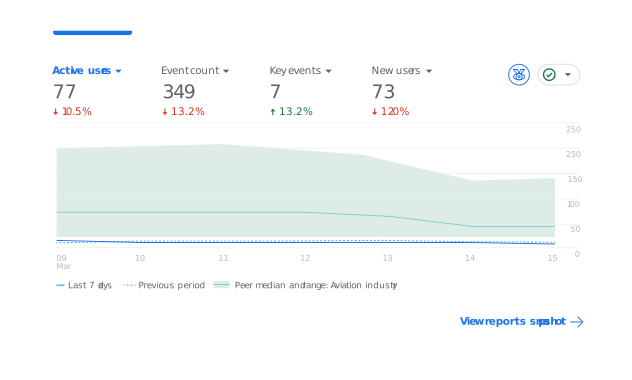
Google Analytics - Watch how your site performs with the new theme

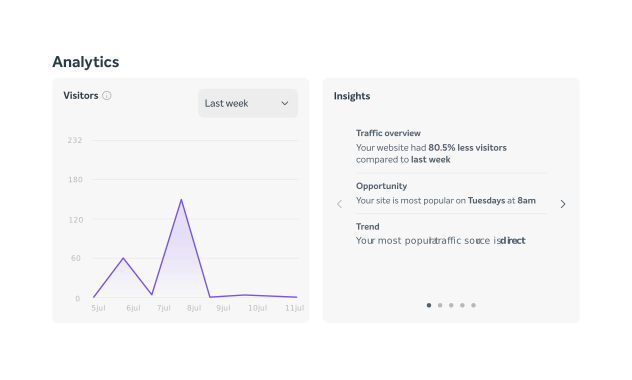
This matters because a theme that looks great but slows your site down or introduces subtle technical issues can frustrate visitors, hurt search rankings, and reduce conversions over time, even if the design itself seems like an upgrade. Tools like Google Analytics and the EasyWP Stats dashboard are quick places to review performance metrics.

EasyWP Stats Dashboard


What to do if something goes wrong

Even with a solid plan, surprises can happen. If your menus or widgets appear to have vanished, re-assign your menu locations, then check the inactive widgets area and drag any recovered widgets into the new sidebars or footer areas. 

If your layout looks completely broken, you can temporarily switch back to your old theme while you troubleshoot, or restore your pre-change backup through EasyWP or your existing backup plugin to get your site back online quickly.

Theme switches do not have to be scary

Theme switches do not have to be scary


Switching WordPress themes is one of the highest-impact changes you can make, but it does not have to put your layout at risk. By backing up first, auditing your menus and widgets, and testing key templates before and after the switch, you stay in control at every step. 

Pairing this workflow with EasyWP hosting and built-in backup tools makes it much easier to clone, test, and, if needed, roll back your site in minutes instead of hours.

Frequently asked questions

Yes. Your posts, pages, and media stay in the database when you switch themes, but the layout around them can change. If you back up first, note your menus and widgets, and test the new theme in a controlled way, you can change themes without losing content and with minimal impact on your layout.

Before switching, create a full backup of your site using the EasyWP dashboard so you can restore it if needed. Then audit your current setup by taking screenshots of your menus, widget areas, page layouts, and any custom CSS. You must have a clear reference if you need to rebuild or reassign anything after the switch.

A staging site is a private copy of your live site where you can activate and configure the new theme without affecting visitors. Clone your site to staging, switch and configure the theme there, then browse through key pages and user journeys to confirm everything looks and performs well. Once you are satisfied, you can repeat those changes on your live site or push them from staging, knowing most issues have already been caught.


Suggested articles

Share your thoughts

More than 10 characters required.
Your identity for public display.
Providing your email address is optional. It will not be shared with third parties.

Help us improve our blog

Share your thoughts in a quick two-minute survey.

A valid email is required