Ersteinrichtung von Hyperlift
Hyperlift ist die Cloud-Bereitstellungsplattform, mit der Sie sich auf Ihr Produkt statt auf die Infrastruktur konzentrieren können. Alles, was Sie tun müssen, ist, den Dockerfile-Pfad anzugeben, und Hyperlift ruft Ihren Code von GitHub ab. Anschließend erstellt und bereitstellt es ein Container-Image, damit Sie Ihr Produkt live schalten können.
Wenn Sie noch keine vollständige Produktionsanwendung haben, haben wir eine Hyperlift-Testbereitstellung mit einem Beispiel-Repository vorbereitet. So können Sie den Build- und Bereitstellungsprozess schnell testen, bevor Sie in Ihre Produktionsumgebung wechseln.
Der Einstieg in Hyperlift ist schnell und einfach. Falls Sie doch ein wenig Hilfe benötigen, haben wir dieses Video vorbereitet, das Sie durch jeden Schritt führt – von der Angabe Ihres Dockerfile-Pfads bis zum Liveschalten Ihres Projekts.
So richten Sie Hyperlift ein
Damit Ihre App läuft, benötigen Sie Folgendes:
Gehen Sie zu Hyperlift Manager und verbinden Sie Ihr GitHub-Repository.
Fügen Sie dem angegebenen Repository eine Dockerfile hinzu. Sie muss mit einem gültigen Basis-Image beginnen.
Hyperlift verwendet eine ordnungsgemäße Dockerfile als Vorlage für Ihre Anwendung. Damit können Sie Pakete installieren, Dateien hinzufügen und die Umgebung entsprechend den Anforderungen Ihrer App einrichten.
Weitere Hinweise finden Sie in der offiziellen Dockerfile-Dokumentation.
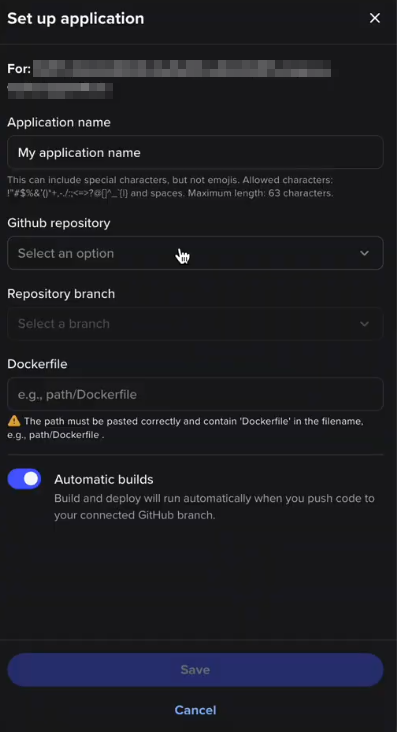
NB! Um einen Port für die Anwendung zu öffnen, verwenden Sie bitte die Umgebungsvariablen, anstatt ihn in der Dockerfile zu exponieren.Nachdem die Verbindung zum GitHub-Konto hergestellt wurde, werden Sie zum Menü Hyperlift Manager weitergeleitet. Dort wird das seitliche Einrichtungsfenster automatisch geöffnet, und Sie können mit der Konfiguration fortfahren:
Dasselbe Seitenfenster kann auch über das Menü Hyperlift Manager > Einrichtung aufgerufen werden: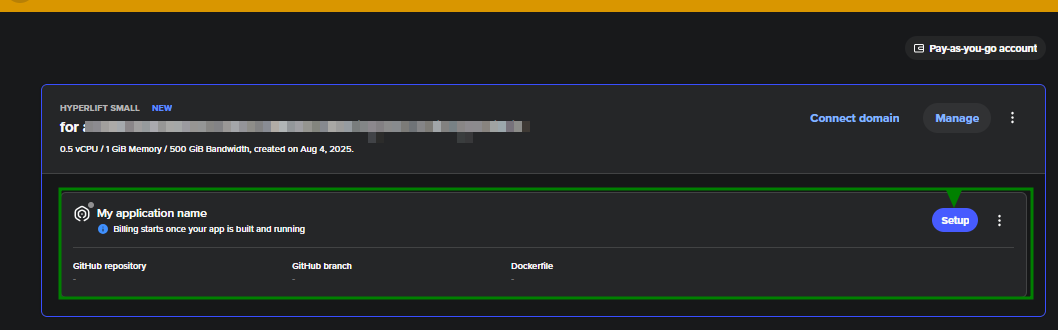
Wenn die Anwendung eingerichtet ist, können Sie sie erstellen und dann bereitstellen. Um mit dem Erstellen der Anwendung zu beginnen, klicken Sie auf die Schaltfläche Build :
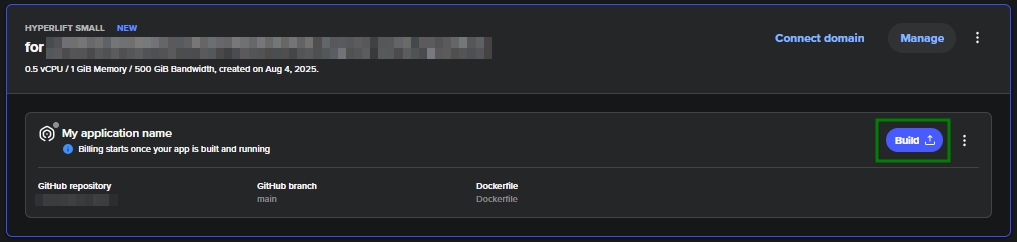
Nachdem der Prozess erfolgreich abgeschlossen ist, startet die Bereitstellung automatisch. Die Abrechnung wird an diesem Punkt aktiviert. Die entsprechenden Informationen werden in der folgenden Benachrichtigung angezeigt: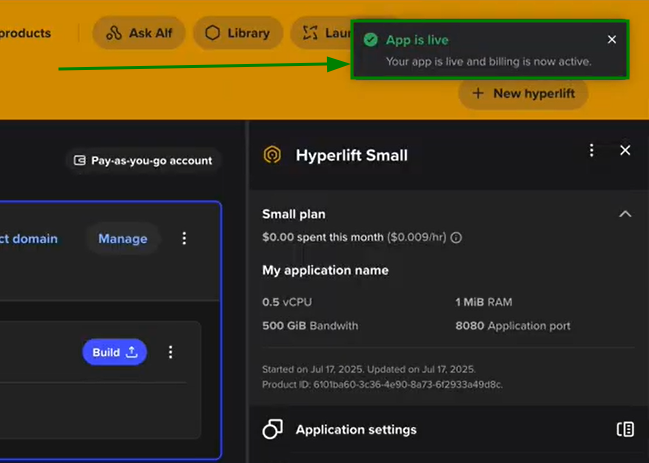
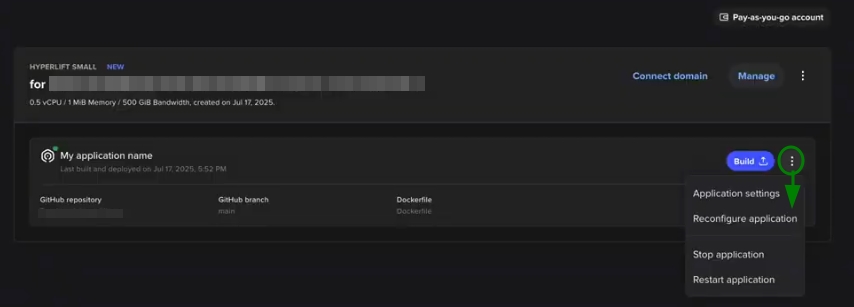
Nachdem alles eingerichtet ist und die Anwendung läuft, können Sie die Anwendung bei Bedarf starten, stoppen oder neu starten:
Das geteilte Menü des Hyperlift Manager
Es ist auch möglich, die Hyperlift-Anwendung über das geteilte Menü zu verwalten. Die folgenden Menüs sind dort verfügbar:
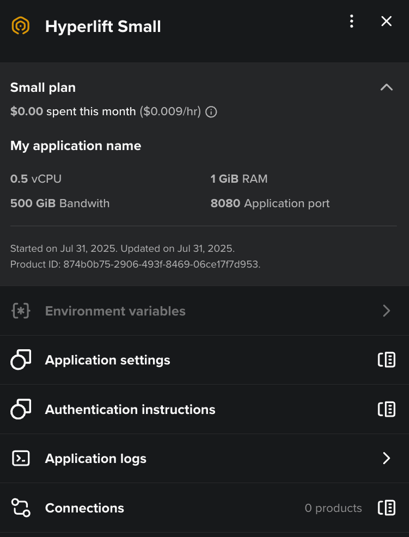
Umgebungsvariablen - Speichern Sie Einstellungen wie API-Schlüssel, Datenbank-URLs, Ports und Konfigurationsdetails.
NB: Der Standardport der Hyperlift-Anwendung ist 8080, aber Sie können dieses Menü verwenden, um ihn entsprechend zu ändern und zu aktualisieren.Anwendungseinstellungen - Hier können Sie Einstellungen wie den Anwendungsnamen, das GitHub-Repository, den Repository-Branch und den Dockerfile-Pfad der Anwendung anpassen.
Authentifizierungsanweisungen - Dies leitet zum Leitfaden „So verbinden Sie ein GitHub-Repository mit Hyperlift“ weiter.
Anwendungsprotokolle - Dort werden Protokolle angezeigt, die während der Laufzeit der Anwendung erfasst wurden.
Verbindungen - Zeigen Sie aktive Verbindungen an (Domains, SSL-Zertifikate usw.), die für das Hyperlift-Abonnement installiert sind.
Automatische Builds
Sie können auch wählen, ob Builds manuell oder automatisch ausgelöst werden.
Mit den Einstellungen für automatische Builds wird Hyperlift jedes Mal, wenn Sie Code in den angegebenen Branch pushen, Ihre App automatisch von GitHub mithilfe Ihres Dockerfile erstellen und bereitstellen.
Um dies während der Konfigurationsphase der Anwendung zu aktivieren, gehen Sie zum MenüHyperlift Manager > Anwendungseinstellungen > Anwendung einrichten. Von hier aus können Sie Automatische Builds ein- oder ausschalten:
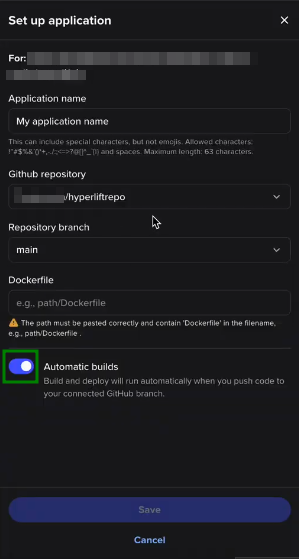
Wenn die Option „Automatischer Build“ deaktiviert ist (der entsprechende Schalter ist ausgeschaltet), ist der manuelle Build eingerichtet, und es werden keine automatischen Anwendungsaktualisierungen vorgenommen.
Empfehlungen
Verwenden Sie kleine, effiziente Basis-Images für Dockerfile.
Kennzeichnen Sie Basis-Image-Versionen ausdrücklich (z. B. python:3.12).
Legen Sie Umgebungsvariablen im entsprechenden Menü von Hyperlift fest.
Überwachen Sie Build- und Anwendungsprotokolle.