Configuring rules and redirects using .htaccess
The .htaccess file is a configuration file at the directory level, supported by the Apache web server. It allows you to modify the web server settings (such as enabling or disabling features) for a specific account, without affecting the global server configuration.
This file applies its settings to the entire directory where it is located, including all files and subdirectories within that directory. Any changes made in the .htaccess file are applied instantly, with no need to restart the server.
How to locate the .htaccess file
To find the .htaccess file:
1. Go to your Spaceship account >> choose Hosting Manager in Launchpad >> Manage next to a hosting plan >> Files and Storage >> Manage Files near the website name.
2. You will be redirected to the domain root folder.
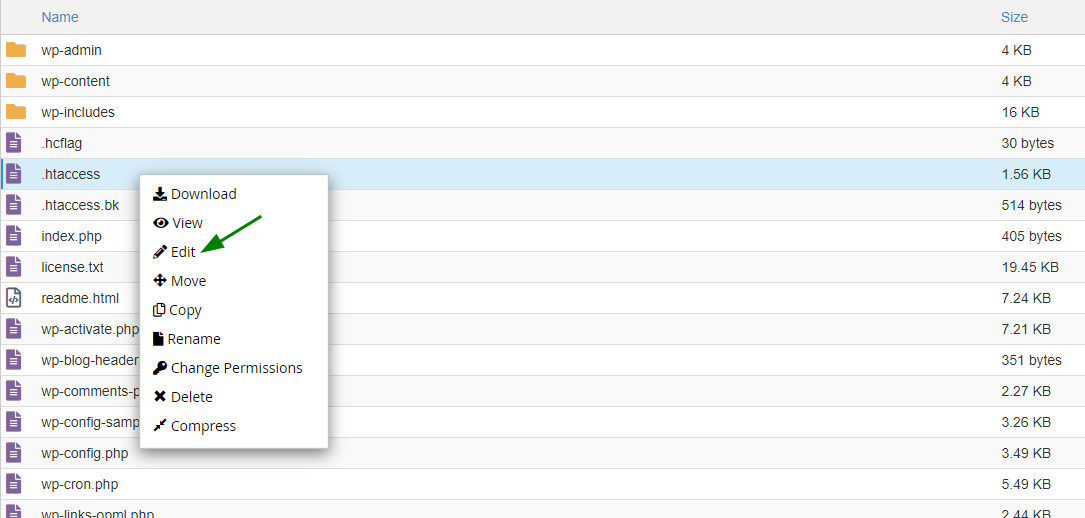
3. If you need to edit the .htaccess file for the domain, locate the .htaccess file in the domain root folder, right-click on it, and choose the Edit option:
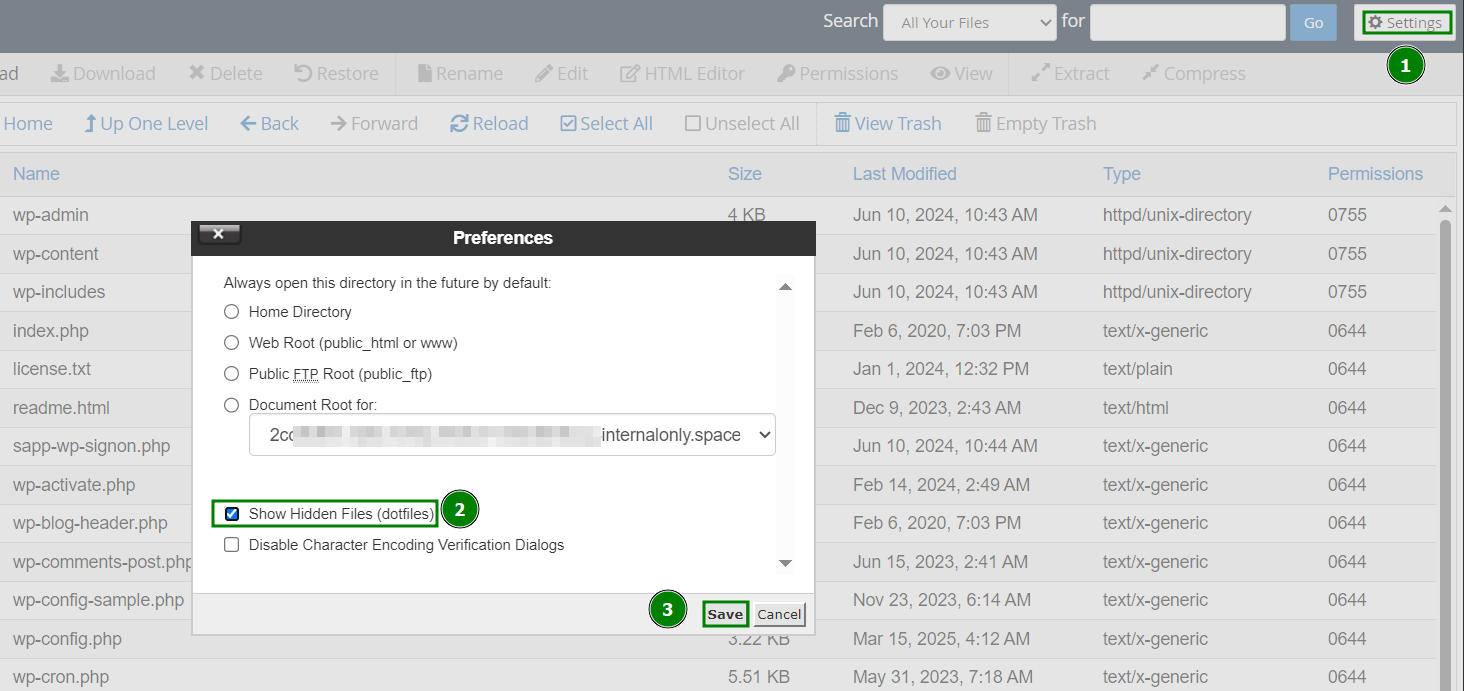
NOTE: Ensure that "Show Hidden Files (dotfiles)" is enabled in the Settings menu:
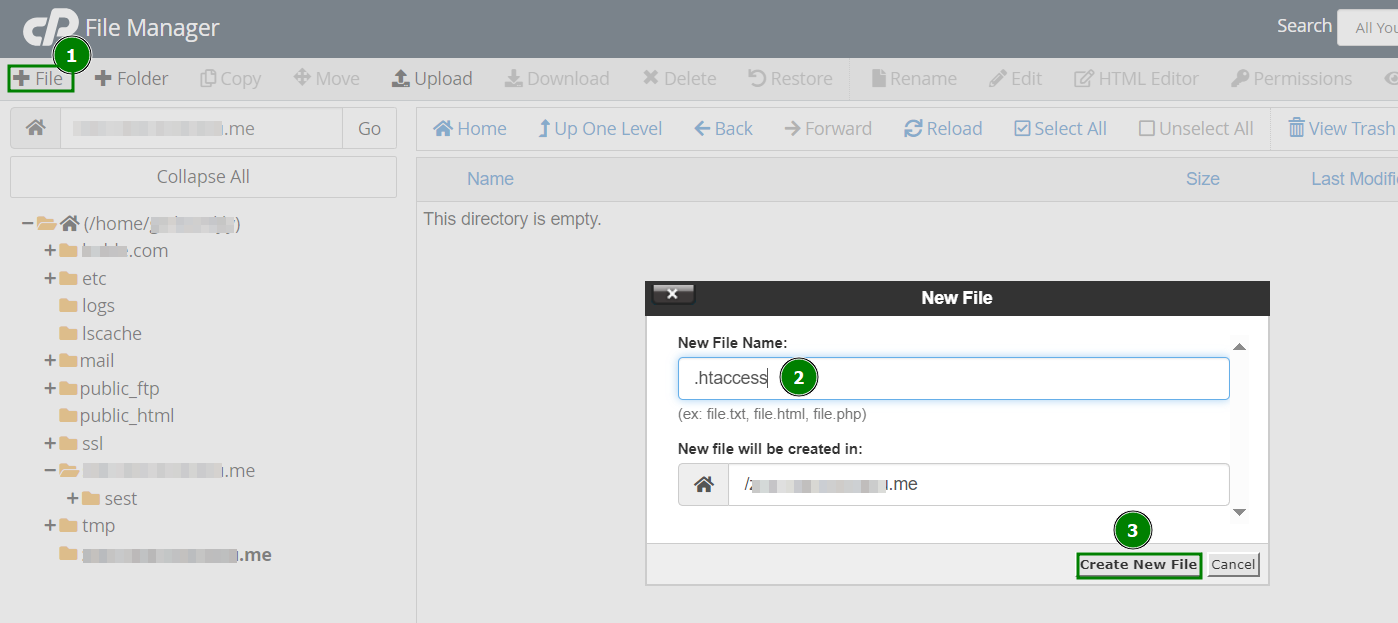
4. If there is no .htaccess file in the File Manager, you can create a new one with the + File button:
5. You are ready to add your own configuration rules and save them.
List of commonly used .htaccess rules
Blocking
This method allows you to block users based on their IP address or domain. It's especially useful for restricting access to unwanted visitors or for limiting access to specific sections of your website, such as the administration area, to the owner only.
To implement specific blocking rules, create a .htaccess file with the following:
(For allowing access to everybody else and blocking users with an X.X.X.X IP address)
<RequireAll>
Require all granted
Require not ip X.X.X.X
</RequireAll>
(For blocking all visitors except for the specific X.X.X.X and Y.Y.Y.Y IPs)
<RequireAll>
Require all denied
Require ip X.X.X.X
Require ip Y.Y.Y.Y
</RequireAll>
NOTE: Do not use the deprecated Allow, Deny, and Order directives with the new Require directive.
Mod_Rewrite (redirect rules)
Mod_Rewrite defines how web pages and URLs are presented to visitors.
By default, Mod_Rewrite maps a URL to a corresponding filesystem path. However, it can also redirect one URL to another.
Before setting up a redirect, it's important to choose the type of redirection that best suits your needs:
Permanent Redirect (301): This redirect sends a status code of 301, indicating that the page has been permanently moved. It is cached in the browser, signaling search engines and user agents to update the URL in their databases. This is the most common type of redirect.
Temporary Redirect (302): This redirect sends a status code of 302, indicating that the move is temporary. The browser will not cache this redirect, and while it will redirect visitors and search engines, the original page will continue to be indexed. This type of redirect is recommended unless you are certain that the URL will not change in the future.
Below is a list of some of the most common and useful redirects that can be configured through the .htaccess file:
Permanent redirect from example1.com to example2.com
RewriteEngine On
RewriteCond %{HTTP_HOST} ^example1\.com$ [OR]
RewriteCond %{HTTP_HOST} ^www\.example1\.com$
RewriteRule ^(.*)$ "http\:\/\/example2\.com/$1" [R=301,L]
Temporary redirect from exampledomain1.com to exampledomain2.com
RewriteEngine On
RewriteCond %{HTTP_HOST} ^example1\.com$ [OR]
RewriteCond %{HTTP_HOST} ^www\.example1\.com$
RewriteRule ^(.*)$ "http\:\/\/example2\.com\/" [R=302,L]
NOTE: Below are examples of permanent redirects. Temporary redirects can be defined by replacing [R=301,L] with [R=302,L] at the end of the code (where necessary).
Redirect from example1.com/subfolder to example2.com
RewriteEngine On
RewriteCond %{HTTP_HOST} ^example1\.com$ [OR]
RewriteCond %{HTTP_HOST} ^www\.example1\.com$
RewriteRule ^subfolder/$ "http\:\/\/example2\.com\/" [R=301,L]
Redirect from HTTP to HTTPS for example.com
RewriteEngine On
RewriteCond %{HTTPS} !=on
RewriteRule .* https://example.com%{REQUEST_URI} [R,L]
or
RewriteCond %{SERVER_PORT} 80
RewriteCond %{HTTP_HOST} ^example\.com$ [OR]
RewriteCond %{HTTP_HOST} ^www\.example\.com$
RewriteRule ^(.*)$ https://www.example.com/$1 [R,L]
Redirect from non-WWW to WWW
for any domain, .htaccess takes effect:
RewriteEngine On
RewriteCond %{HTTP_HOST} !^www\.
RewriteRule ^(.*)$ http://www.%{HTTP_HOST}/$1 [R=301,L]
for a specified domain:
RewriteEngine On
RewriteCond %{HTTP_HOST} ^example\.com$ [NC]
RewriteRule ^(.*)$ http://www.example.com/$1 [R=301,L]
Redirect from WWW to non-WWW
for any domain .htaccess takes effect:
RewriteEngine On
RewriteCond %{HTTP_HOST} ^www\.(.*)$ [NC]
RewriteRule ^(.*)$ http://%1/$1 [R=301,L]
for a specified domain:
RewriteEngine On
RewriteCond %{HTTP_HOST} ^www\.example\.com [NC]
RewriteRule (.*) http://example.com/$1 [R=301,L]
Redirect all example.com pages to the corresponding domain.com pages
RedirectMatch 301 ^/(.*)$ http://domain.com/$1
NOTE: All page names have to match on both domains or the redirect will result in a "Page not Found" message.
Redirect one page to a new URL
Redirect 301 /old_page.html http://www.domain.com/new_page.html
NOTE: This technique can be useful for redirecting a deleted page to a 404 error, or for making SEO adjustments after updating content references.
Authorization/authentication
This type of rule defines security restrictions for a directory or subdirectory. You can password-protect directories so that any visitor trying to access them will be prompted to enter a username and password.
To set up this protection:
1. Create the directory you want to protect within the /home/cpanel_user/.htpasswds/ folder (e.g., for domain.com/test, the path is .htpasswds/domain.com/test/).
2. In this directory, create a passwd file and add hashed access credentials using an online generator.
3. Add the following directives to the .htaccess file:
AuthType Basic
AuthName "Directory Name"
AuthUserFile "/home/cpanel_user/.htpasswds/public_html/test/passwd"
require valid-user
Custom error pages
This feature allows you to create personalized error pages for your website. It’s a useful option as it lets you present visitors with an error message that aligns with your website’s theme if there are broken URLs. This helps to avoid displaying the default '404 File Not Found’ error and instead returns a custom-designed error page with instructions to guide users back to your website content, preventing confusion.
To set up a custom error page, add the following text to an .htaccess file:
ErrorDocument 404 /404.html
This line instructs the Apache Web server to load a 404.html file located in the root directory of the domain whenever a 404 (File Not Found) error occurs.
NOTE: To create custom error pages for other errors (such as 403 or 500), simply replace 404 with the corresponding error code and /404.html with the path to your custom error file.
Disabling existing .htaccess rules
If you need to temporarily disable some of the existing rules, such as for testing purposes, you can easily comment them out. To do this, simply add a pound/hash sign (#) at the beginning of the line.
As an alternative, you can disable a single line or a block of lines by selecting them and using the Ctrl + / shortcut.