Jak vytvářet a spravovat MySQL databáze v cPanelu
Jak vytvořit databáze
Databáze můžete v cPanelu vytvořit pomocí následujících nástrojů:
Spravovat mé databáze
Přihlaste se do svého účtu cPanel, přejděte do sekce Databáze a otevřete nabídku Spravovat mé databáze.
POZNÁMKA: Do příslušné nabídky se také můžete dostat ze svého účtu Spaceship > nabídka Hosting Manager > klikněte na Spravovat pro otevření rozdělené správy příslušného hostingového předplatného > Pokročilé > Správa databází > klikněte na Spravovat mé databáze.V sekci Vytvořit novou databázi pojmenujte databázi, kterou chcete vytvořit, a klikněte na tlačítko Vytvořit databázi:
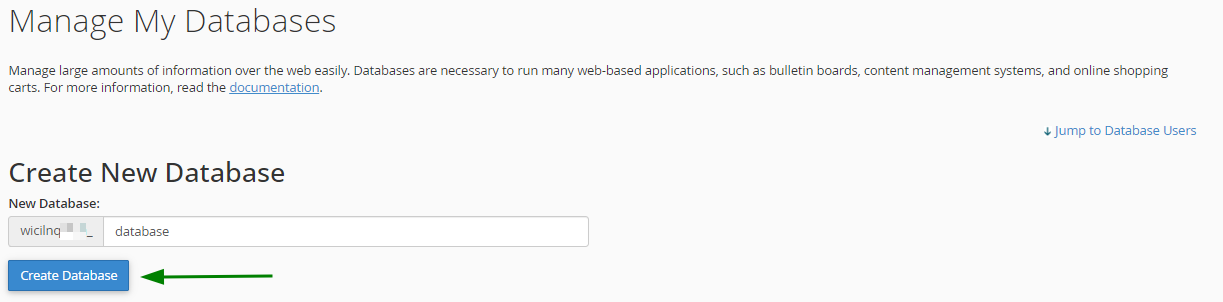
Databáze byla nyní úspěšně vytvořena a je připravena k použití.
Než začnete přidávat data nebo je spravovat, musíte nastavit Uživatele databáze a udělit tomuto uživateli příslušná přístupová práva.
Pro přidání uživatele databáze najděte oblast Uživatelé databáze > Přidat nového uživatele, poté zadejte uživatelské jméno, které chcete propojit s databází. Poté vytvořte silné heslo pro tohoto uživatele a zadejte jej do příslušných polí. Klikněte na Vytvořit uživatele: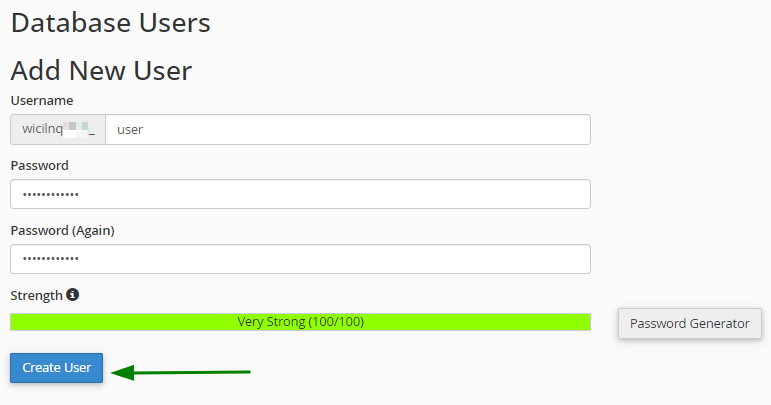
Po vytvoření databáze i uživatele je dalším krokem propojit uživatele s databází a nastavit potřebná oprávnění.
Přejděte do sekce Přidat uživatele do databáze, poté vyberte příslušnou databázi a uživatele z rozbalovacích nabídek. Po výběru klikněte na Přidat pro pokračování: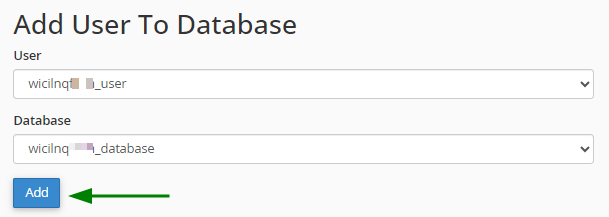
Budete vyzváni ke konfiguraci přístupových práv uživatele databáze. Pro plnou správu databáze udělte kompletní přístup výběrem Všechna oprávnění a změny potvrďte kliknutím na Provést změny:
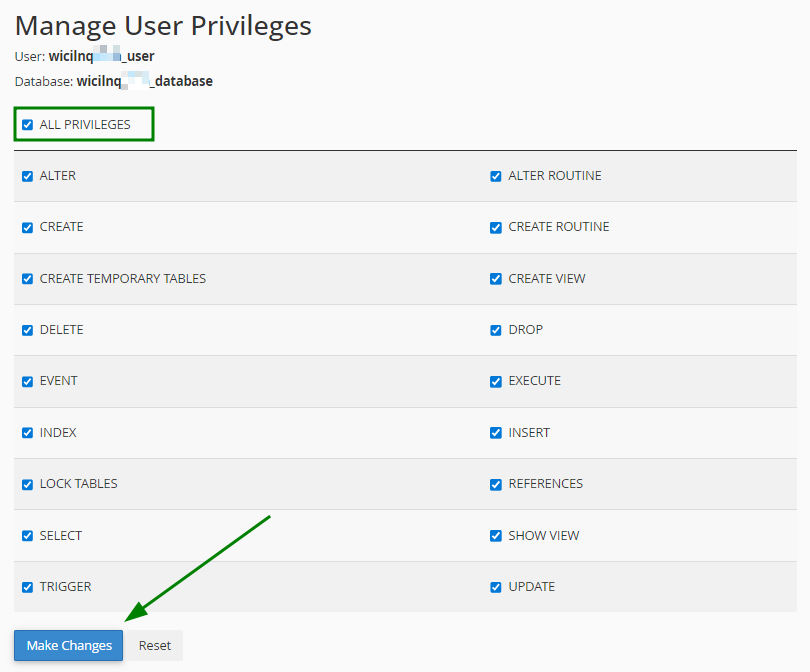
POZNÁMKA: K jedné databázi může být přiřazeno více uživatelů, přičemž každý může mít jinou sadu oprávnění podle své role.
Po dokončení procesu připojení se databáze a její uživatel zobrazí v sekci Aktuální databáze:

Průvodce databází
Průvodce databází Database Wizard vás provede stejnými kroky, jaké jsou popsány výše, ale více srozumitelně a přívětivě pro začátečníky. Zde je návod, jak jej použít:
Přihlaste se do svého účtu cPanel, přejděte do sekce Databáze a otevřete nabídku Průvodce databází.
Zadejte název nové databáze a klikněte na Další krok pro pokračování:
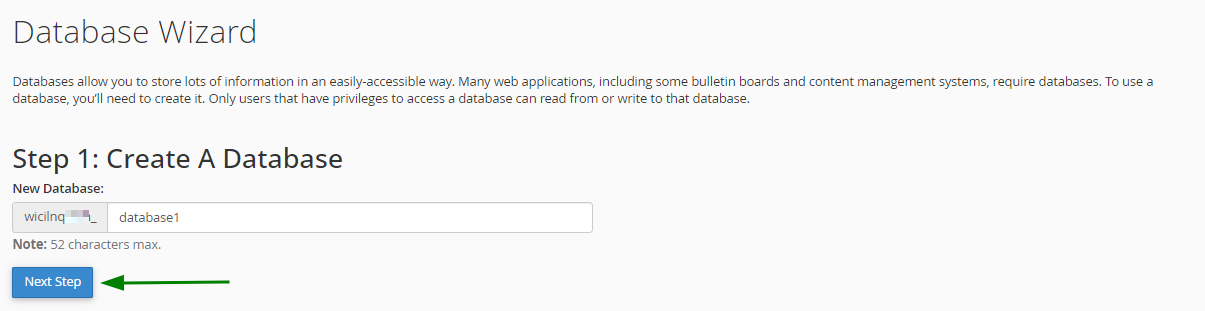
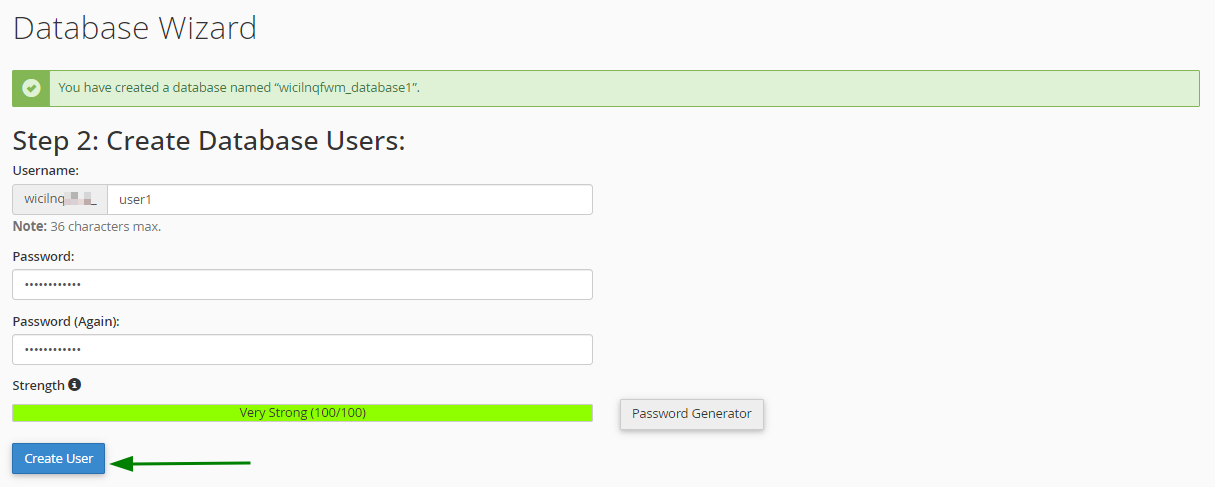
V dalším kroku budete požádáni o vytvoření uživatele databáze a nastavení hesla, stejně jako v předchozí metodě. Po zadání uživatelského jména a hesla klikněte na Vytvořit uživatele:
Poté budete moci zvolit, jaká oprávnění má nový uživatel mít. Pro plný přístup k databázi vyberte Všechna oprávnění (1) a klikněte buď na Provést změny (2) nebo Další krok (3):
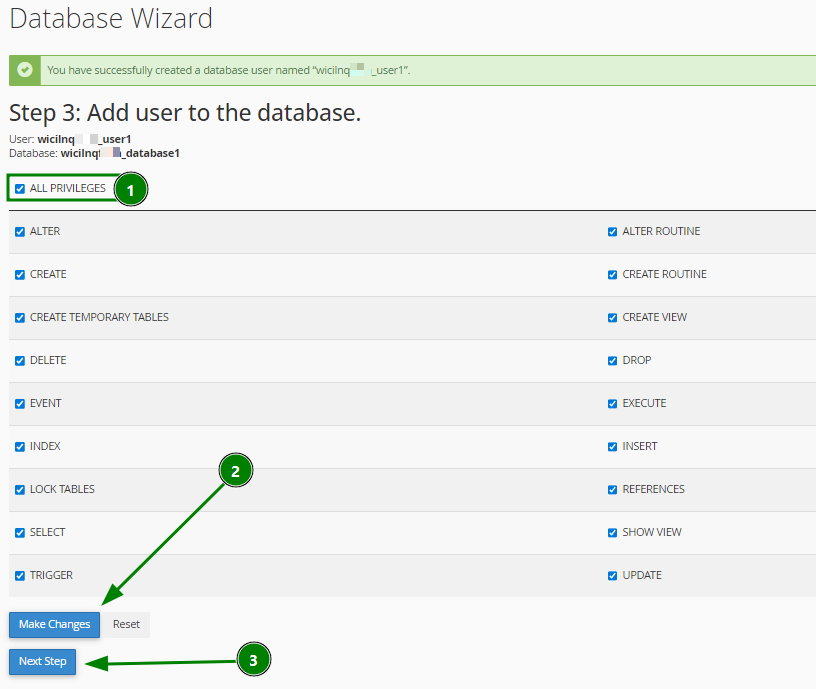
To je vše; vše je nastaveno. Zobrazí se potvrzovací zpráva, že uživatel byl úspěšně přidán do databáze.
Jak spravovat databáze
MySQL databáze lze v cPanelu spravovat pomocí nástroje phpMyAdmin. Umožňuje vytvářet, upravovat a odstraňovat tabulky databáze, stejně jako importovat a exportovat data. Můžete také spouštět SQL dotazy, optimalizovat tabulky, kontrolovat je na chyby, opravovat problémy a upravovat nastavení kolace.
Poznámka: Před použitím phpMyAdmin se ujistěte, že databáze, se kterou chcete pracovat, již byla vytvořena.
Nabídku phpMyAdmin najdete v cPanelu v sekci Databáze.
Do příslušné nabídky se také můžete dostat ze svého účtu Spaceship > nabídka Hosting Manager > klikněte na Spravovat pro otevření rozdělené správy příslušného hostingového předplatného > Pokročilé > Správa databází > klikněte na phpMyAdmin.
Po otevření budete přesměrováni na následující stránku:
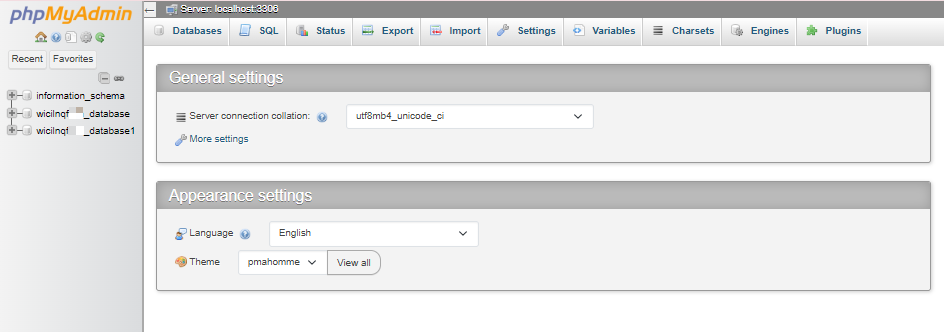
Níže si projdeme nejčastěji používané karty a jejich účel.
Možnosti správy phpMyAdmin
Databáze
Karta Databáze zobrazuje seznam všech databází dostupných pod vaším účtem cPanel. Odtud můžete vybrat libovolnou databázi ke správě.
Pokud jsou povoleny statistiky databáze, zobrazí se také užitečné podrobnosti, jako je použitá kolace, počet tabulek a řádků, velikost dat a indexů, celková velikost databáze a případné přetížení.
SQL
Karta SQL umožňuje spouštět SQL dotazy. Můžete buď vložit celý SQL příkaz, nebo jej sestavit ručně nastavením parametrů.
Pamatujte, že tato karta je kontextově citlivá. To znamená, že dotaz se bude vztahovat na úroveň, kterou právě zobrazujete. Například pokud není vybrána žádná databáze a spustíte dotaz z domovské stránky phpMyAdmin, může ovlivnit celý server (nebo váš hostingový účet na sdíleném hostingu).
Export
Karta Export slouží ke stažení dat databáze v různých formátech, jako jsou SQL, CSV, XML, PDF, Microsoft Excel nebo Microsoft Word. Můžete exportovat celou databázi nebo vybrat pouze konkrétní tabulky.
Tato možnost je také kontextově citlivá, takže můžete exportovat všechny databáze, jednu databázi nebo jen jednu tabulku podle toho, co je vybráno.
Import
Karta Import umožňuje nahrát data databáze ze souboru uloženého na vašem počítači.
Poznámka: phpMyAdmin podporuje import databází do velikosti 1 GB. Pokud je váš záložní soubor větší, budete jej muset importovat pomocí SSH.
Možnosti správy databáze
Pro správu databáze klikněte na databázi, se kterou chcete pracovat, na kartě Databáze vlevo:
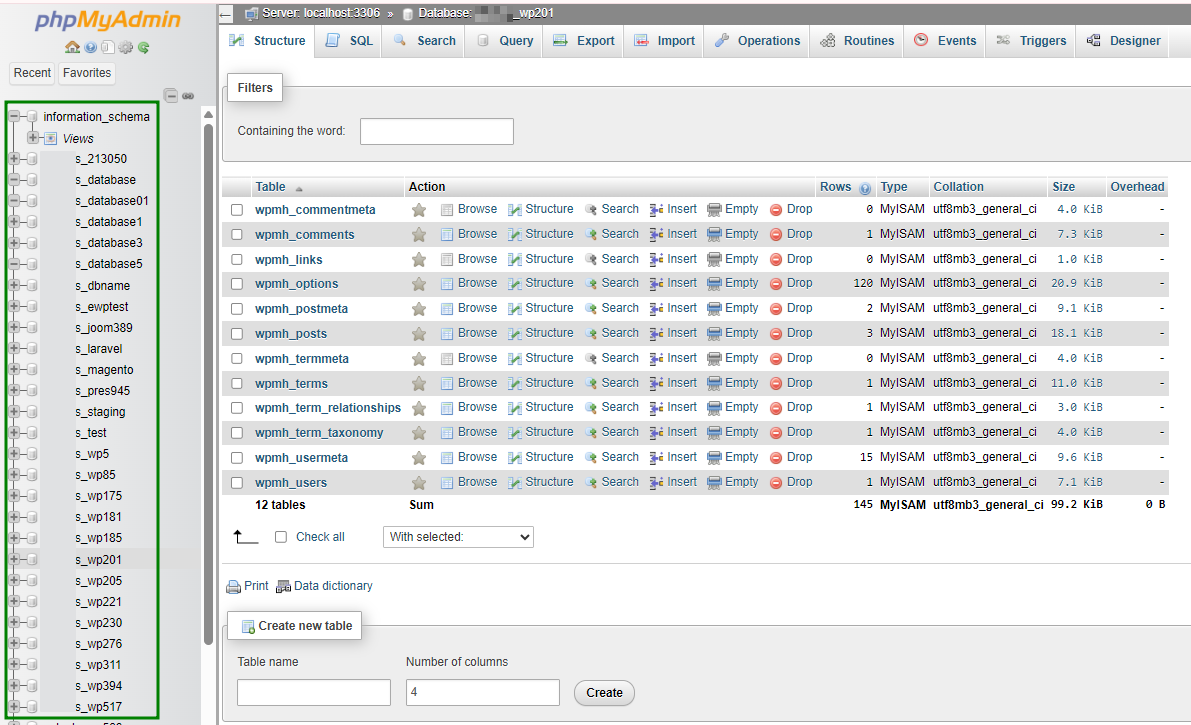
Tím se otevře vybraná databáze a zobrazí se všechny tabulky, které do ní byly přidány.
Vytvořit tabulku
Pokud v databázi nejsou žádné tabulky, je možné je vytvořit:
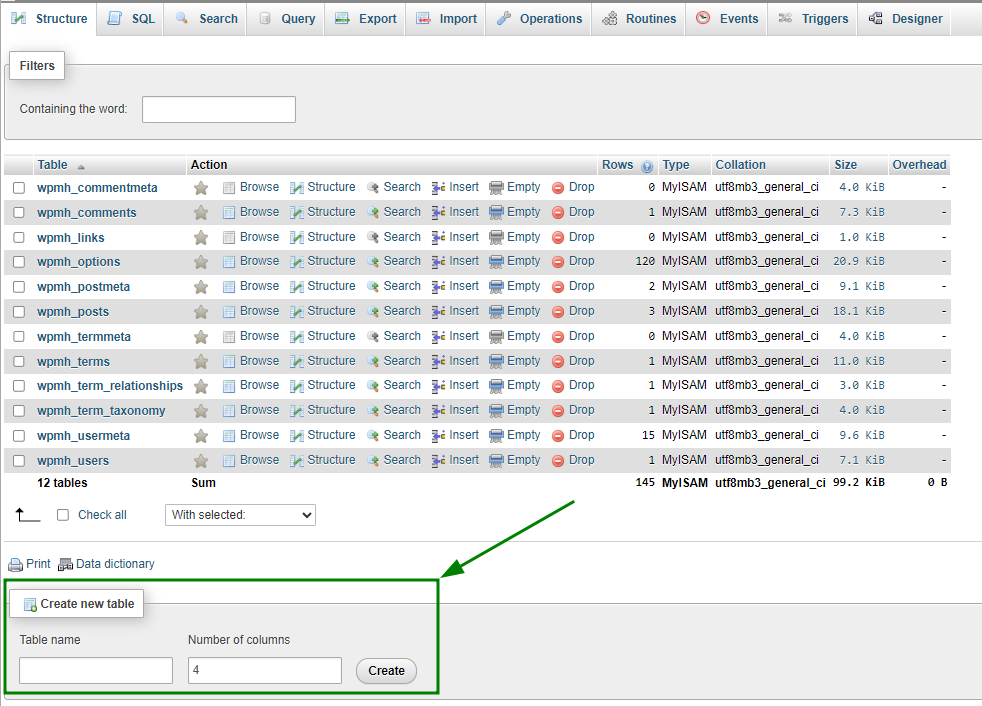
Zadejte název tabulky do pole Název.
Zadejte, kolik sloupců má tabulka mít, do pole Počet sloupců.
Klikněte na Provést pro přechod na další krok.
Nastavte sloupce tabulky vyplněním následujících údajů:
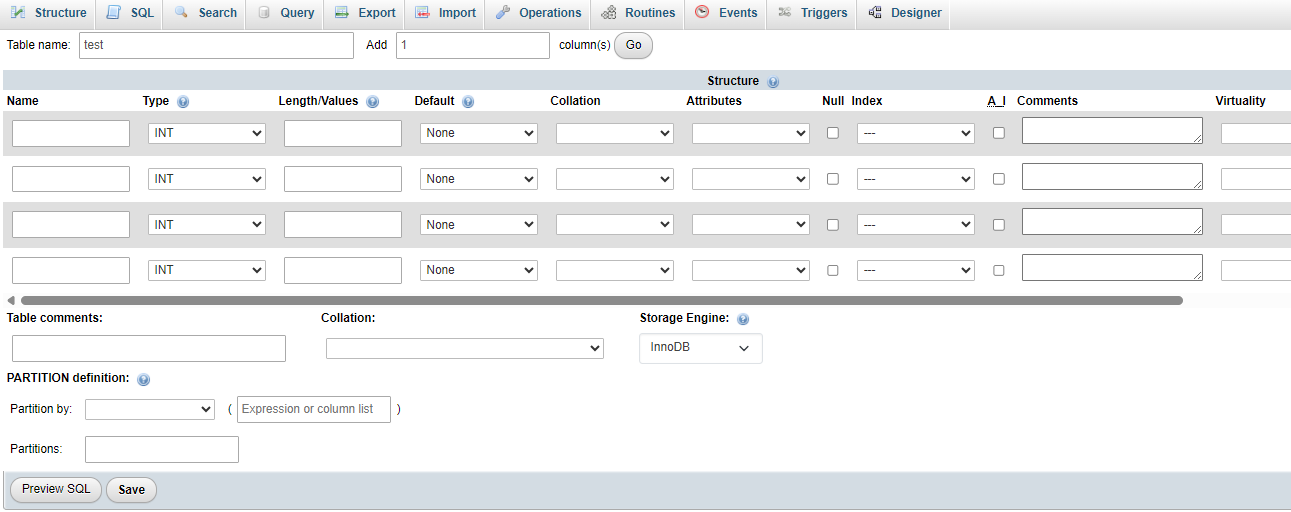
Název – název každého sloupce.
Typ – typ dat, která bude sloupec uchovávat. Běžné možnosti zahrnují:
-- INT – celá čísla (bez desetinných míst)
-- CHAR – text s pevnou délkou
-- VARCHAR – text s proměnlivou délkou
-- TEXT – velké bloky textu
-- DATE – pouze datum
-- DATETIME – datum a čas
Délka/Hodnoty – požadováno pro některé datové typy. Například při použití CHAR je třeba definovat maximální počet znaků.
Zbývající pole jsou volitelná a lze je upravit podle potřeby.
Klikněte na Uložit pro vytvoření tabulky.
Správa tabulek databáze
Pro každou tabulku jsou k dispozici následující akce: Procházet, Struktura, Hledat, Vložit, Vyprázdnit a Odstranit:
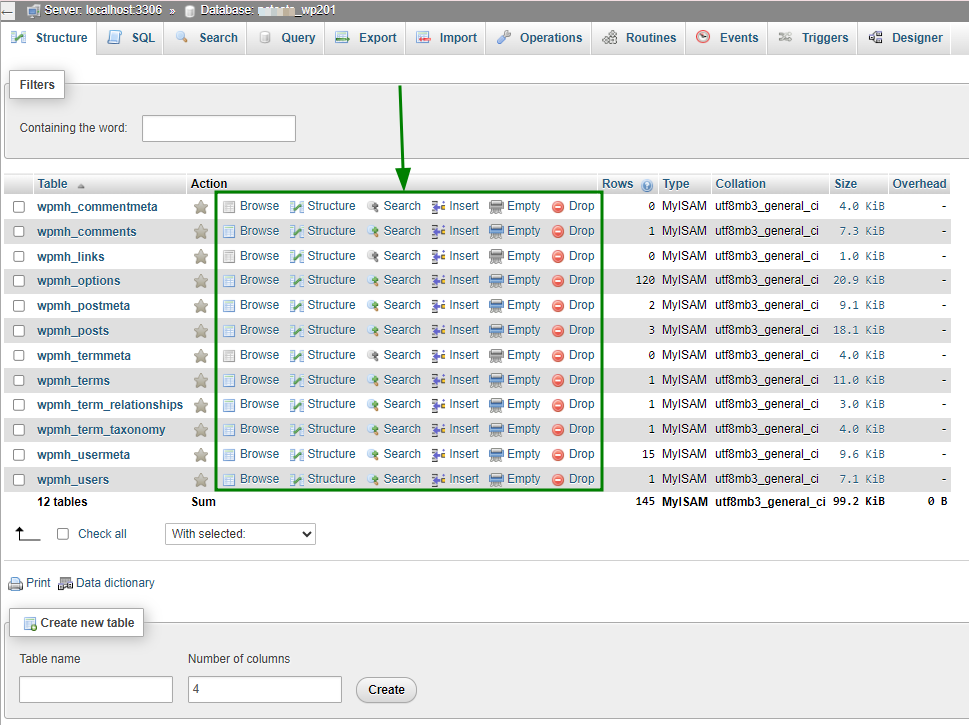
Procházet
Možnost Procházet je dostupná pouze pro tabulky, které již obsahují data. Po kliknutí se otevře seznam existujících záznamů v novém zobrazení. Pro úpravu konkrétní položky klikněte na ikonu tužky vedle ní. Tím se záznam otevře pro úpravu hodnot.
Struktura
Zobrazení Struktura zobrazuje rozložení tabulky. Zde můžete vidět názvy sloupců, datové typy, kolace, atributy, výchozí hodnoty, další nastavení a zda pole umožňuje hodnotu NULL.
Hledat
Možnost Hledat umožňuje vyhledávat konkrétní data v tabulce. Můžete zadat vlastní podmínku WHERE nebo použít vestavěná pole „dotaz podle příkladu“. Klikněte na Provést pro spuštění hledání.
Vložit
Pomocí možnosti Vložit můžete do tabulky přidat nové záznamy. Vyplňte požadovaná pole a klikněte na Provést pro uložení nové položky.
Vyprázdnit
Akce Vyprázdnit odstraní všechna data z tabulky, ale zachová její strukturu.
Odstranit
Možnost Odstranit zcela smaže tabulku včetně všech jejích dat. Používejte tuto akci opatrně, protože ji nelze vrátit zpět.